

Starting an Amazon FBA business is one of the most effective ways to build a scalable, hands-off eCommerce income. Whether you focus on wholesale, online arbitrage, or dropshipping, FBA lets you sell profitable products while Amazon handles storage, shipping, and customer service.
But success takes more than listing a few items – it requires the right structure, sourcing strategy, and automation tools.
In this post, we’ll show you how to start an Amazon FBA business the smart way: from setting up your Seller Central account to finding winning products, verifying what you can and can’t sell, and scaling efficiently with Seller Assistant.
Note. Seller Assistant is an end-to-end Amazon workflow management platform that integrates 10+ wholesale-focused solutions into one connected system. It combines sourcing workflow automation, bulk research and intelligence tools, and integrated Chrome extensions – giving you everything you need to streamline finding deals, managing suppliers, and creating purchase orders.

The platform aggregates: workflow management tools – Purchase Orders Module, Suppliers Database, Warehouses Database to organize, automate, and scale every step of your wholesale and arbitrage operations; bulk research & sourcing tools – Price List Analyzer, Bulk Restriction Checker, Sourcing AI, Brand Analyzer, Seller Spy to evaluate supplier price lists, verify selling eligibility and restrictions, open new brands, and discover winning product ideas from competitors to expand your product catalog; Chrome extensions – Seller Assistant Browser Extension, IP-Alert Extension, and built-in VPN by Seller Assistant to deep-research products, check IP claims and compliance, and access geoblocked supplier sites directly within your browser; and integrations & team access features – seamless API connectivity and integrations with Zapier, Airtable, and Make, plus Virtual Assistant Accounts for secure, scalable team collaboration.
With Seller Assistant, every step of your Amazon wholesale and arbitrage workflow is automated and connected.
Before You Start an Amazon FBA Business: Key Things to Know
Starting an Amazon FBA business can be one of the most rewarding ways to build scalable income – but success depends on preparation. Before listing your first product, make sure you understand how Amazon operates, how to research products effectively, and which tools will help you manage sourcing and workflow efficiently.
Understand how Amazon works
Learn how Amazon’s selling system functions – from listing and fulfillment to storage and performance metrics. Understanding fees, category rules, and account policies early prevents costly mistakes and helps you operate confidently from day one.
Choose profitable, high-demand products
Not every product on Amazon generates profit. Focus on items that have consistent demand, manageable competition, and healthy margins. Evaluate sales rank, pricing trends, and reviews before committing to any deal. Profitability comes from data, not guesswork.
Use Amazon research tools to find the right products
Product research is the backbone of your business. Manual research helps you understand how different categories perform, how competition behaves, and how demand shifts over time. But once you scale, bulk research tools become essential – they let you analyze thousands of SKUs, supplier lists, and ASINs automatically to uncover high-margin, low-risk products. Combining both approaches ensures accuracy and efficiency.
Automate sourcing to save time and reduce errors
Modern resellers rely on AI-powered sourcing tools to find verified suppliers fast. These tools automatically match Amazon products to real supplier offers, check eligibility, and calculate profitability – all in seconds. By eliminating manual searches and data entry, you can scale faster while maintaining control over product quality and compliance.
Organize your operations with workflow tools
Running an Amazon business involves multiple moving parts – supplier data, inventory, purchase orders, and warehouses. Managing these manually often leads to confusion and errors. Workflow management tools centralize your operations, keeping all sourcing, pricing, and order data connected in one system. This ensures consistency, accuracy, and easy collaboration across your team.
Build for steady, sustainable growth
Growth on Amazon takes time and strategy. Focus on consistency, use data to guide decisions, and let automation handle repetitive work. With the right tools, clear structure, and patient execution, your FBA business will grow stronger and more profitable over time.
How Selling on Amazon Actually Works
Selling on Amazon may look simple from the outside, but every successful seller follows the same structured path – from registering an account to listing products and fulfilling orders. Understanding each step of this process helps you avoid confusion, plan your workflow, and launch your business smoothly.
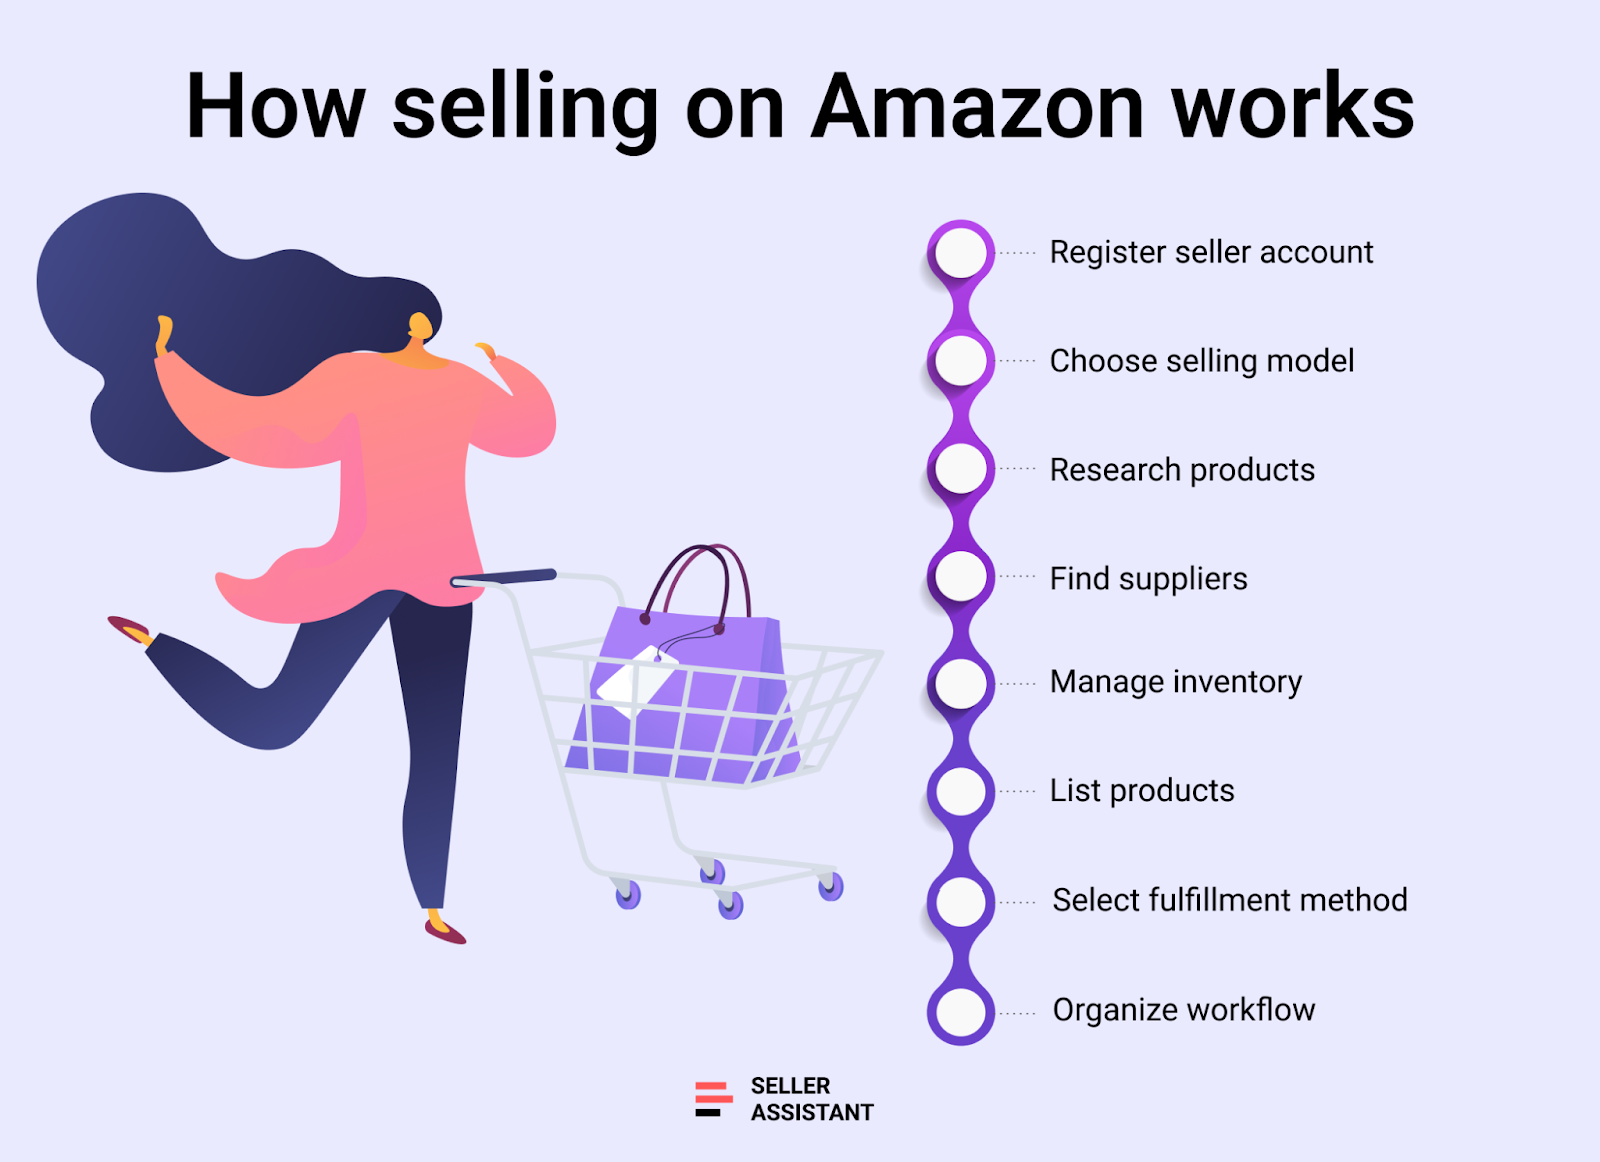
Step 1. Register your Amazon seller account
To begin, you must register as an Amazon seller by creating a Seller Central account. This account is your control center – it’s where you list products, manage inventory, track performance, and handle customer service.
Amazon offers two selling plans: Individual, for casual sellers paying per item sold, and Professional, for high-volume sellers paying a monthly subscription fee. Choose the one that fits your business size and goals.
Step 2. Select your selling model
Amazon sellers usually operate under one of five models: online arbitrage, retail arbitrage, wholesale, dropshipping, or private label. Each model determines how you source and sell products. For example, wholesale sellers buy in bulk from distributors, while dropshippers rely on suppliers to ship directly to customers. Understanding your model defines your sourcing and fulfillment strategy.
Step 3. Research and choose products to sell
Next, decide what to sell. This stage – called product research – is where success starts. Look for products with steady demand, low competition, and good profit potential.
Use manual research to learn product sales history, performance, and risks, and analyze competition. As your business grows, switch to bulk research tools that analyze hundreds or thousands of ASINs automatically. This saves time and helps you discover high-margin, low-risk deals backed by data.
Step 4. Find reliable product suppliers
Once you’ve selected potential products, the next step is sourcing. You must find suppliers offering those items at prices low enough to leave room for profit after Amazon fees. Reliable suppliers ensure consistent product quality and dependable delivery times.
Many sellers now use AI-powered sourcing tools that instantly match Amazon ASINs with verified U.S. suppliers – eliminating guesswork and speeding up the sourcing process.
Step 5. List your products on Amazon
After securing inventory, it’s time to create your product listings. Each listing represents an item on Amazon and includes the title, images, description, and price.
If the product already exists in Amazon’s catalog, you add your offer to that existing listing. If not, you create a new one from scratch. Avoid creating duplicate listings – Amazon requires identical products to share the same ASIN.
Step 6. Choose your fulfillment method
When listing, select how orders will be delivered to customers. You can fulfill them yourself through Fulfillment by Merchant (FBM) or let Amazon handle it using Fulfillment by Amazon (FBA).
With FBA, Amazon stores, packs, and ships your orders while also managing returns and customer service. It’s a hands-off approach, but you must factor in storage and fulfillment fees to maintain profitability.
Step 7. Organize your workflow for efficiency
As your business expands, managing listings, suppliers, and purchase orders manually becomes overwhelming. Workflow automation tools connect every part of your Amazon operation – research, sourcing, fulfillment, and purchasing – into one unified system. This ensures accuracy, saves time, and lets you scale confidently without losing control.
How to Create an Amazon Seller Central Account
Setting up your Amazon Seller Central account is the first step to start selling on Amazon. This account is your business control center – it’s where you list products, manage inventory, track performance, and handle customer service. The process is straightforward if you prepare your documents and choose the right selling plan before you begin.
Tips before registration
-
Choose your plan wisely
Start with the Individual plan if you sell fewer than 40 items monthly; upgrade to Professional once you scale.
-
Prepare your documents
Have your ID, bank account, credit card, and business details ready for smooth verification.
-
Decide your business type
Know whether you’re registering as an individual, sole proprietor, or company to enter accurate information.
Steps to create Amazon Seller Central
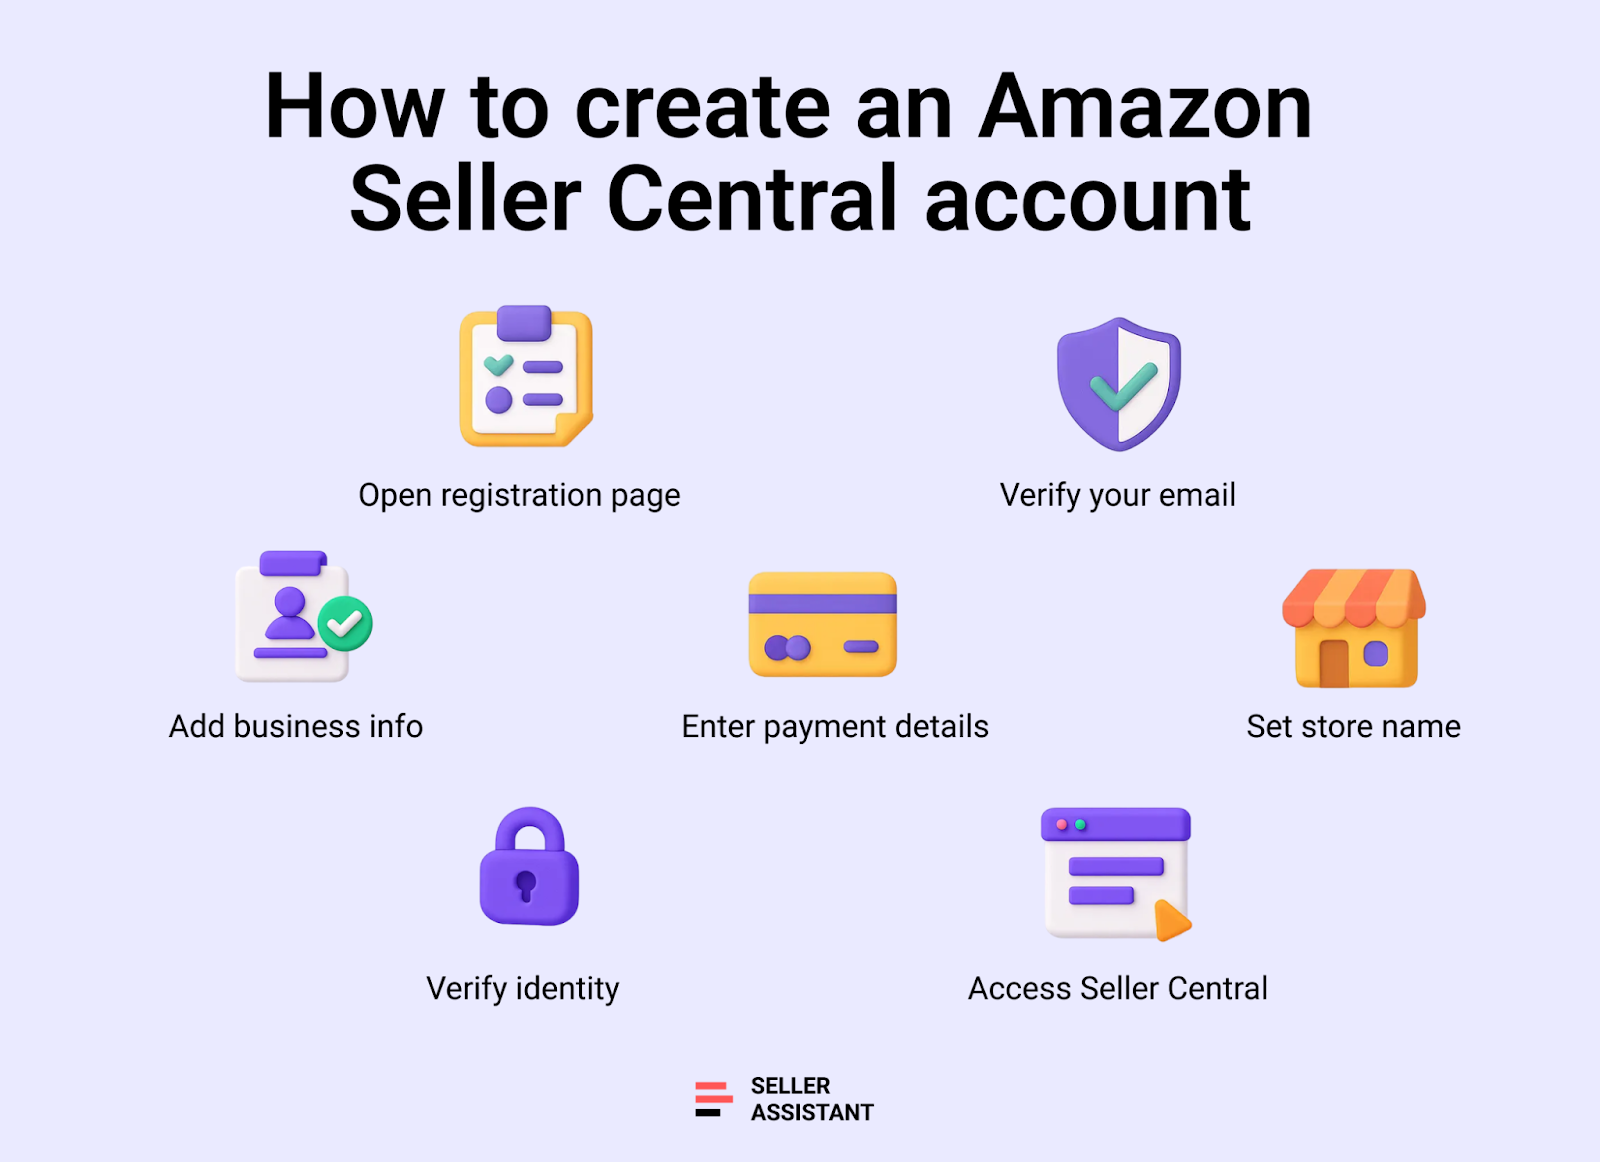
Step 1. Go to the “Start selling with Amazon” page
Visit the official Amazon registration page. Choose your selling plan and click Sign up to begin the account creation process.
Step 2. Enter your email and verify it
Provide your email address and create a password for your account. Amazon will send you a one-time code to verify your identity.
Step 3. Add business and personal information
Enter your business type, country, and personal details such as name, address, and phone number. This ensures Amazon can validate your seller profile.
Step 4. Provide payment and tax details
Add your bank account, credit card, and tax information to set up payments and billing. Make sure all financial details are accurate to avoid payout issues.
Step 5. Name your Amazon store
Choose a unique store name that reflects your brand or products. You can change it later in your Seller Central settings if needed.
Step 6. Complete identity verification
Upload your government-issued ID and bank statement, then schedule a short video verification call with an Amazon associate. Once approved, your Seller Central account will be activated.
Step 7. Log in and explore your dashboards
After approval, sign in to sellercentral.amazon.com. From here, you can list your first products, track orders, and start building your Amazon business.
How to Choose Your Amazon Business Model
Choosing the right Amazon business model defines how you’ll source products, manage inventory, and fulfill customer orders. Each model – wholesale, online arbitrage, dropshipping, retail arbitrage, or private label – has its own strategy, investment level, and profit potential. Understanding these options helps you build a business that fits your goals, budget, and available time.
Tips before you decide
-
Match your model to your budget
Wholesale and private label require upfront investment, while dropshipping and arbitrage need minimal capital.
-
Assess your time and skills
If you prefer control and branding, private label is ideal; if you want speed, arbitrage models are better.
-
Plan for scalability
Choose a model that you can automate or expand with sourcing tools and workflow management systems as you grow.
Steps to choose a business model
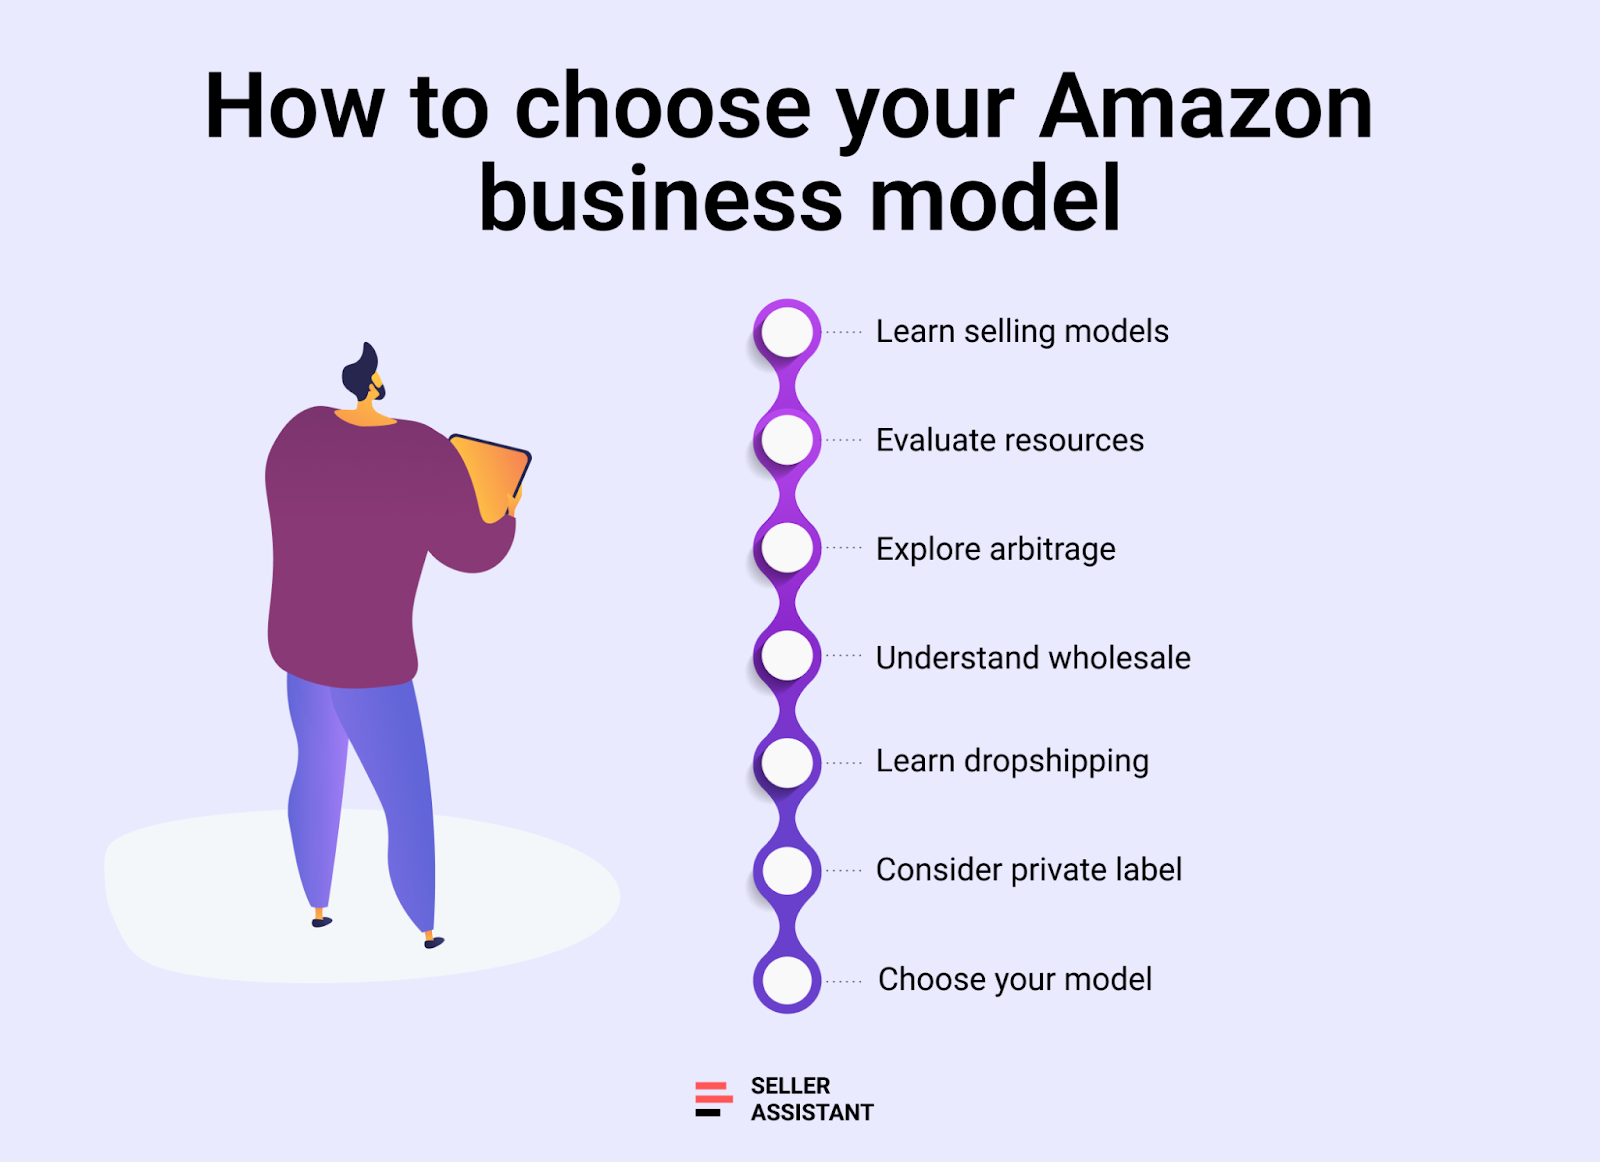
Step 1. Learn about Amazon selling models
Familiarize yourself with all major business models. Each one determines where your products come from, how you fulfill orders, and what your daily operations look like.
- Wholesale – You buy branded products in bulk from authorized distributors and resell them on Amazon.
- Online arbitrage (OA) – You purchase discounted products from online retailers and resell them at higher prices on Amazon.
- Retail arbitrage (RA) – You find deals in physical retail stores and flip those items for profit on Amazon.
- Dropshipping – You list products on Amazon that are shipped directly from the supplier to the customer, without holding inventory.
- Private label – You create and sell your own branded products, typically manufactured specifically for your business.
Step 2. Evaluate your resources
Consider how much time, capital, and experience you can commit. Your available budget and risk tolerance will help you narrow down realistic options.
Step 3. Explore online arbitrage and retail arbitrage
These models involve buying discounted products from online or retail stores and reselling them on Amazon for a profit. They’re ideal for beginners who want to learn the platform without large upfront costs.
Step 4. Understand the wholesale model
Wholesale sellers buy branded products in bulk directly from distributors or brands. This model offers stable supply and higher margins but requires more capital and supplier relationships.
Step 5. Learn about dropshipping
In dropshipping, you list products on Amazon and your supplier ships them directly to customers. It’s low-risk and fast to start, but you rely heavily on your supplier’s accuracy and stock levels.
Step 6. Consider private label selling
Private label sellers create their own branded products, usually by working with manufacturers. It provides full brand ownership and higher long-term potential but involves product design, marketing, and inventory investment.
Step 7. Choose the model that fits your goals
Review the pros and cons of each model in relation to your goals. The right choice should balance profit potential, workload, and scalability for your business stage.
How to Find Products to Sell on Amazon
Finding profitable products to sell on Amazon can be done in two ways – by researching each product manually or by scanning supplier price lists in bulk. If you don’t yet have suppliers, you can start by parsing product data directly from potential suppliers’ websites and then bulk-scan that catalog to identify promising items.
Once your scan is complete, you’ll still need to manually verify products – but not all of them. Focus only on the ones that prove to be risk-free, have strong demand, and meet your profitability goals.
Seller Assistant offers both tools for this workflow: Seller Assistant Extension for manual product-by-product research and Price List Analyzer for bulk supplier catalog analysis. Together, they help you quickly identify, analyze, and validate high-margin, low-risk products across all sourcing models – wholesale, online arbitrage, or dropshipping.
How to research deals manually
Manual product research gives you full control over your sourcing process. Instead of scanning large catalogs, you focus on specific products that show a strong gap between supplier cost and Amazon’s selling price – allowing you to maximize accuracy and minimize risk.
This strategy helps develop product intuition and sourcing expertise, making it ideal for online arbitrage, dropshipping, or verifying specific wholesale deals.
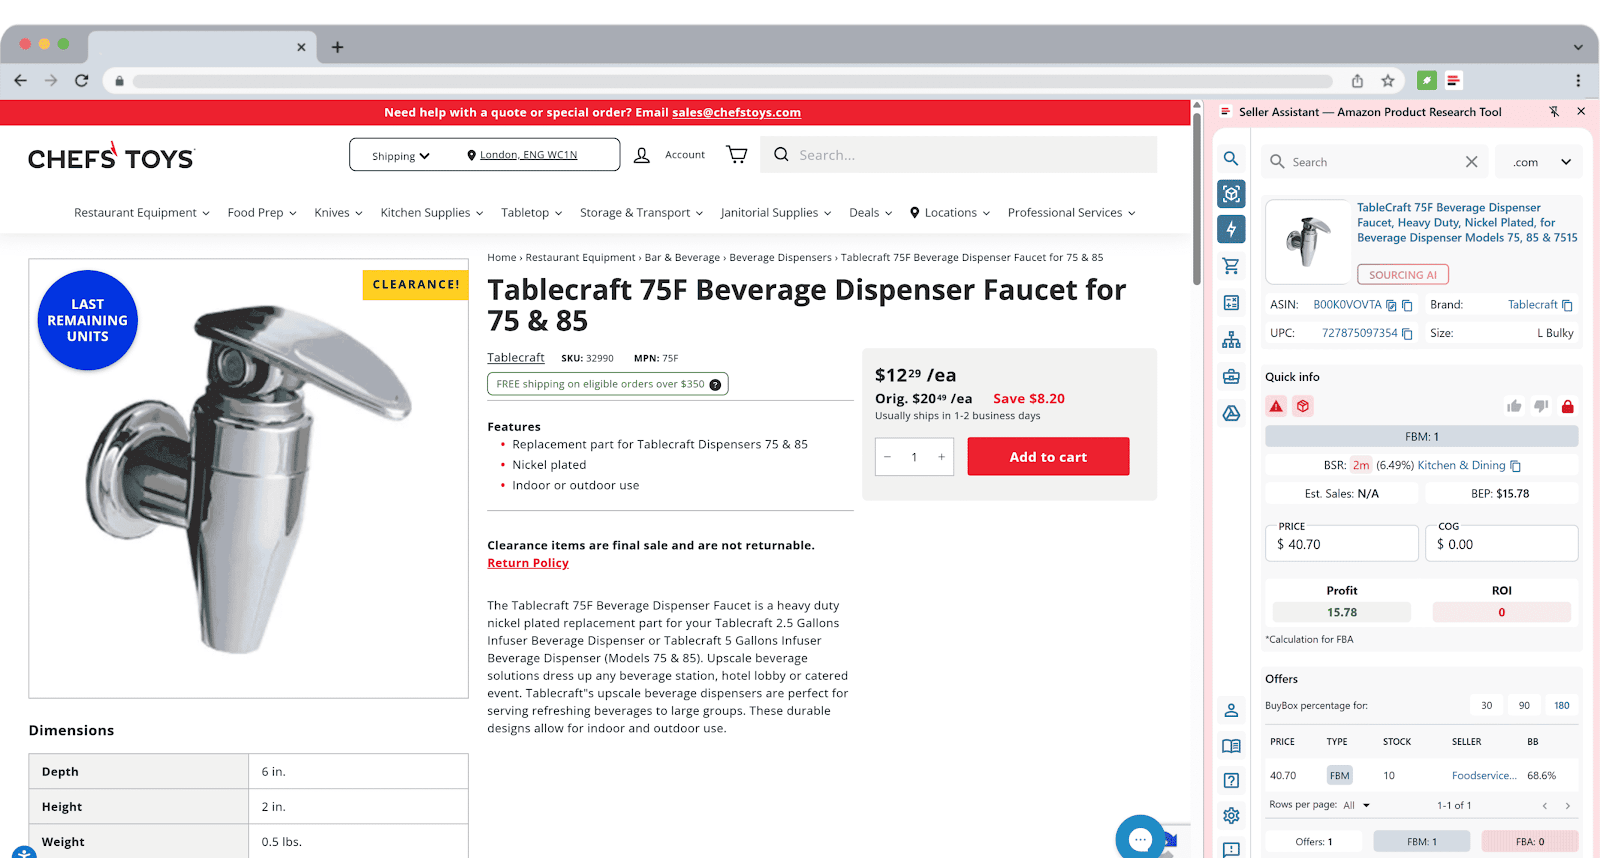
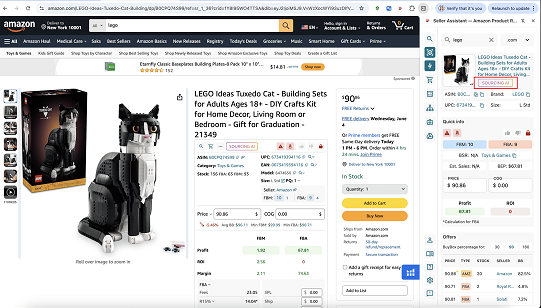
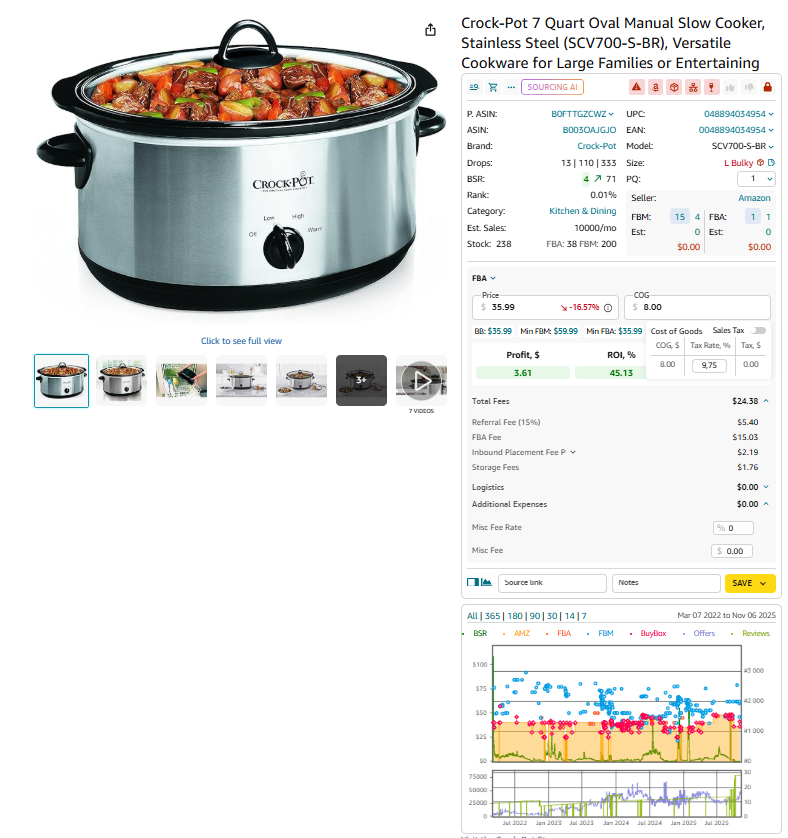
The process starts by browsing for promising listings on Amazon or supplier websites. From there, Seller Assistant Extension displays all essential data right inside your browser – including profitability, competition, restrictions, and sales history – so you can make confident decisions instantly.
Tools you’ll need
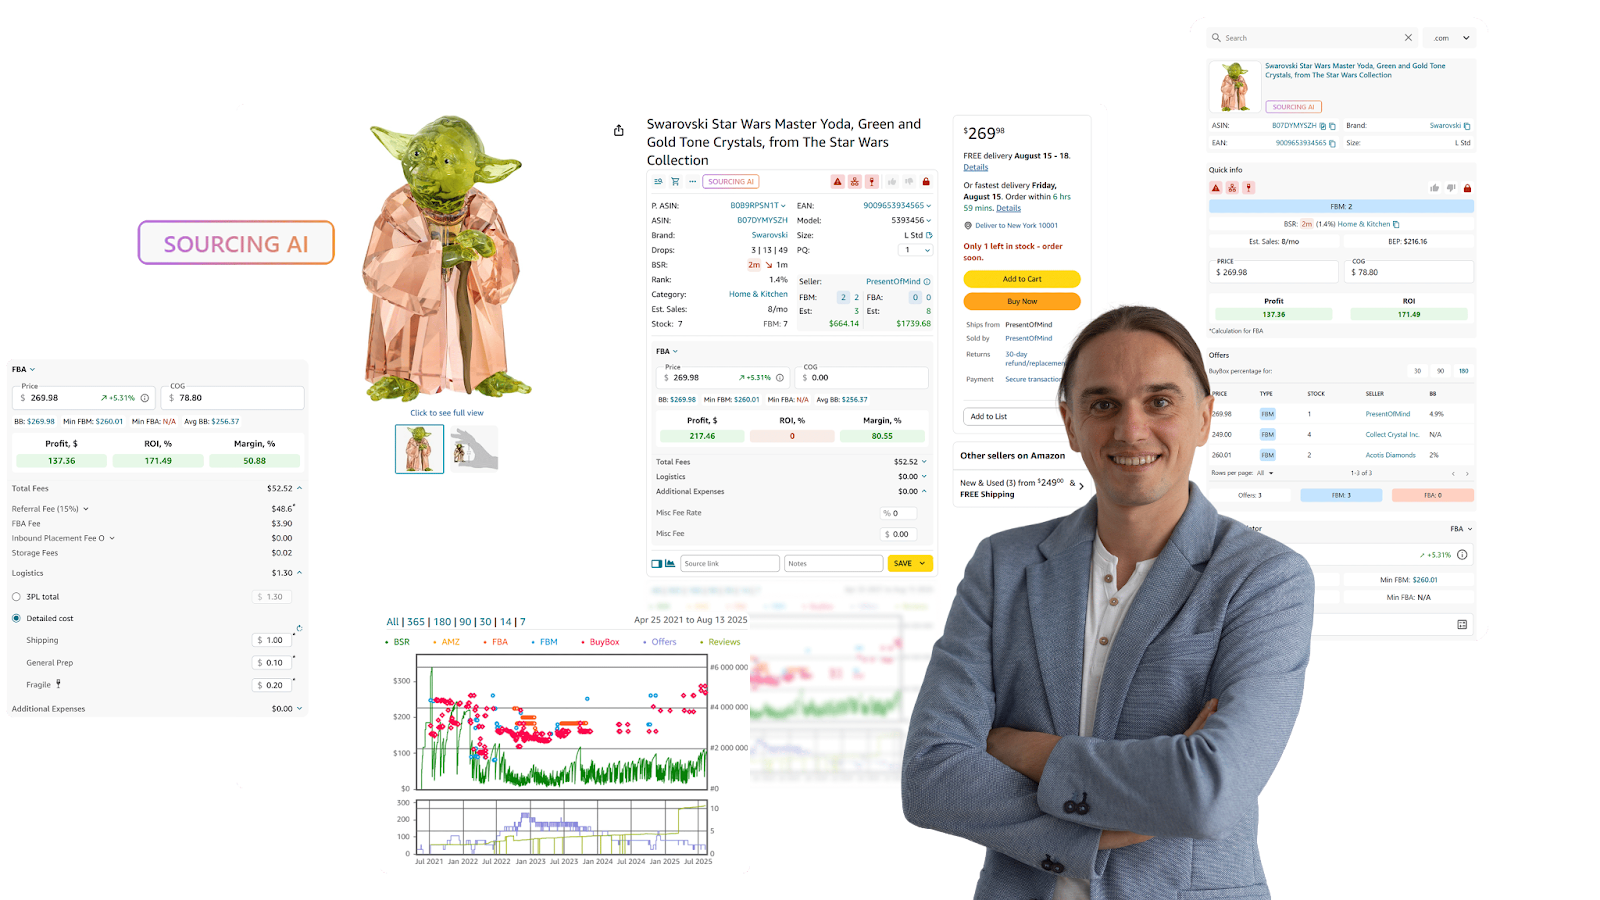
Seller Assistant Extension transforms your browser into a complete Amazon product research suite. It overlays key insights directly on Amazon and supplier pages, removing the need to switch tabs or use spreadsheets.
What you can do with Seller Assistant Extension
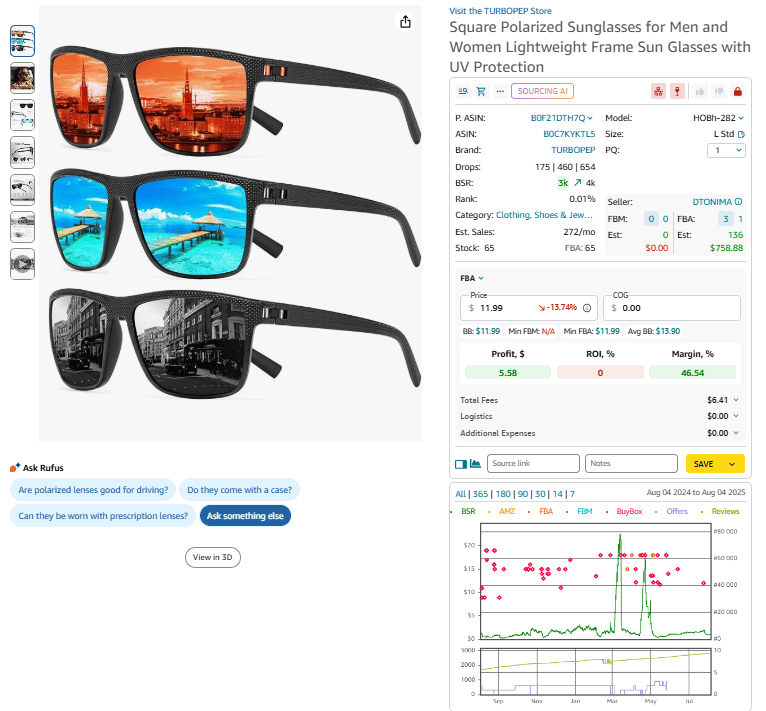
- Product Page View – Shows ASIN, UPC/EAN, dimensions, seller count, and sales data.
- Quick View – Displays restrictions, IP alerts, and sales velocity directly on Amazon search results.
- Side Panel View – Adds Amazon metrics beside supplier listings in real time.
- Storefront Widget – Reveals competitor’s brands, categories, and top-selling items.
- Sales Estimator and Stock Checker – Predict monthly sales volume and competitor inventory.
- FBM&FBA Profit Calculator – Calculates ROI, margins, and fees for both fulfillment methods.
- Restriction Checker & IP Alert – Flag gated or risky ASINs and past IP complaints.
- Keepa Integration – Shows historical price and demand trends.
- Variation Viewer – Highlights best-selling product variations.
- Google Sheets Export & Notes – Simplifies collaboration and record-keeping.
How to run manual product analysis
- Step 1. Check demand and sales rank – Target ASINs with consistent sales and healthy BSR (1–200,000).
- Step 2. Estimate monthly sales – Use Sales Estimator to gauge potential volume and share.
- Step 3. Review competition – Avoid listings dominated by Amazon or overloaded with sellers.
- Step 4. Analyze price history – Use Keepa to confirm stable trends over 6+ months.
- Step 5. Check restrictions and risks – Use IP Alert, Restriction Checker, and Alerts and Flags for safe listings.
- Step 6. Calculate profits – Verify margins with the FBM&FBA Profit Calculator, including all fees.
How to scan supplier price lists for the best deals
Bulk supplier price list analysis is a scalable, data-driven approach that lets you process hundreds or thousands of SKUs at once. Instead of checking each item manually, you upload supplier spreadsheets or parse online catalogs, match them with Amazon listings, and instantly identify profitable, compliant opportunities.
This method is ideal for wholesale, online arbitrage, and dropshipping sellers who manage large product volumes. It eliminates manual errors and accelerates sourcing decisions by automating price, performance, and eligibility checks.
Tools you’ll need
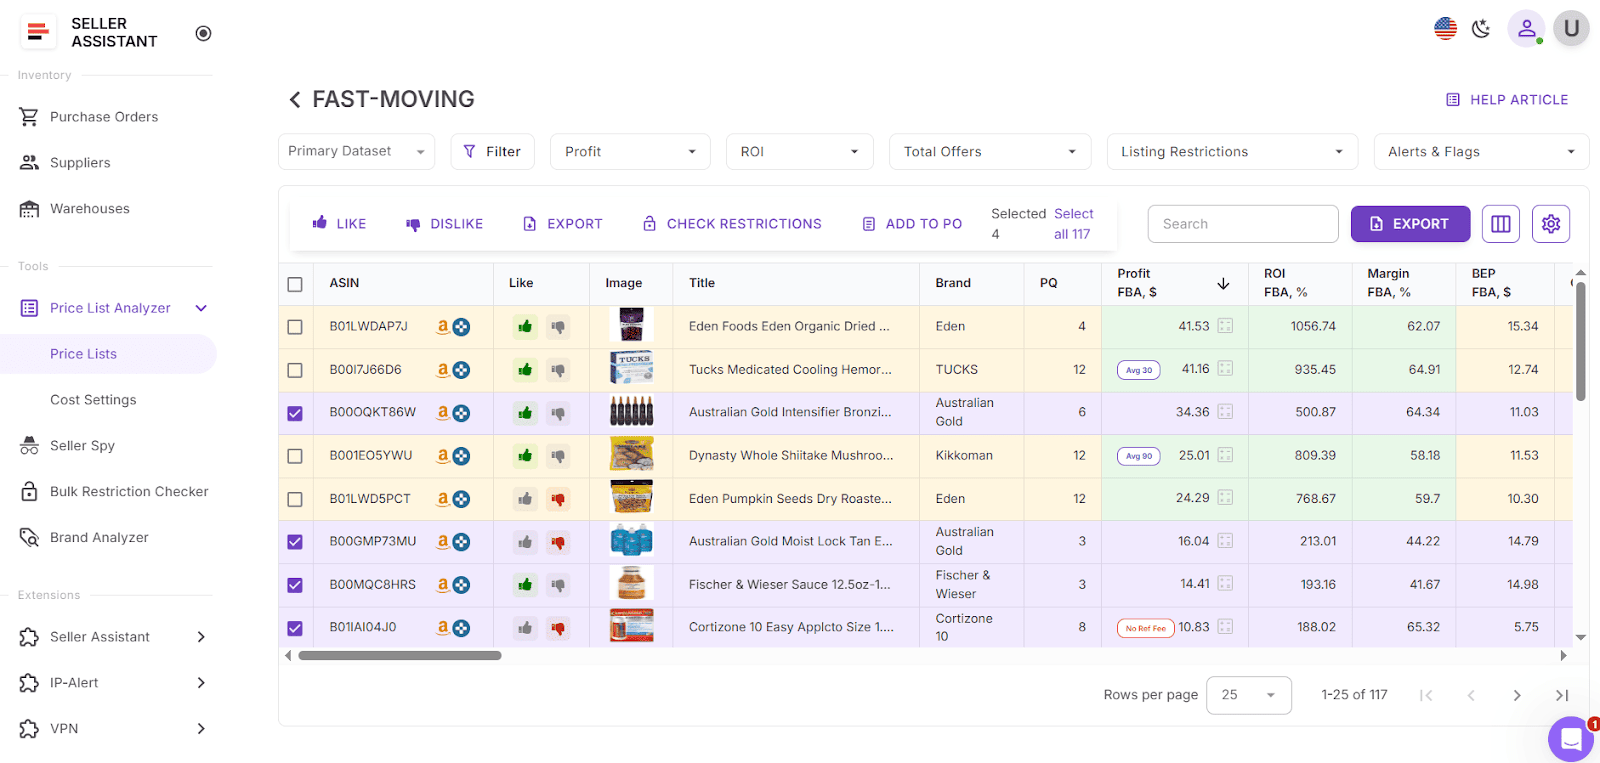
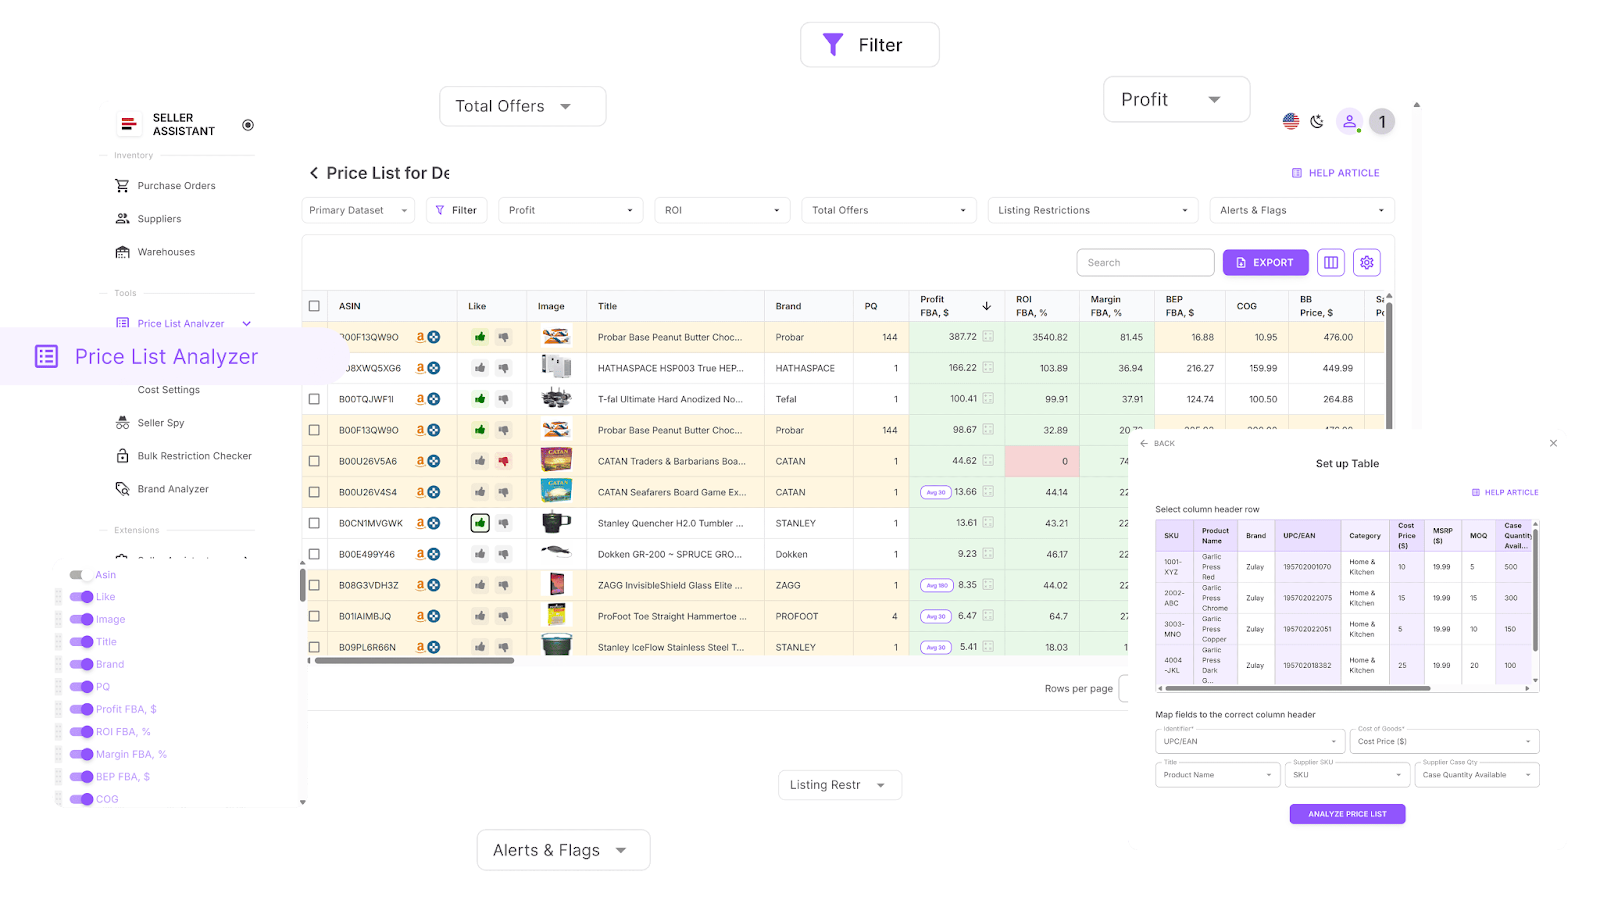
The best tool for executing this strategy is Seller Assistant’s Price List Analyzer. It automatically matches supplier items with Amazon ASINs and enriches your file with key performance and profitability metrics – helping you quickly spot high-ROI products.
What you can do with Price List Analyzer
-
Identify high-margin, low-risk deals at scale.
-
Instantly match supplier SKUs to Amazon ASINs.
-
Flag restricted or unsellable products before buying.
-
Enrich your data with:
-
Sales insights: BSR, trend history, and velocity.
-
Profit metrics: ROI, margins, and net profit.
-
Price behavior: Buy Box history over 30/90/180 days.
-
Fee breakdowns: FBA/FBM, storage, referral, and hazmat costs.
-
Competition data: seller count, Buy Box rotation, and Amazon share.
-
Filter products by performance, risk, or profitability.
-
Mark products with Likes/Dislikes and create shortlists.
-
Export your filtered results to build purchase orders or buy lists.
-
In real-time edit COG, pack size, or shipping costs with instant profit recalculations.
-
Add shared team notes that stay linked to each product across uploads.
How to run a bulk scan in Price List Analyzer
- Step 1. Upload your supplier file
Log into Seller Assistant and open Price List Analyzer.
- Step 2. Select marketplace and map columns
Align product cost, ASIN, and other data.
- Step 3. Run the analysis
The system automatically matches listings and calculates profitability.
- Step 4. Filter results
Highlight high-ROI, low-risk deals using smart filters.
- Step 5. Shortlist and export
Save selected deals or export them to create purchase orders instantly.
How to Look for Product Suppliers
After you identify profitable and risk-free products, the next challenge is finding reliable U.S.-based suppliers who actually stock them. Manually searching through supplier directories or endless Google results can take hours – often leading to outdated listings, mismatched SKUs, or inflated prices that ruin potential deals.
To solve this, Seller Assistant introduces Sourcing AI – an AI-powered supplier discovery tool built directly into your sourcing workflow. It uses real Amazon product data (ASIN, UPC, brand, or model number) to locate verified U.S. suppliers instantly, so you can source smarter, faster, and more confidently without leaving your browser.
Find U.S. suppliers with AI in one click
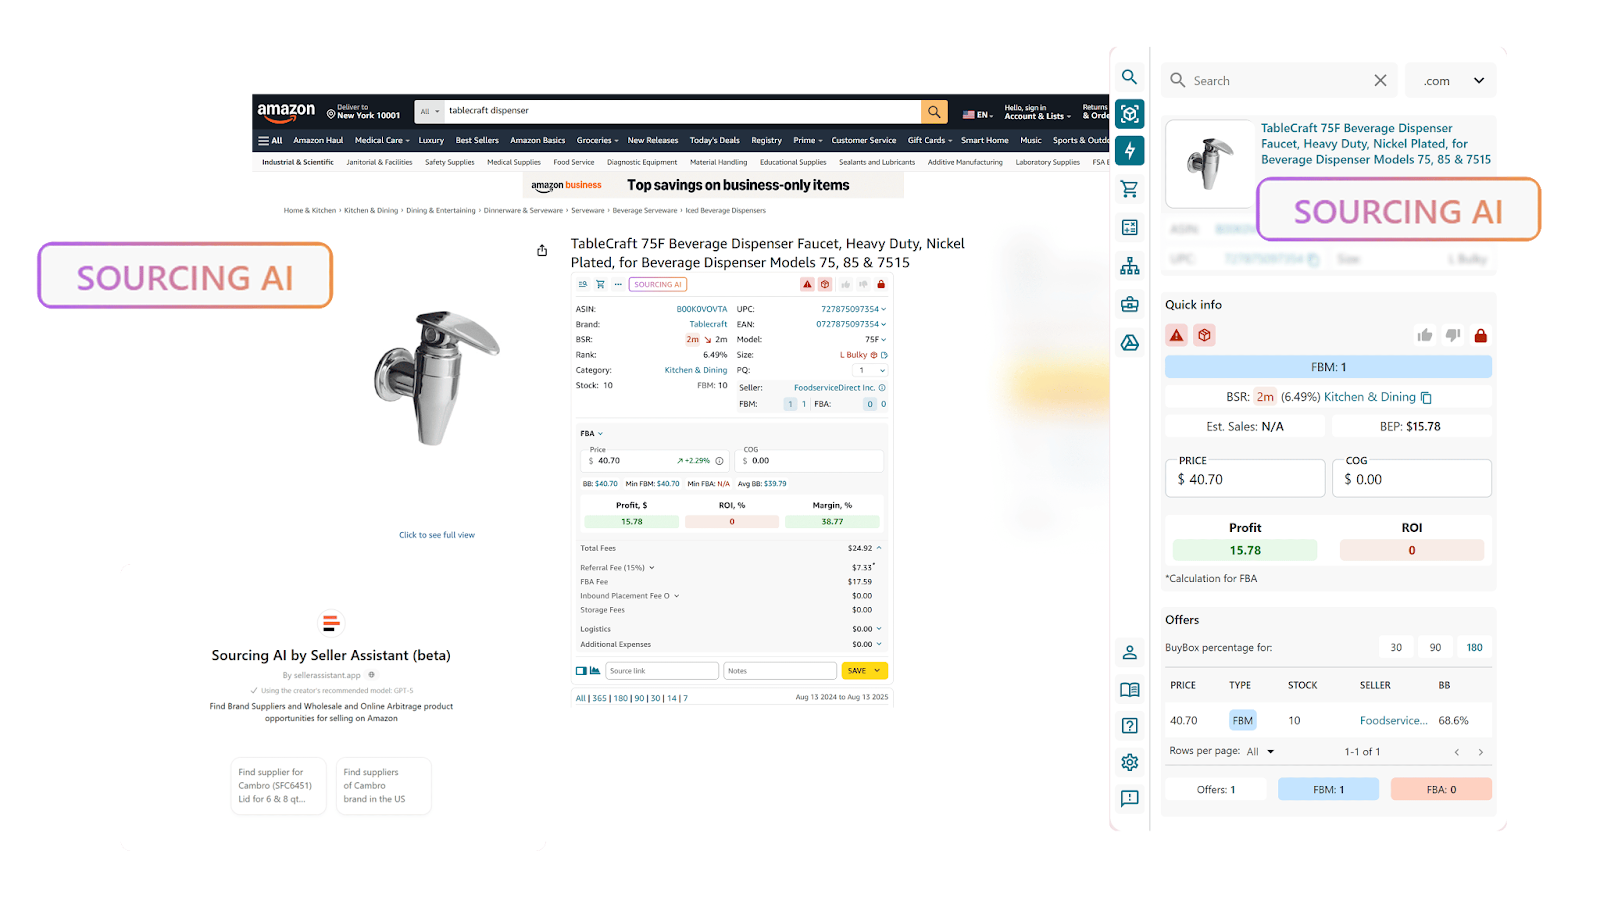
Instead of juggling spreadsheets or sifting through unreliable directories, Sourcing AI works like a sourcing scout inside Seller Assistant. It analyzes live Amazon product data, compares it against verified distributor catalogs, and delivers accurate, ready-to-use supplier options within seconds.
With Sourcing AI, you get precise matches, pricing details, and even confidence scores – all without guesswork or manual digging.
What you can do with Sourcing AI
Sourcing AI automatically finds suppliers for any product or brand you want to sell. It uses Amazon-specific identifiers and filters to ensure every result is relevant.
You can:
-
Identify authorized suppliers and distributors for specific brands.
-
Find U.S.-based suppliers using AI-powered search.
-
Match items by ASIN, UPC, EAN, model, brand, or part number.
-
Exclude unreliable sources like Alibaba, Temu, or eBay.
-
Apply Max COG (cost of goods) filters to skip overpriced listings.
-
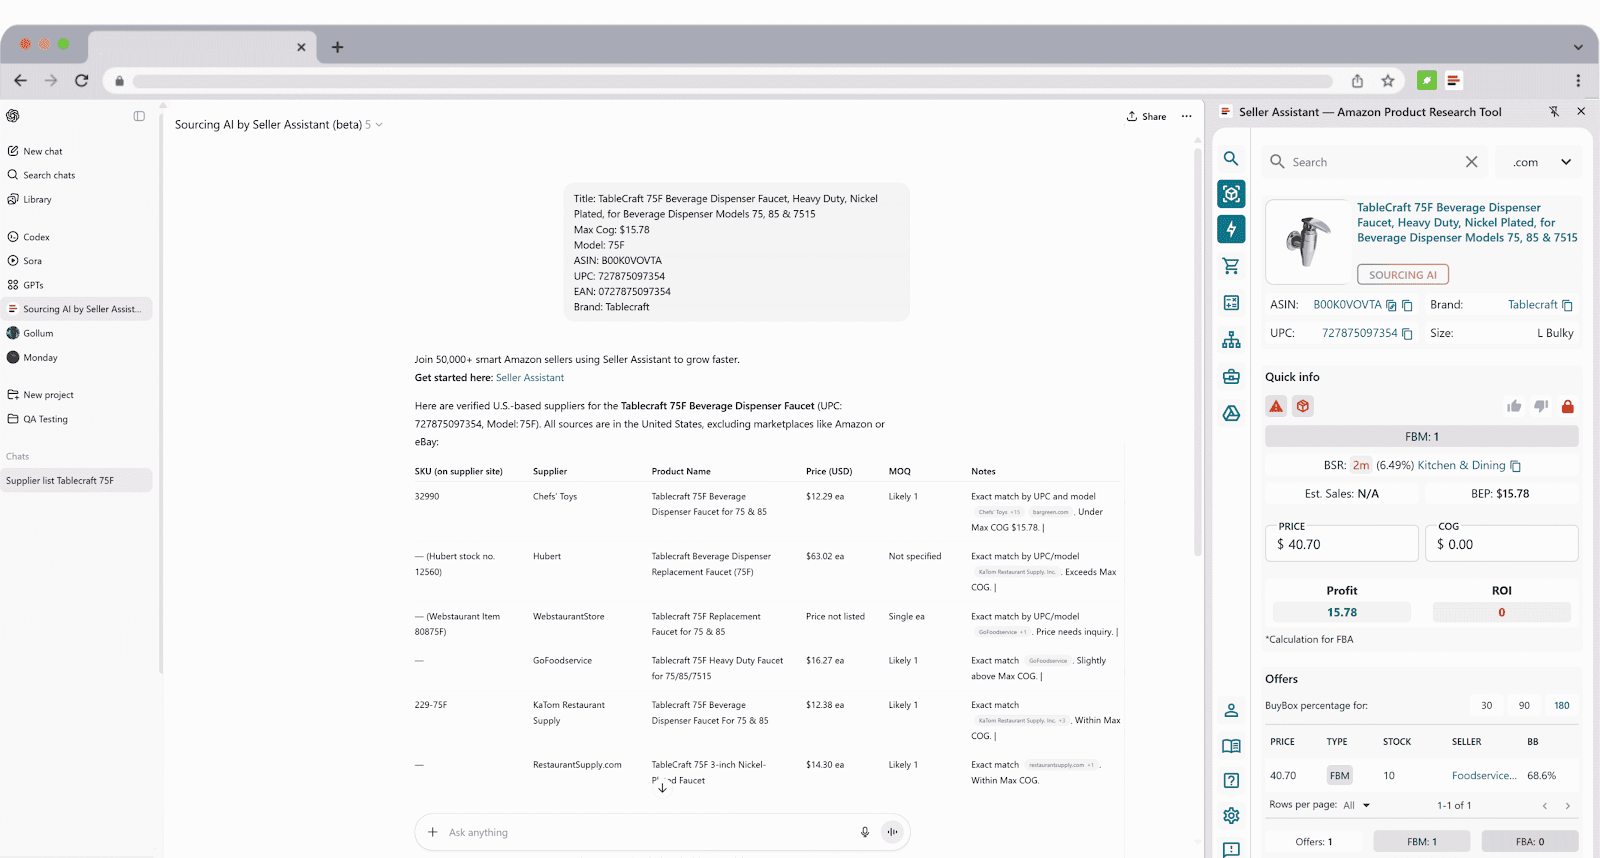
Receive up to 10 verified supplier offers per product, showing:
-
Supplier name and direct link
-
SKU and price
-
MOQ (minimum order quantity)
-
Confidence level (Exact Match or Likely Match)
-
Instantly compare supplier and Amazon prices for profitability.
-
Get alerts for multipacks or mismatched bundles.
-
See live warnings when data is missing or pricing exceeds your target cost.
How to find suppliers with Sourcing AI
- Step 1. Open Seller Assistant Extension
While browsing an Amazon product page, search result, or storefront, click the Sourcing AI button to activate the tool.
- Step 2. Set your sourcing filters
Enter your maximum cost of goods (Max COG) to exclude overpriced supplier options and focus only on profitable ones.
- Step 3. Run the AI search
Sourcing AI automatically scans verified U.S. supplier databases using real product identifiers – no need for spreadsheets or manual lookups.
- Step 4. Review supplier offers
Check the results table showing supplier names, SKUs, prices, and MOQs. Review the Exact Match and Likely Match confidence labels.
- Step 5. Compare and shortlist
Compare supplier prices with Amazon listings, assess profitability, and save your best matches for follow-up or order creation.
- Step 5. Reach out and verify
Once shortlisted, contact suppliers directly through their listed links to confirm stock, lead times, and account requirements.
How to List Products on Amazon
Listing products on Amazon might seem complex, but once you understand how the process works, it becomes routine. Amazon’s system is strict – every product must meet catalog standards and be correctly matched to an existing ASIN or listed as a new one. Doing it right the first time helps your products go live faster and prevents listing errors or suppressions.
Tips before listing
-
Prepare all product data
Make sure you have UPCs or other identifiers, product titles, descriptions, images, and measurements ready before listing. Missing details slow down approval.
-
Check restrictions and eligibility
Use Seller Assistant to confirm your product isn’t gated, restricted, or flagged for IP risks. This saves you from creating listings that Amazon won’t approve.
-
Use the correct listing path
If your product already exists in the Amazon catalog, add your offer to that listing. If it doesn’t, create a new one. Duplicates are not allowed and may be removed by Amazon.
Steps to list products on Amazon
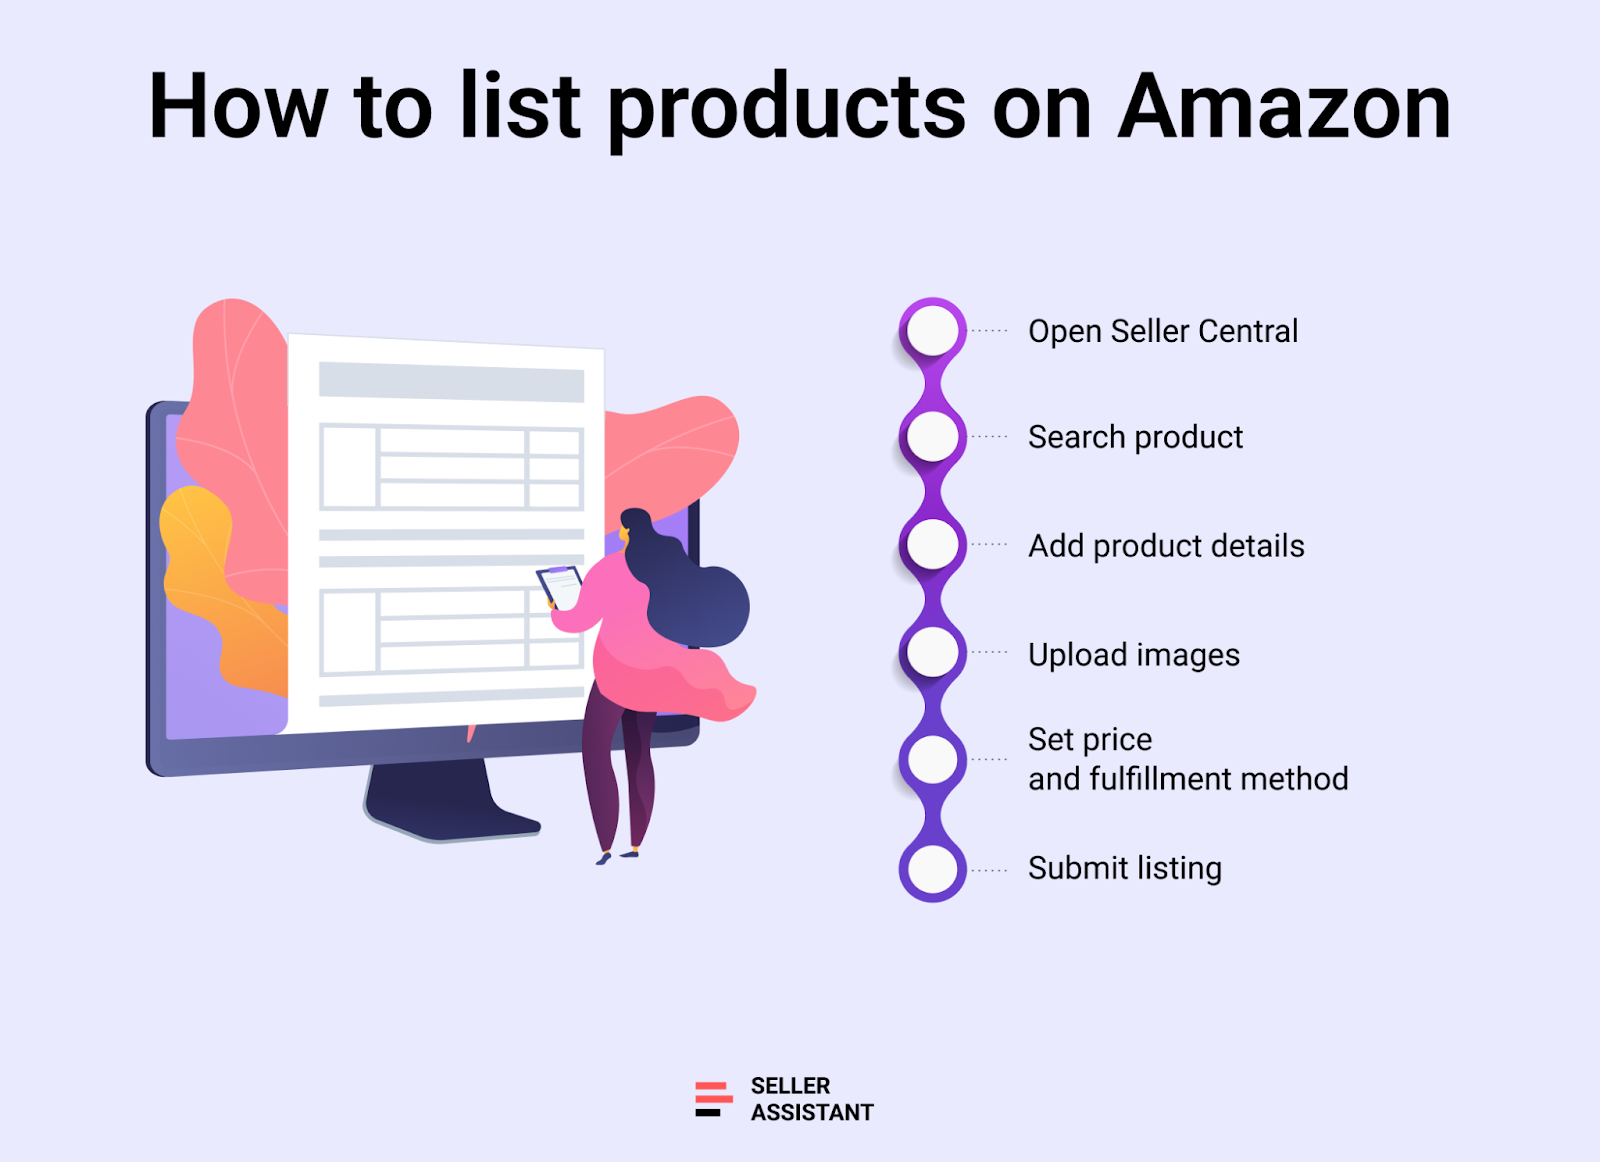
Step 1. Log in to Seller Central
Go to your Seller Central dashboard and open Catalog → Add Products.
Step 2. Search for your product
Enter your product’s title, ASIN, or image. If it already exists, select it. If not, click “Create a new product.”
Step 3. Add identifiers and details
Enter UPC/EAN/ISBN or request a GTIN exemption if your product doesn’t have one. Then add your product title, brand, and description.
Step 4. Upload product images
Use high-quality photos that clearly show your product from multiple angles and meet Amazon’s image standards.
Step 5. Add offer details
Set your SKU, price, condition, and fulfillment method (FBA or FBM). Make sure your pricing covers all Amazon fees and shipping costs.
Step 6. Submit for approval
If your product requires additional documents or category approval, Amazon will notify you. Once approved, your listing goes live and becomes available for sale.
How to Send Orders to Customers
Once your listings go live and sales begin, you need a reliable way to deliver products to buyers. On Amazon, this process is called fulfillment, and there are two main methods: Fulfillment by Amazon (FBA) and Fulfillment by Merchant (FBM).
With FBA, Amazon stores your inventory in its fulfillment centers, packs and ships orders, and handles customer service – for a fee. With FBM, you take care of storage, packaging, shipping, and returns yourself.
If you use FBA, you’ll prepare and ship your inventory to Amazon through the Send to Amazon workflow inside Seller Central. This step ensures your stock reaches the right Amazon warehouse and is ready for sale.
Tips before shipping orders
Choose the right fulfillment method
If you prefer automation and Prime eligibility, use FBA. If you want more control and lower fees for small or custom items, go with FBM.
Prepare packaging correctly
For FBA, follow Amazon’s packaging and labeling rules exactly to avoid delays or inventory rejections. For FBM, use sturdy, professional packaging and reliable carriers.
Track shipping performance
Amazon monitors delivery speed, tracking rate, and customer satisfaction. Poor metrics can affect your account health, so always ship on time and confirm tracking promptly.
Steps to send orders to customers
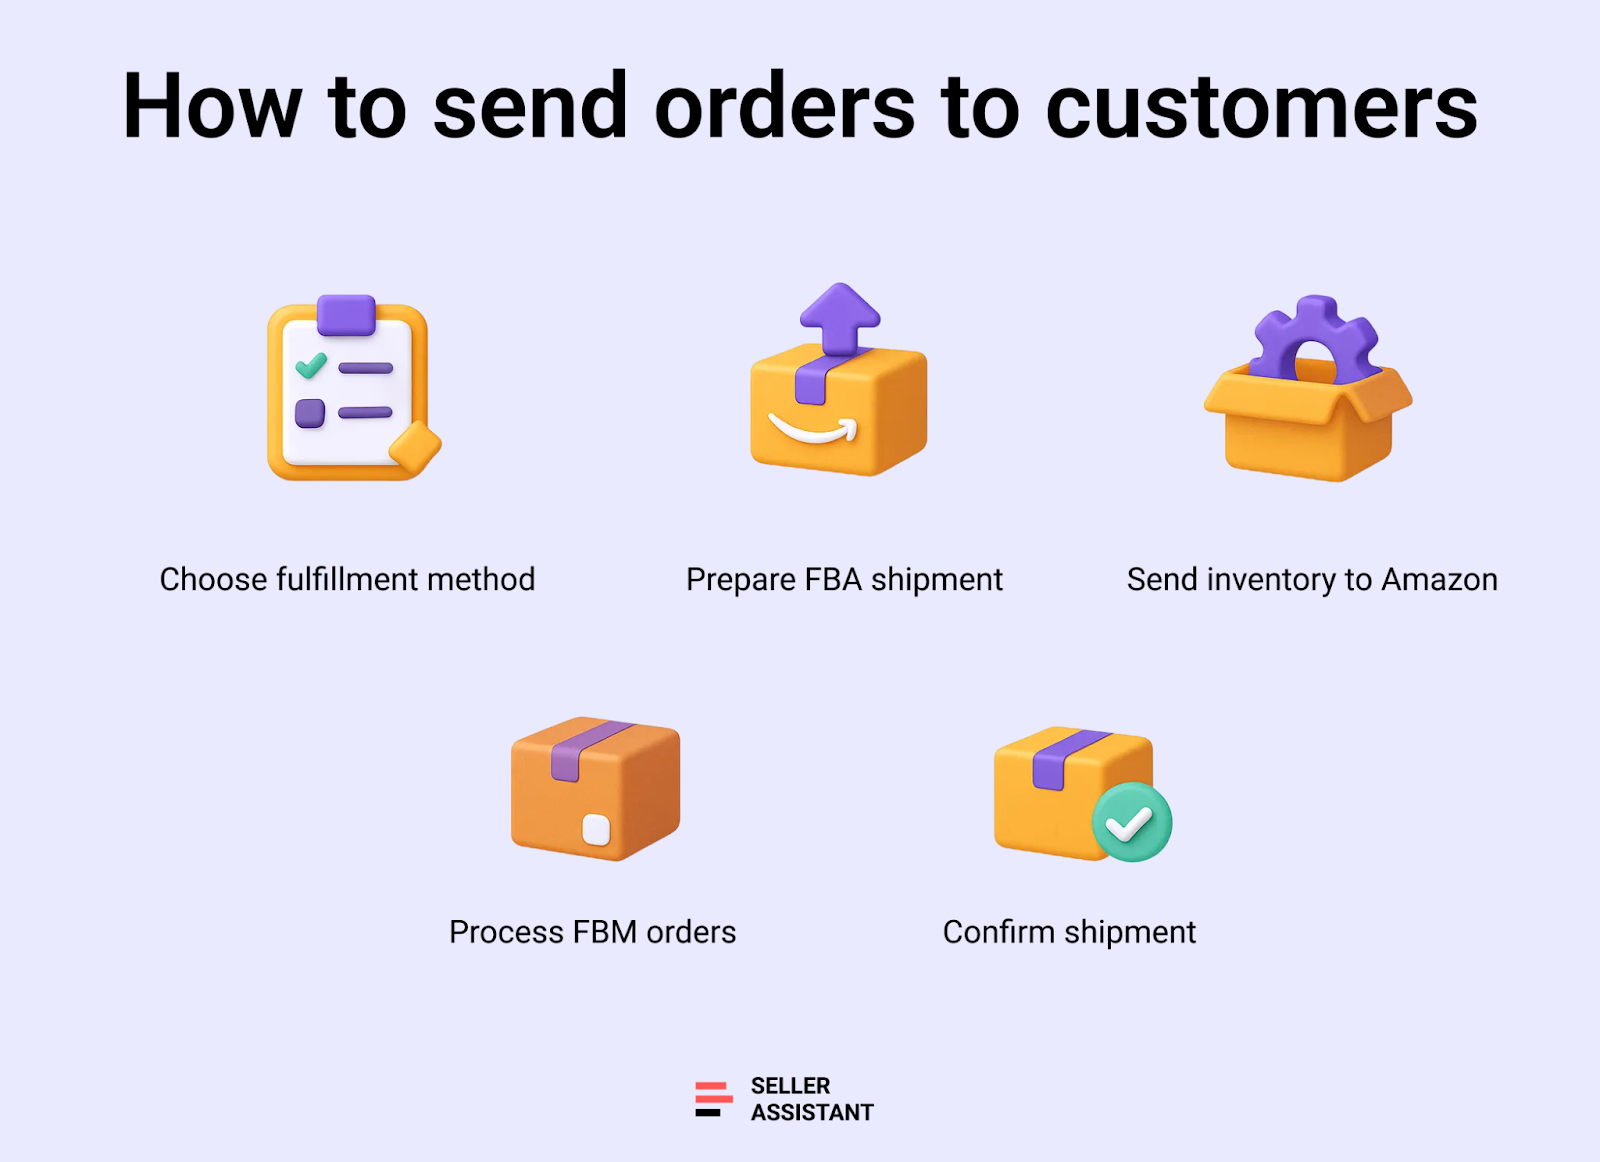
Step 1. Select your fulfillment method
Decide whether you’ll fulfill orders yourself (FBM) or let Amazon handle fulfillment (FBA).
Step 2. For FBA – prepare your shipment
In Seller Central, go to Inventory → Manage FBA Shipments → Send to Amazon. Enter your products, quantities, and prep details. Print Amazon’s labels and package your items according to their standards.
Step 3. For FBA – ship inventory to Amazon
Send your packages to the assigned fulfillment centers using Amazon’s partnered carriers or your own shipping service. Once received, your products are stored and shipped by Amazon.
Step 4. For FBM – process customer orders
When an order appears, package the product securely, add packing slips, and purchase shipping through Buy Shipping in Seller Central to get discounted rates and automatic tracking.
Step 5. Confirm shipment
After sending, update tracking details in Seller Central. This step confirms that the order is fulfilled and prevents late-shipment penalties.
How to Organize Your Amazon Workflow
Running an Amazon business involves managing dozens of moving parts – from researching products and finding suppliers to analyzing prices and creating purchase orders. To stay efficient and profitable, you need a connected Amazon workflow.
Your workflow is the system that links all your daily operations – sourcing, verification, purchasing, and scaling – into one structured process. Without it, tasks become fragmented, errors multiply, and growth stalls. A streamlined workflow with Seller Assistant gives you clarity, consistency, and control, ensuring every decision is backed by accurate, synchronized data.
Tips before building your workflow
Connect every step
Don’t treat research, sourcing, and purchasing as separate tasks. Link them in one system to keep data consistent and avoid manual re-entry.
Automate repetitive tasks
Automation reduces human error, saves hours of manual work, and ensures that all information – from supplier details to ASIN eligibility – stays accurate and up to date.
Use integrated workflow tools
Platforms like Seller Assistant connect every part of your business – research, sourcing, supplier management, and purchasing – into one seamless ecosystem.
Amazon seller workflow in steps
Step 1. Choose what to sell
Start strategically by selecting categories, brands, and products using real sales data – not assumptions.
Tools
Use them to
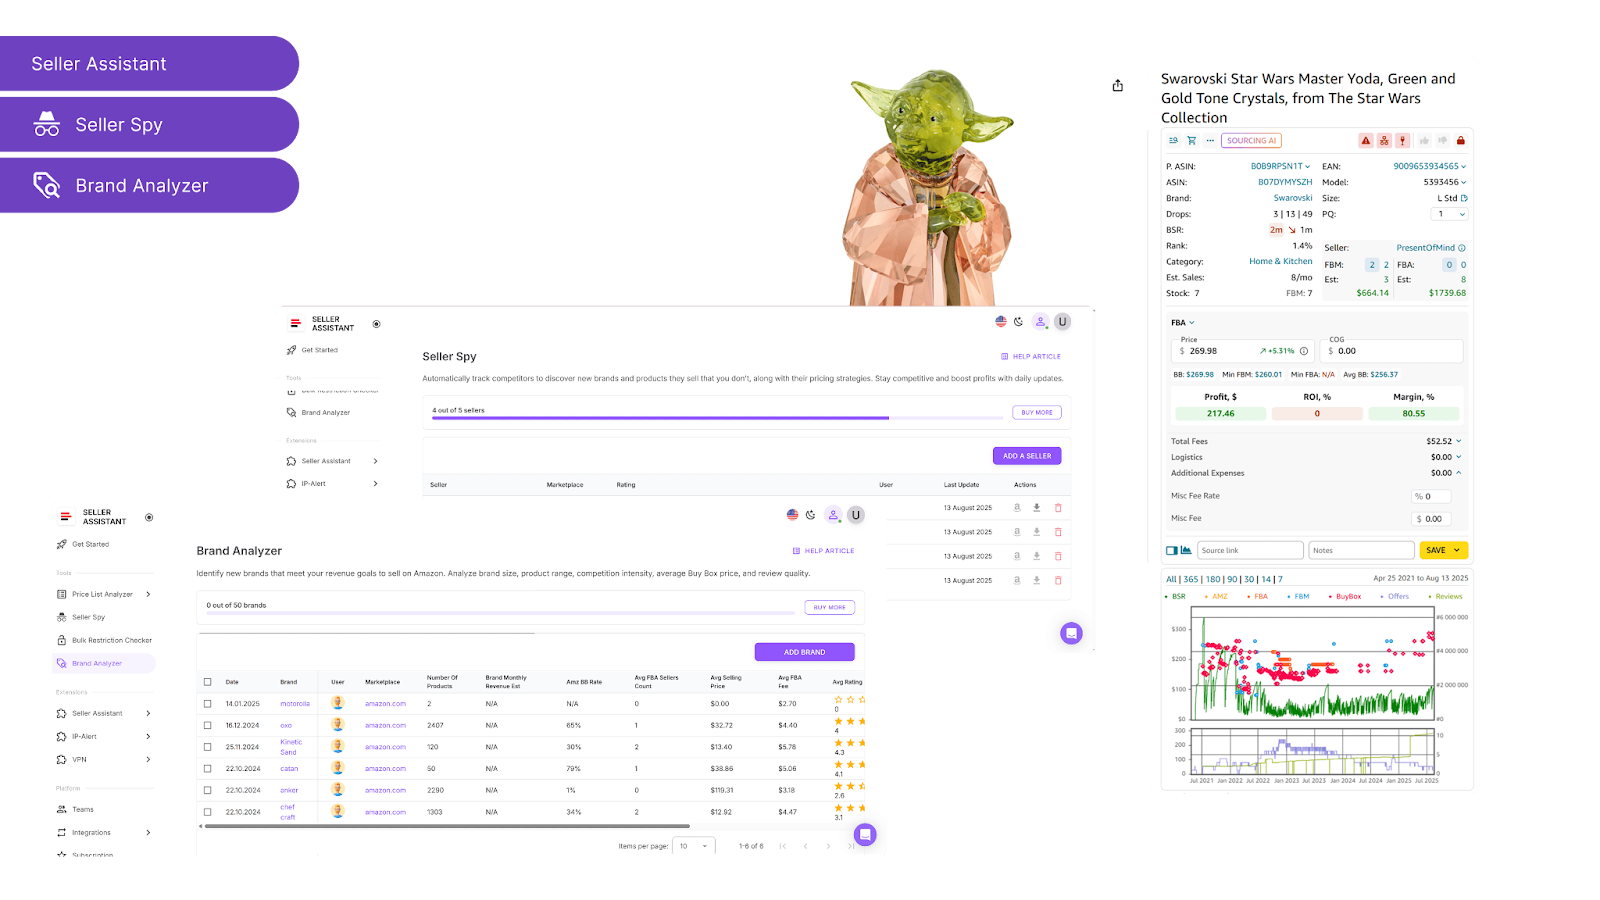
- Storefront Widget
Study competitor storefronts to identify profitable categories and brands.
- Seller Spy
Track which products successful sellers add or remove to discover new brand opportunities.
- Brand Analyzer
Evaluate brands by catalog size, sales potential, competition, Buy Box prices, and customer ratings.
Step 2. Verify selling eligibility
Avoid wasting time analyzing restricted or gated ASINs that you can’t sell.
Tool
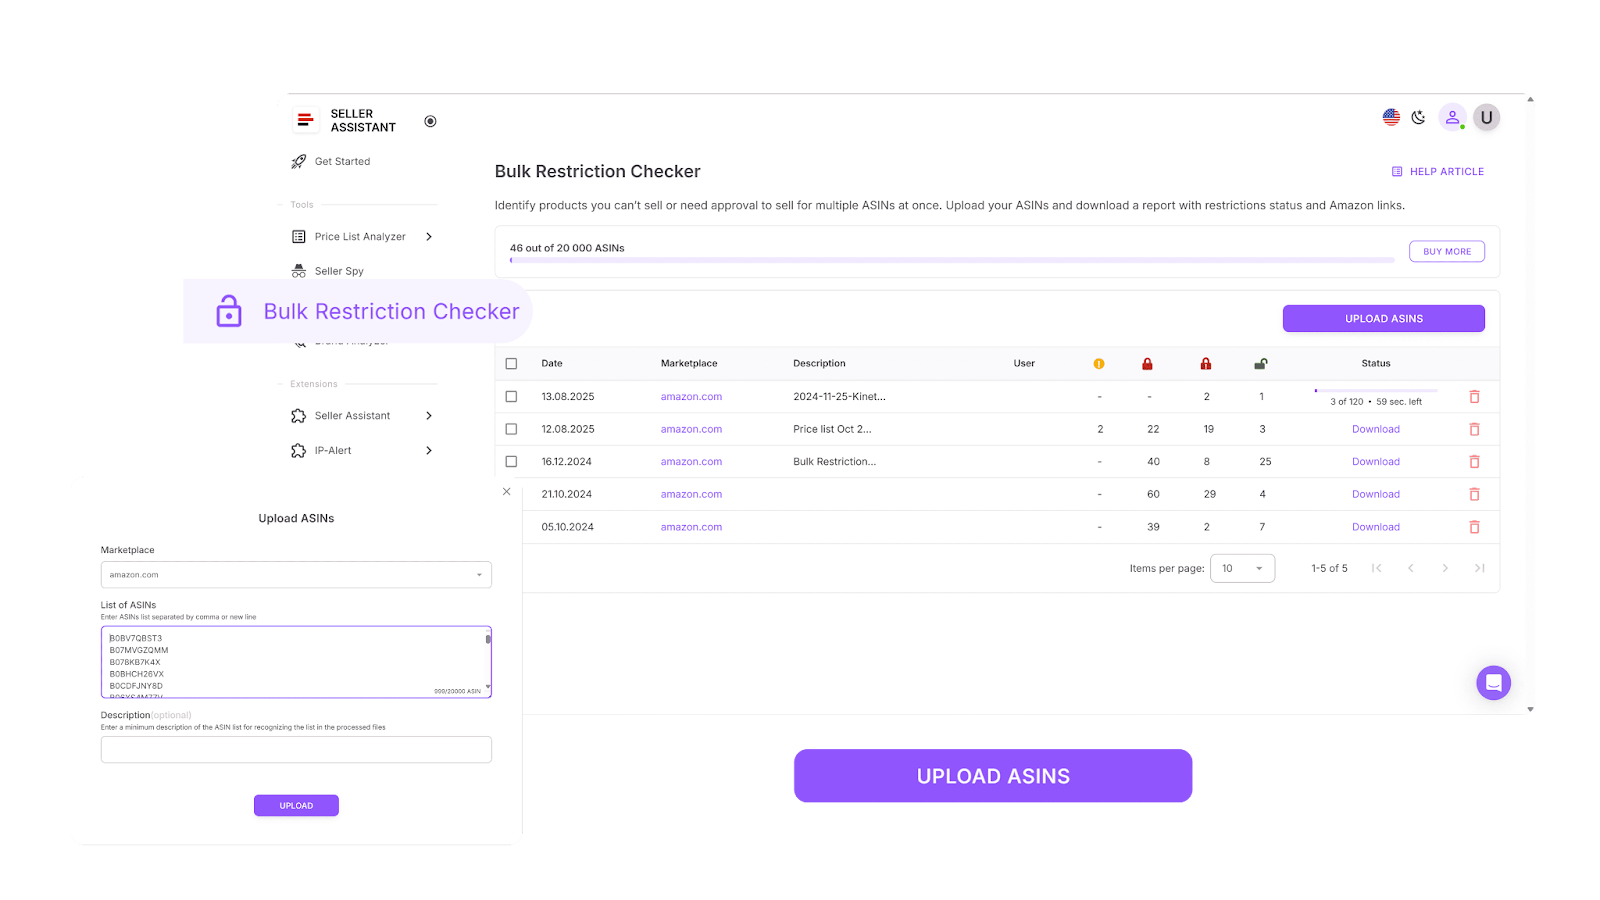
Use it to
Instantly confirm whether products are sellable on your account and spot restrictions before sourcing.
Step 3. Find verified suppliers
Skip endless Google searches – use AI-driven sourcing to locate reliable U.S.-based distributors and wholesalers.
Tool
Use it to
Instantly identify suppliers for specific brands or products using ASINs, UPCs, or brand names.
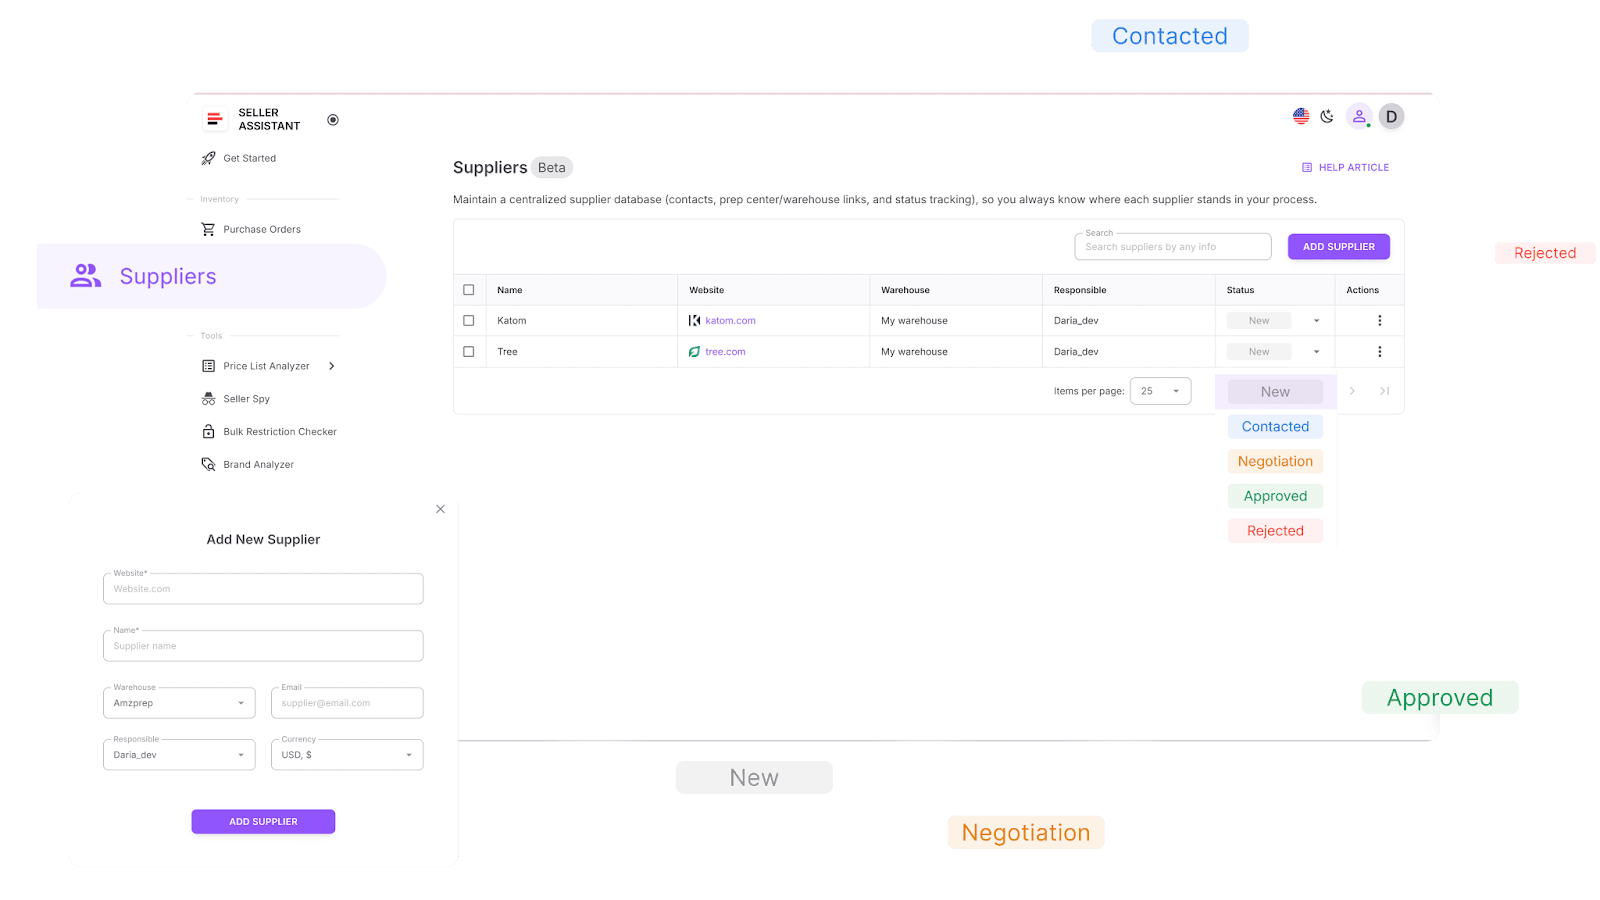
Step 4. Build your supplier database
Keep every supplier detail organized and accessible in one central location.
Tool
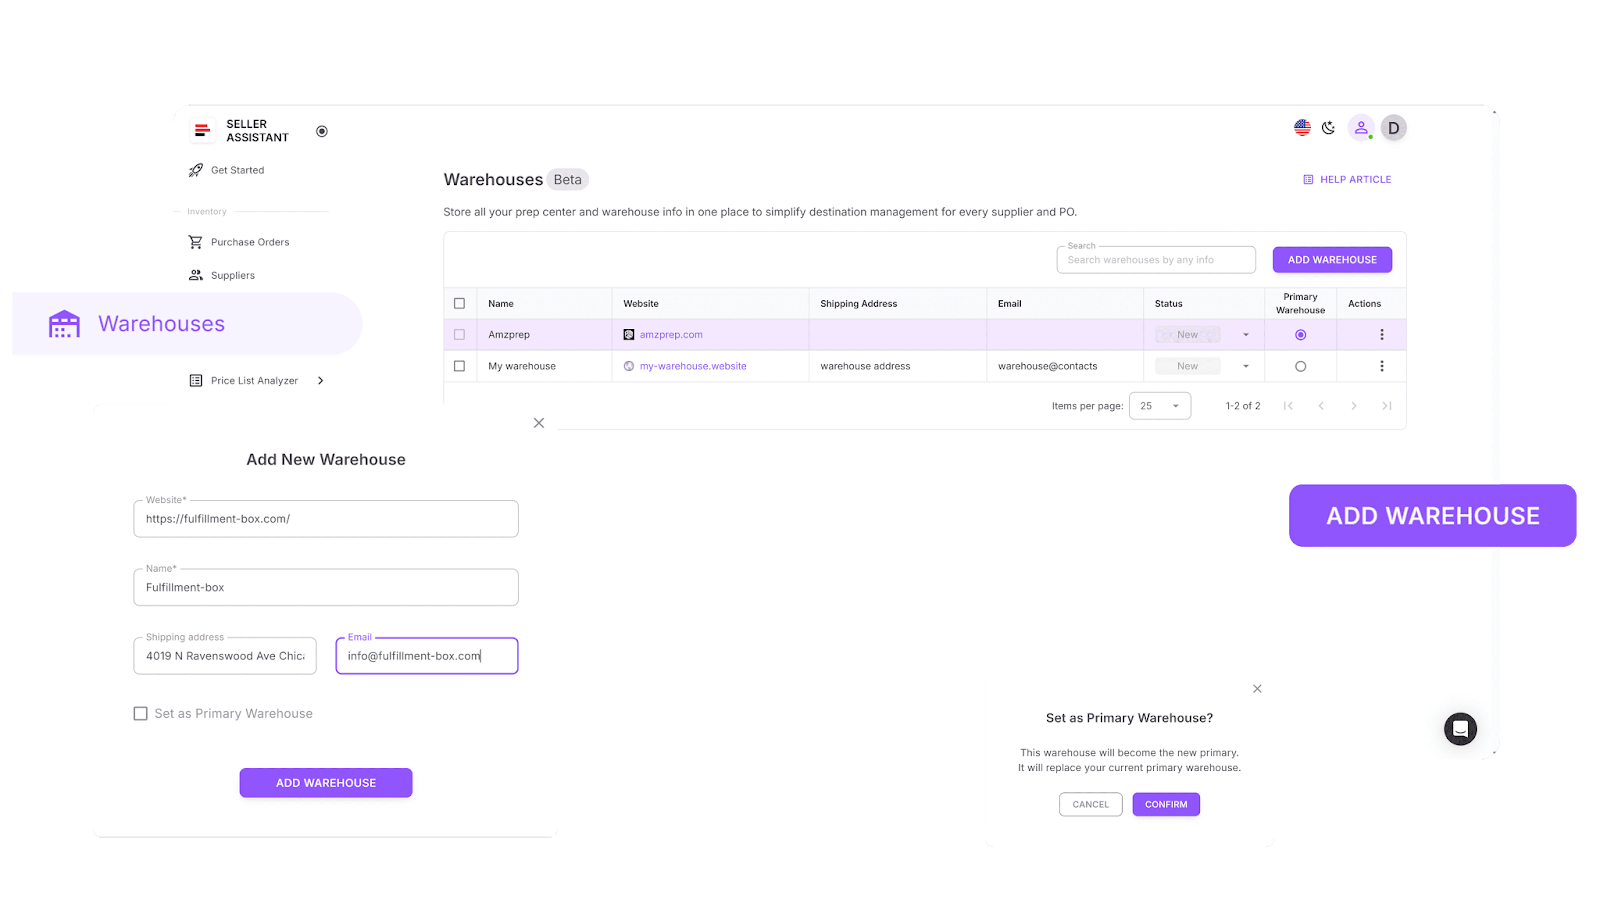
Use it to
Link suppliers to default shipping destinations and sync logistics data across all tools.
Step 6. Analyze supplier price lists
Turn supplier spreadsheets into actionable buy lists in minutes.
Tools
Use them to
Match supplier SKUs to ASINs, view 100+ performance and profit metrics, and shortlist profitable deals.
Verify shortlisted products directly on Amazon or supplier sites to confirm demand, competition, and restrictions.
Step 7. Create purchase orders
Move seamlessly from analysis to sourcing with automation.
Tool
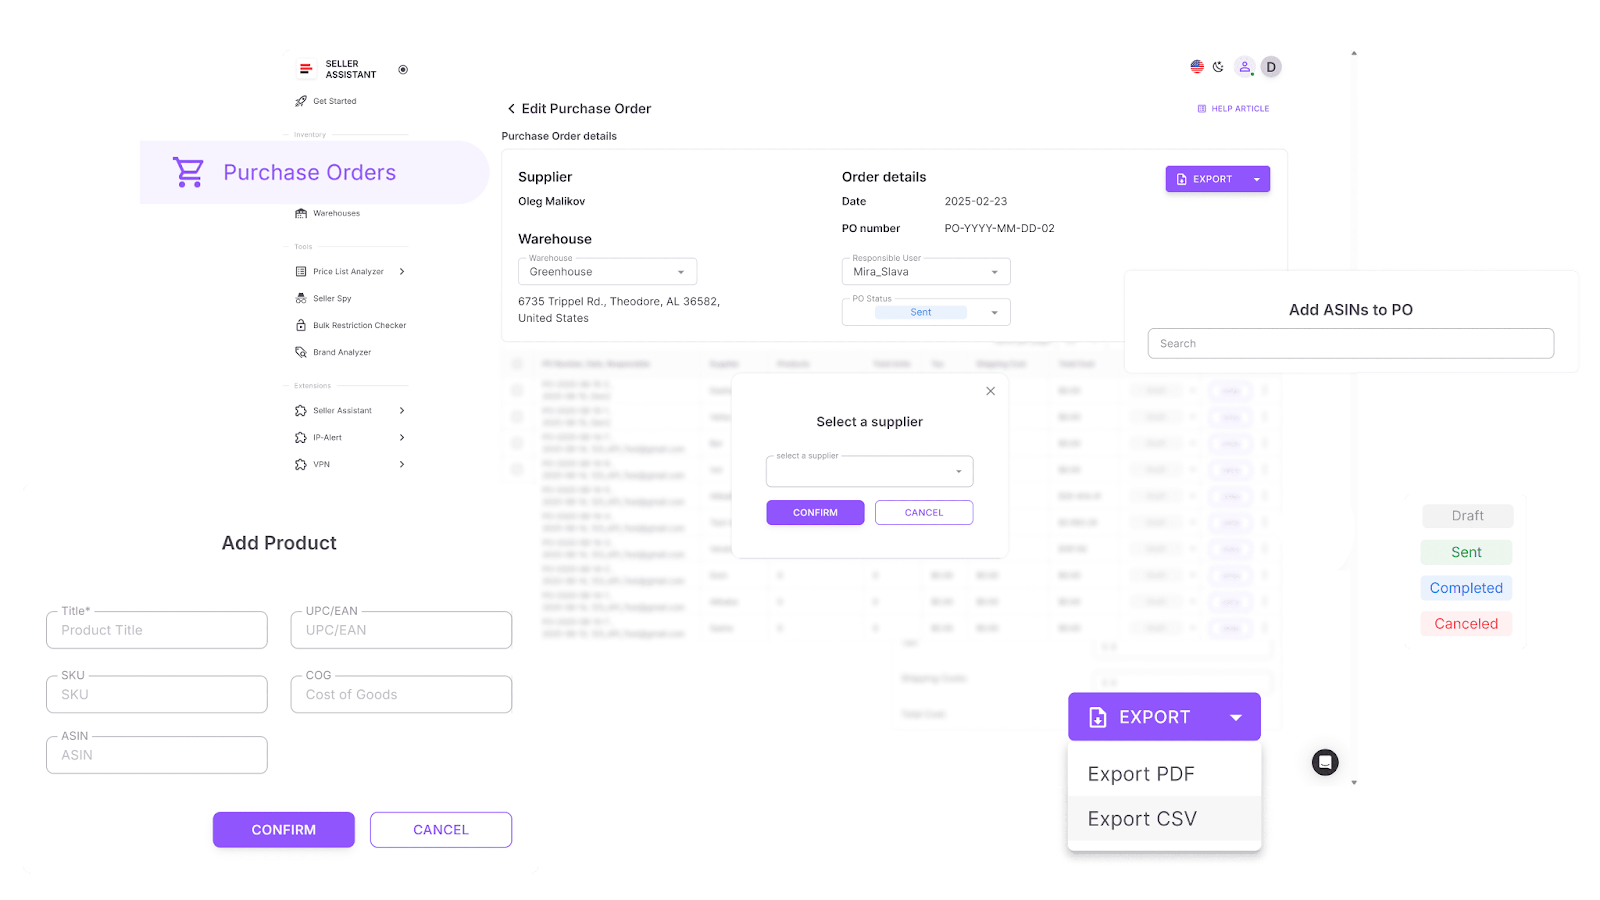
Use it to
Generate and track purchase orders directly from your shortlisted deals, automatically pulling supplier and warehouse data.
Step 9. Scale and stay in control
As your business grows, delegate tasks and automate your workflow.
Tools
Use them to
Assign tasks to team members, automate processes, and keep your workflow efficient and scalable.
FAQ
What do I need to start an Amazon FBA business?
To start, you need an Amazon Seller Central account, a valid ID, a bank account, and a credit card. Once registered, choose a selling plan, pick your business model, and decide what products you’ll sell.
How do I find profitable products to sell on Amazon?
You can either research products manually using tools like Seller Assistant Extension or scan bulk supplier lists with Price List Analyzer. The goal is to find products with strong demand, low risk, and solid profit margins.
How do I find reliable suppliers for my products?
The easiest way is to use Sourcing AI inside Seller Assistant, which automatically finds verified U.S.-based suppliers for your products. It matches ASINs and UPCs to real supplier listings and filters out unreliable sources.
How does Amazon FBA fulfillment work?
With FBA, Amazon stores, packs, ships, and handles customer service for your products in exchange for fees. You simply send your inventory to Amazon’s fulfillment centers through the Send to Amazon workflow.
Why do I need workflow automation for my Amazon business?
Automation connects product research, sourcing, inventory management, and purchasing in one system – eliminating manual errors and saving hours of work. Tools like Seller Assistant let you scale efficiently while keeping every part of your Amazon business organized and profitable.
Final Thoughts
Starting an Amazon FBA business is one of the fastest ways to build a scalable online income – but success doesn’t come from guesswork. It’s about setting up your Seller Central account correctly, choosing the right business model, sourcing profitable products, and managing your operations through a structured workflow.
With the right tools, like Seller Assistant, every step becomes easier and faster. You can research products, verify restrictions, analyze supplier lists, and create purchase orders – all within one connected system.
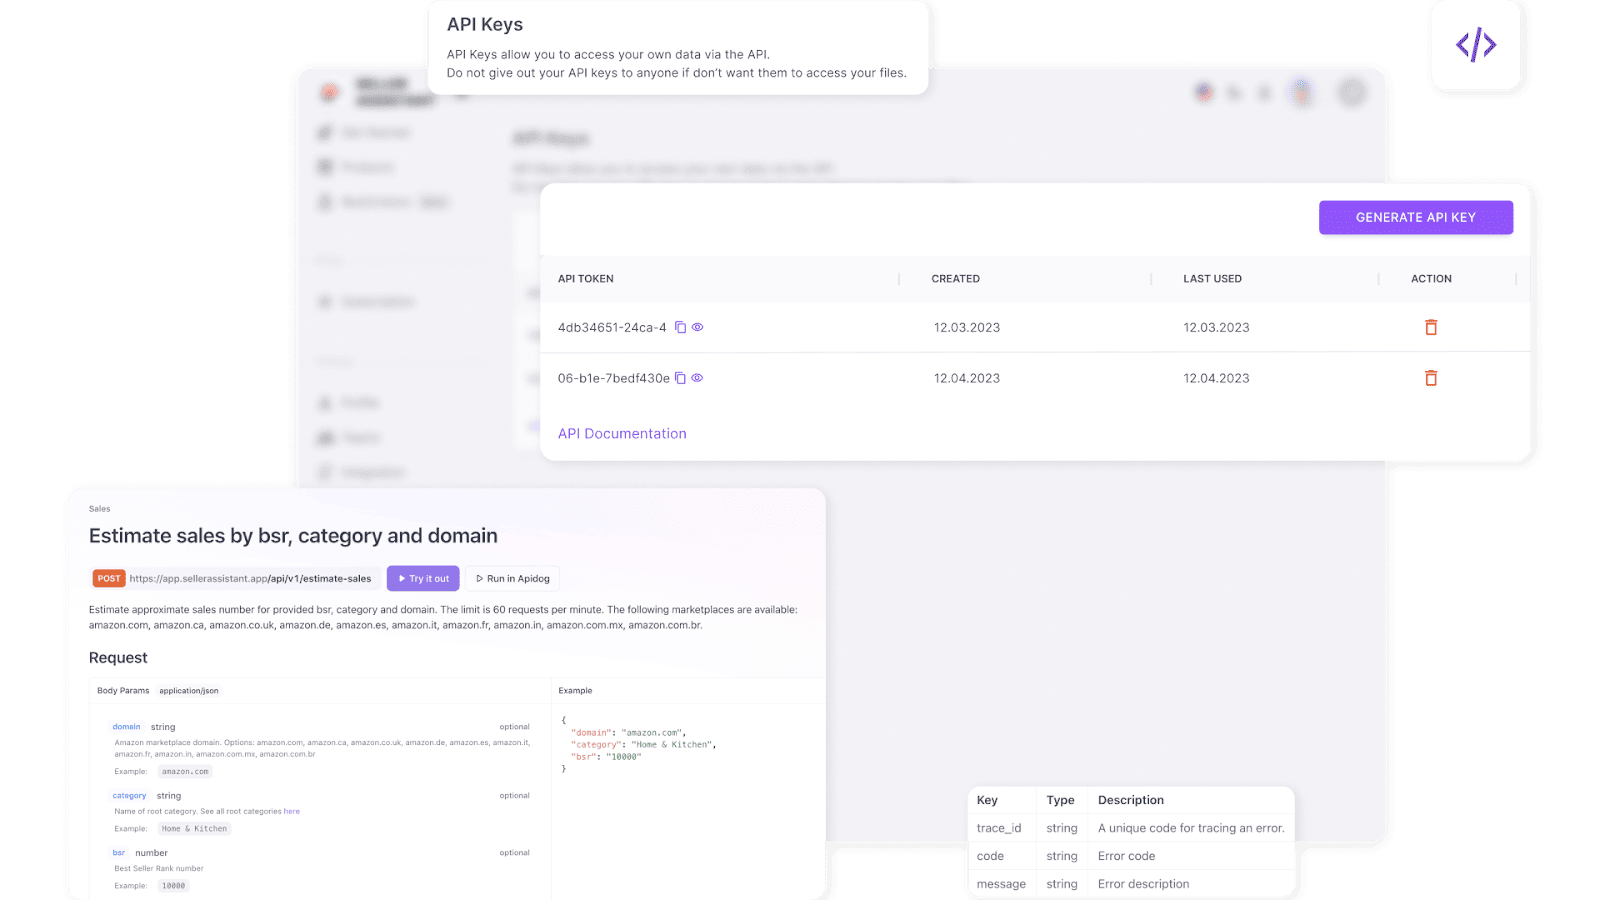
Seller Assistant automates and connects every stage of your Amazon wholesale and arbitrage workflow. It brings together in one platform: workflow management tools – Purchase Orders Module, Supplier Database, Warehouse Database, bulk research & sourcing tools – Price List Analyzer, Bulk Restriction Checker, Sourcing AI, Brand Analyzer, Seller Spy, Chrome extensions – Seller Assistant Browser Extension, IP-Alert Extension, and built-in VPN by Seller Assistant, and integrations & team access features – seamless API connectivity, integrations with Zapier, Airtable, and Make, and Virtual Assistant Accounts.