As an Amazon seller, a big part of success requires a deep understanding of the seller tools available to you. At the heart of those tools is Amazon Seller Central. It allows sellers to add inventory, manage orders, and improve selling skills.
But how to set up your Seller Central? Are there basic steps to follow? What exactly do you need to start selling and follow up on your sales and profits?
This post will explore Amazon Seller Central basics, what you can do with it, and how to use it.
Related: How to Sell on Amazon for Beginners - Complete Guide
How to List Products on Amazon - Complete Guide
What Is Amazon Seller Central?
Amazon Seller Central is a web-based dashboard that lets sellers manage their Amazon business. When you start selling on Amazon, you must register as a seller. To do so, you need to create an Amazon seller account. On Amazon, this account is called Seller Central account.
Amazon Seller Central offers sellers a range of tools and services, including inventory management, order fulfillment, payment processing, and customer service.
With Amazon Seller Central, you can sell your products on Amazon’s marketplace and reach millions of customers worldwide.
What Can You Do in Amazon Seller Central?
Amazon Seller Central is the central hub for running a business on Amazon as a third-party seller. It’s an all-in-one dashboard where you can manage pretty much everything related to your Amazon sales.
When you open your Amazon Seller Central, and click the three lines for the hamburger menu icon in the top left corner of the page, you will get to a navigation menu.
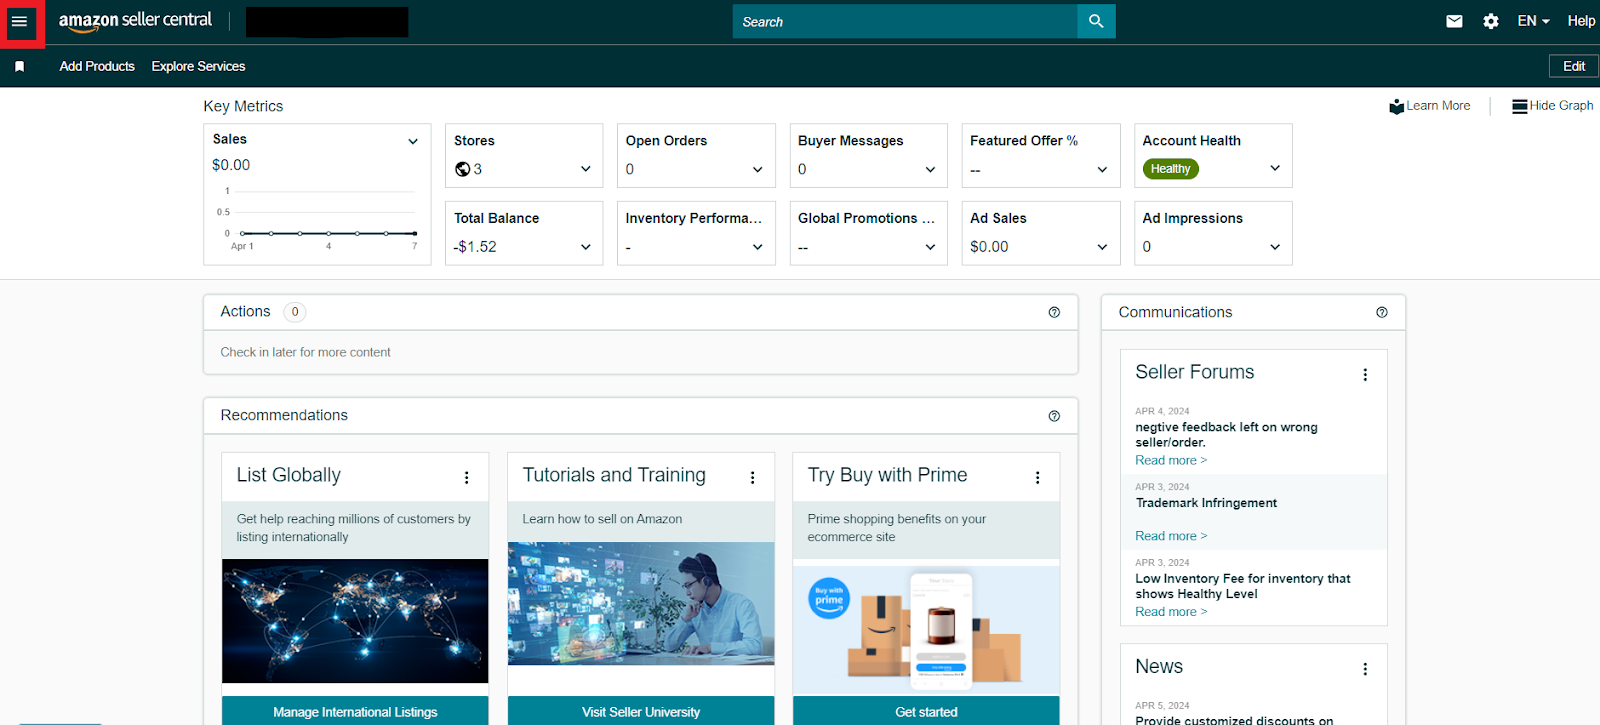
When you open your Amazon Seller Central, and click the three lines for the hamburger menu icon in the top left corner of the page, that will open a navigation menu
In this menu, you will see all the main things you can do in your Seller Central.
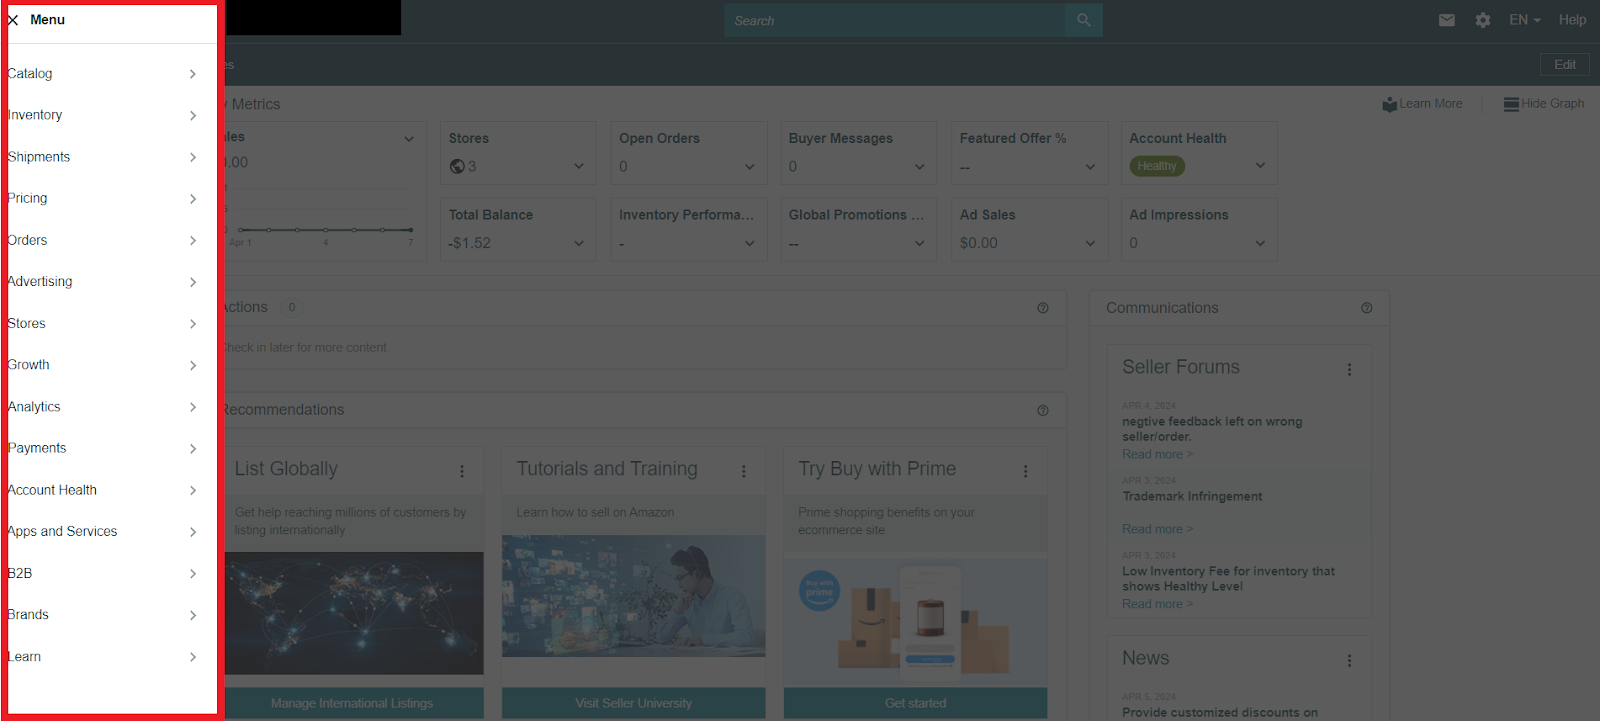
In this menu, you will see all the main things you can do in your Seller Central
Rundown of what you can do in Seller Central
Amazon Seller Central organizes your business into various sections for efficient management. Let’s explore what you can do in each.
Catalog
This section is the foundation of your store. Here you can add new products with descriptions, images, and variations, and improve your product listings.
Inventory
Here you can keep track of your stock levels and manage them effectively. You can manage your FBA and FBM inventory, and sell globally. You can see how much of each product you have available, and view and update your inventory status and prices.
Shipments
In this section, you can manage how your products get to customers. You can create FBA shipments to end your inventory at Amazon fulfillment centers. You can also track shipments to monitor the progress of your order delivery to Amazon and customers.
Pricing
Here you can review your pricing health and recommended prices, and adjust or automate product prices.
Orders
In Orders, you can view and manage orders, view order reports, upload order-related files, and manage customer returns.
Advertising
Here you can promote your products and reach a wider audience. You can use Campaign Manager to create and manage PPC (pay-per-click) campaigns, A+ Content Manager, and enroll in the Amazon Vine program to get customer reviews. You can also create deals, coupons, Prime exclusive discounts, and promotions.
Stores
Stores lets you create a custom-branded storefront to showcase your products.
Growth
This section offers tools and resources to help grow your business. You can find Amazon product recommendations and 50 opportunities in all opportunity types ranked by impact, explore programs to increase your sales, and review a personalized list of your products having demand in other international marketplaces.
Related: How To Sell On Amazon From Alibaba: The Ultimate Guide
Amazon vs. Etsy: What’s the Best Option for You?
Selling on Amazon vs. eBay: Which Is Better
Analytics
Here you gain valuable insights into your business performance. You can access Amazon Selling Coach and various types of reports, including business, fulfillment, advertising, return, and inventory reports. You can also use the tax document library.
Payments
In this important section, you can view your earnings and manage your account balance. Here you can access the Payments Dashboard, request payment reports, and use a currency converter.
Account Health
This section allows you to maintain a good standing with Amazon. You can access the Account Health Dashboard and Account Health Rating, and monitor your performance metrics to ensure your account meets Amazon’s selling requirements. You can also resolve any policy violations and address any issues that could potentially restrict your selling privileges. You can access Feedback Manager, A-to-z guarantee, and chargeback claims.
Related: Amazon Account Health: A Guide for FBA Sellers
What is Amazon Seller Account Health Rating?
How to Handle Negative Reviews on Amazon
Building Reputation for Amazon Store - Everything Sellers Need to Know
Apps and Services
Here, you can extend the functionalities of Seller Central with third-party integrations. You can access the Selling Partner Appstore, manage your apps, and explore services.
B2B
If you sell to businesses, this section offers tools to manage your B2B operations. Here you can access B2B Central, product opportunities, manage quotes, create and edit your business profile, and add minority-owned, veteran-owned, or women-owned business certifications. You can add business prices and quantity discounts, and case pack product opportunities.
Brands
Here brand owners registered under the Amazon Brand Registry get access to the Build Your Brand page. That helps create and develop your own brand. Here you can also enroll in the Amazon Brand Registry.
Learn
With Learn, you can access Amazon’s resources and educational materials to become a pro seller. In this section, you can use Seller University, forums, and read the latest news.
How to Start Selling with Amazon Seller Central?
To start selling with Amazon Seller Central, you must follow a number of essential steps. It’s important to understand them to have a clear picture of how the selling process works on Amazon. Here’s a roadmap to get you started selling on Amazon through Seller Central.
Steps to selling with Amazon Seller Central
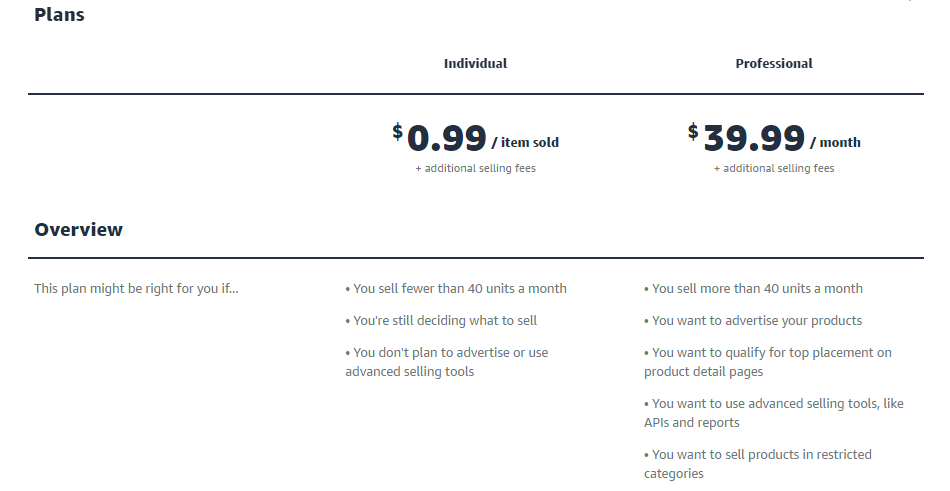
Step 1. Choose your selling plan
- Individual Plan ($0.99 per item sold) is ideal for casual sellers with a limited number of products;
- Professional Plan ($39.99 per month) is suitable for serious sellers with a higher sales volume. It unlocks features like bulk product uploads and advanced advertising tools.
Step 2. Create your Seller Central Account
- Head to https://sell.amazon.com/ and click “Create your Amazon seller account;”
- Provide your business information, tax information, and banking details;
- Choose your selling plan and complete the registration process.
Step 3. Research and source products
- Identify profitable products that align with your interests and budget. Consider using product sourcing tools like Seller Assistant to research product demand and competition;
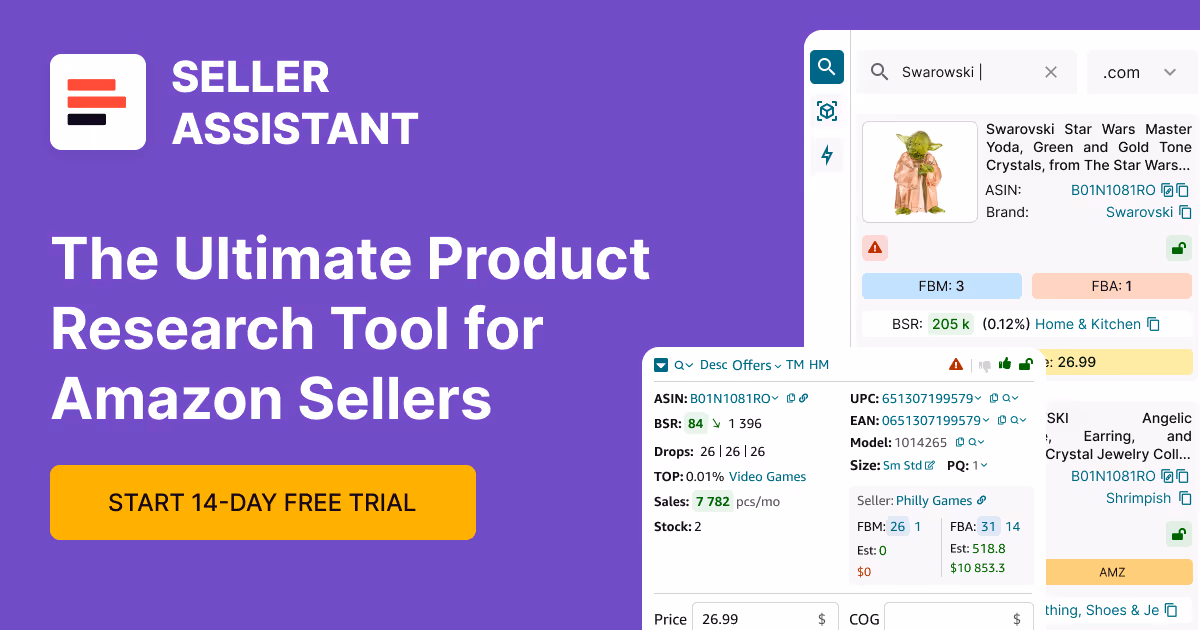
Note. Seller Assistant is a comprehensive product-sourcing software that helps Amazon sellers quickly find high-profit deals. It combines three extensions: Seller Assistant Browser Extension, and IP-Alert Chrome Extension by Seller Assistant, and VPN by Seller Assistant, Amazon seller tools: Price List Analyzer, Brand Analyzer, Seller Spy, Bulk Restrictions Checker, and API integrations, and features: Storefront Widget, Side Panel View, FBM&FBA Profit Calculator, Quick View, ASIN Grabber, UPC/EAN to ASIN converter, Stock Checker, IP Alert, and Restrictions Checker.
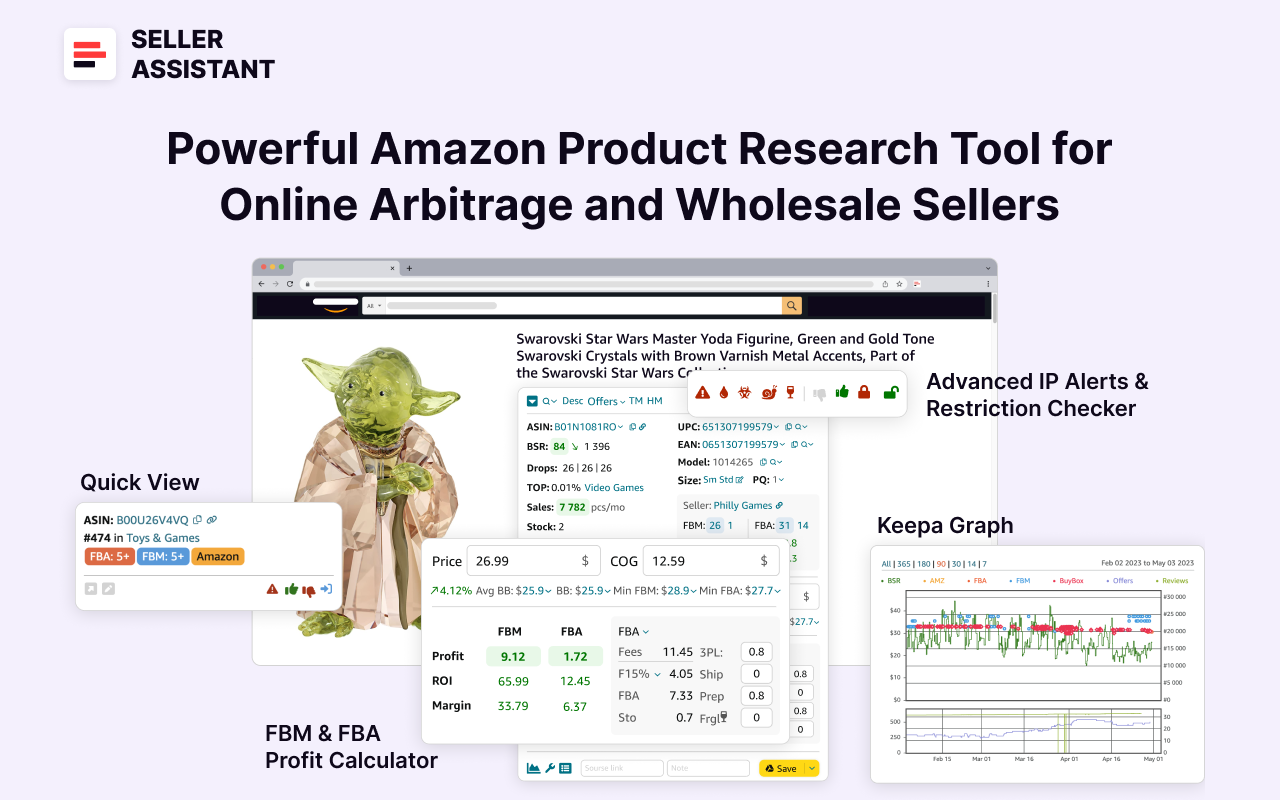
Seller Assistant Powerful Amazon Product Research Tool for Online Arbitrage and Wholesale Sellers
- Source your products from reliable suppliers. You can buy online or retail arbitrage products, wholesale, or dropship. You can also create your own brand with a private label.
Step 4. List your products on Amazon
- If you sell a product that already exists on the Amazon catalog, find the matching losing and add your offer;
- If you sell a product that doesn’t exist on the Amazon catalog, create a new listing, write compelling product titles and descriptions, use high-quality product images, and optimize your listings with relevant keywords to improve product search ranking.
Step 5. Set your inventory and pricing
- Determine your storage needs. If you choose FBA (Fulfillment by Amazon), you’ll need to ship your inventory to Amazon fulfillment centers;
- Set competitive prices considering product costs, shipping fees, and Amazon’s selling fees.
Step 6. Launch your products
Once your listings are complete and your inventory is in place, activate your listings and make them live on Amazon.
Step 7. Get money and repeat
When you see that your inventory will soon be sold out, timely order new products to avoid stock-out.
Related: Amazon Business Models: How to Choose the Right One?
Seller Assistant Extension Review
Seller Assistant — the Ultimate Tool for Amazon Online Arbitrage
How to Create an Amazon Seller Central Account?
To start selling on Amazon, you must create an Amazon Seller Central account. Below is a short step-by-step guide on how to do it.
Creating an account in Amazon Seller Central step-by-step
Step 1. Prepare your business and personal details
Step 2. Select an Individual or Professional selling plan
- Choose an Individual plan if you want to sell single products occasionally. You will be charged $0.99 for every unit you sell. This plan is viable for you if you’re going to sell less than 40 products per month.
- A Professional plan is a perfect opportunity if you sell many products monthly. With a Professional plan, you’ll pay $39.99 per month. A Professional account will save you money if you plan to sell more than 40 products monthly. In addition, the Professional plan gives you access to many marketing and reporting tools. You can qualify for the Buy Box, enroll in different seller programs, and more.
Amazon selling plans
Step 3. Open the ‘Start selling with Amazon’ sign-in page.some text
- If you want to register for a Professional plan, click the Sign-up button.
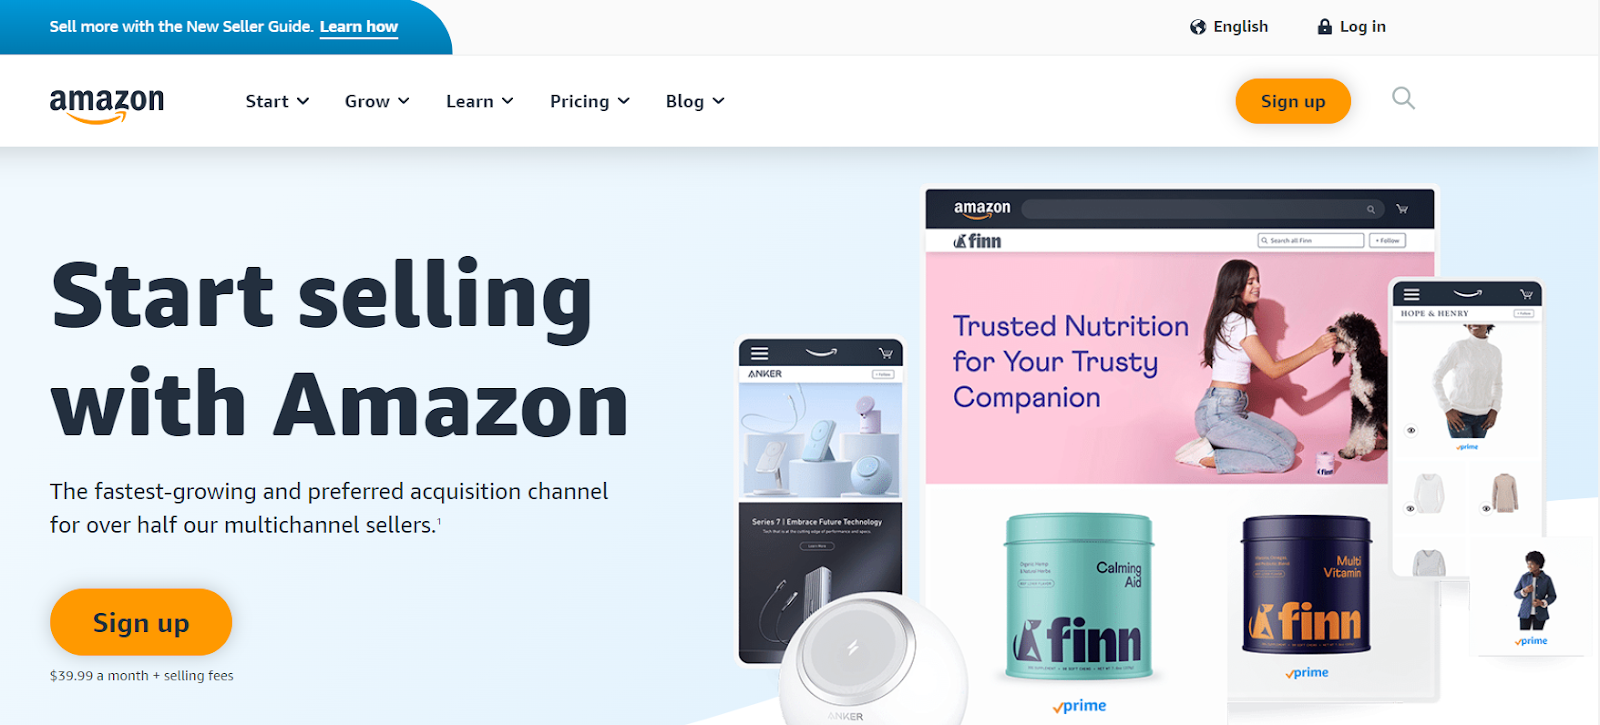
‘Start selling with Amazon’ sign-in page
- If you want to register for an Individual plan, scroll down the page and click “Sign up to become an individual seller.”
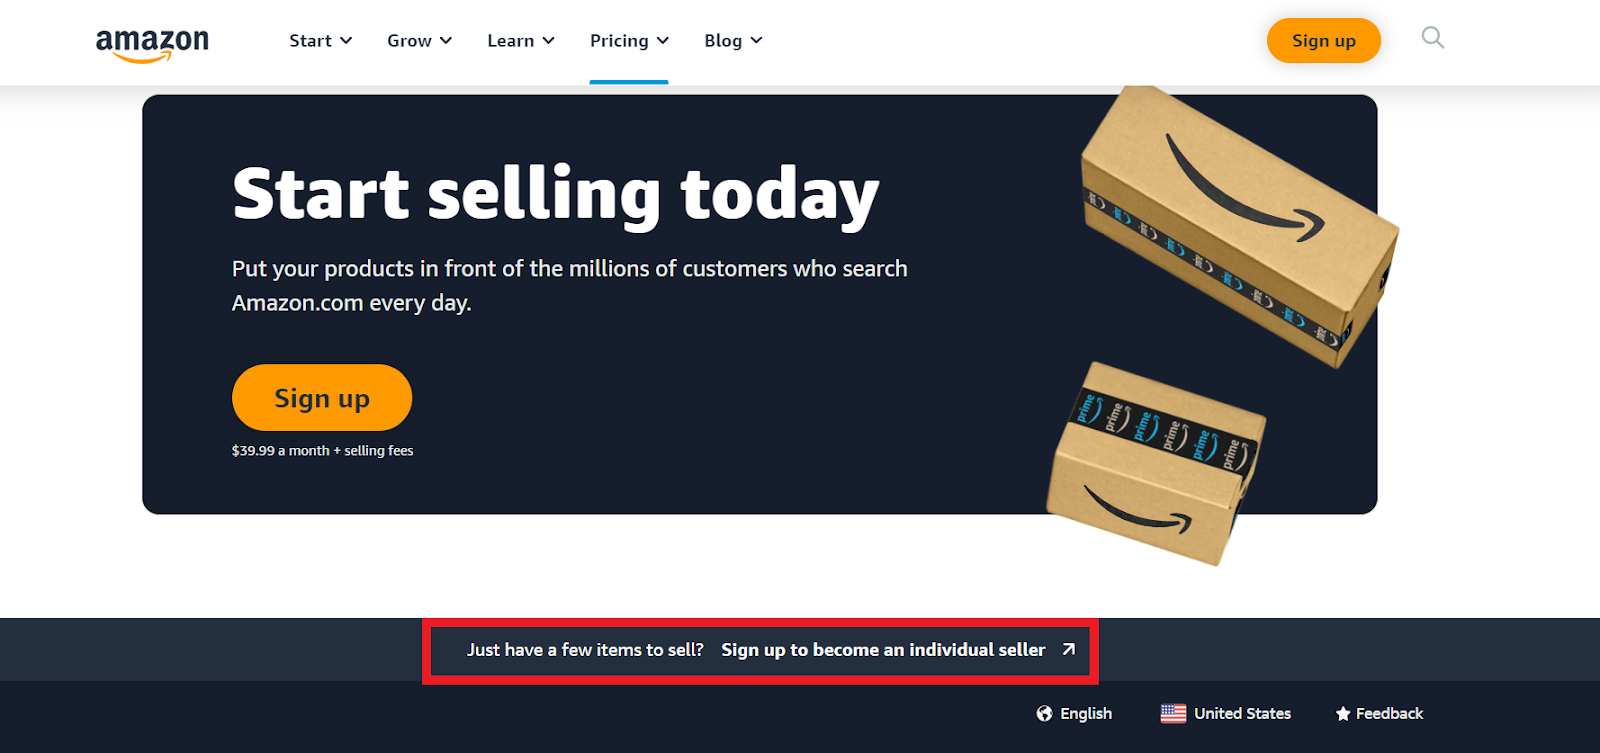
If you want to register for an Individual plan, scroll down the page and click “Sign up to become an individual seller”
Step 4. Enter your e-mail address and password
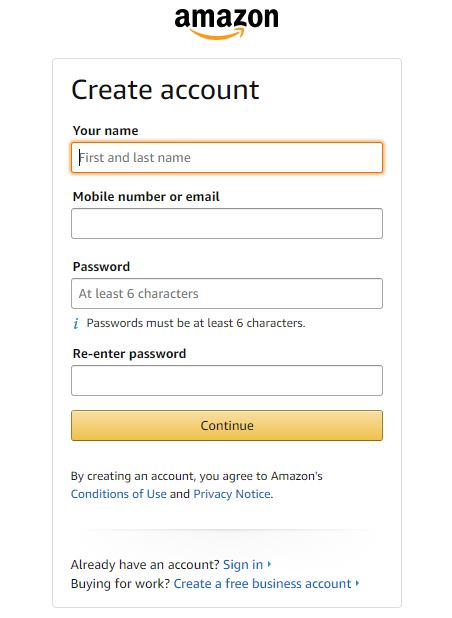
Amazon sign-up page
Step 5. Add your business location and business type
Step 6. Enter your personal and business details
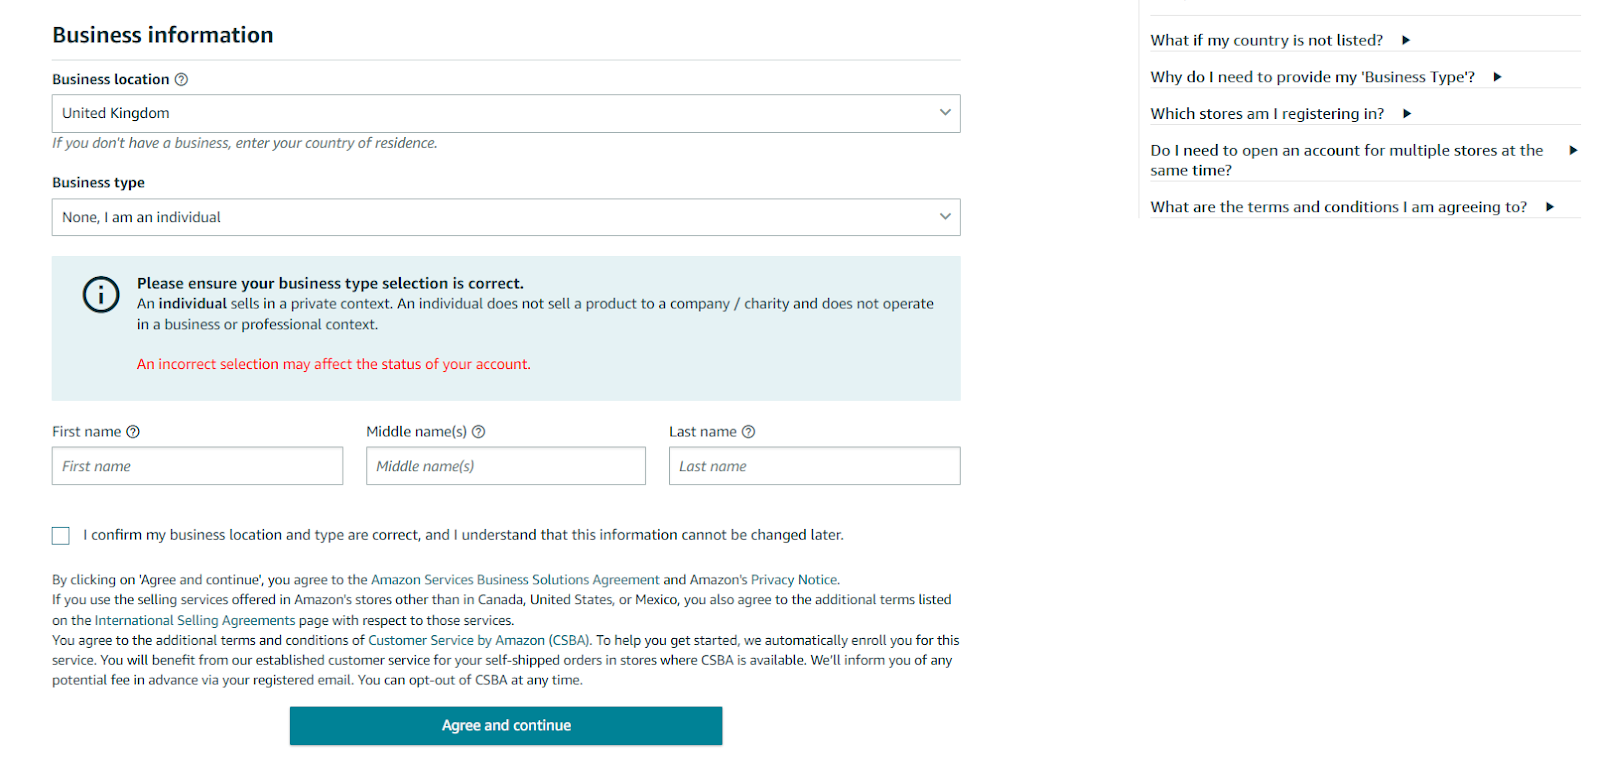
Enter your personal and business details
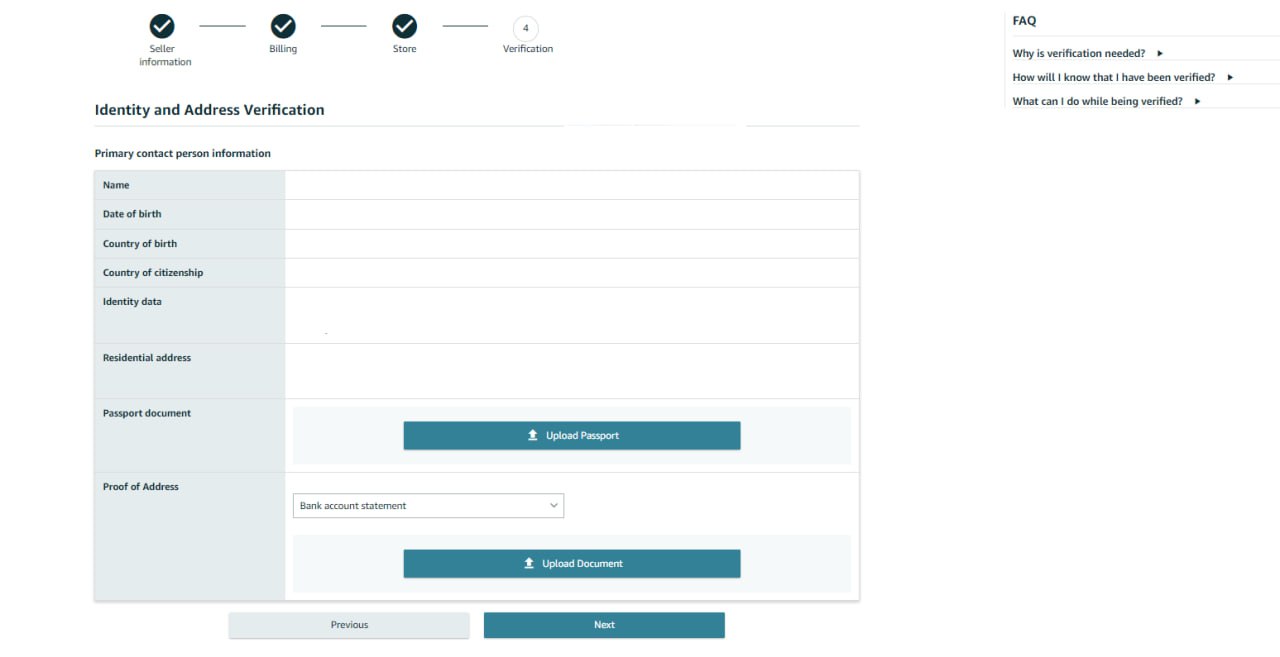
Step 7. Fill in and verify primary contact person information

Primary contact person information page
Step 8. Enter your payment method.
Step 9. Submit your Amazon store’s name.
Step 10. Verify your identity.
Verify your identity
Step 11. Amazon will ask you to schedule a video call with an Amazon associate to complete the verification to confirm the data you entered. Wait until Amazon approves your account.
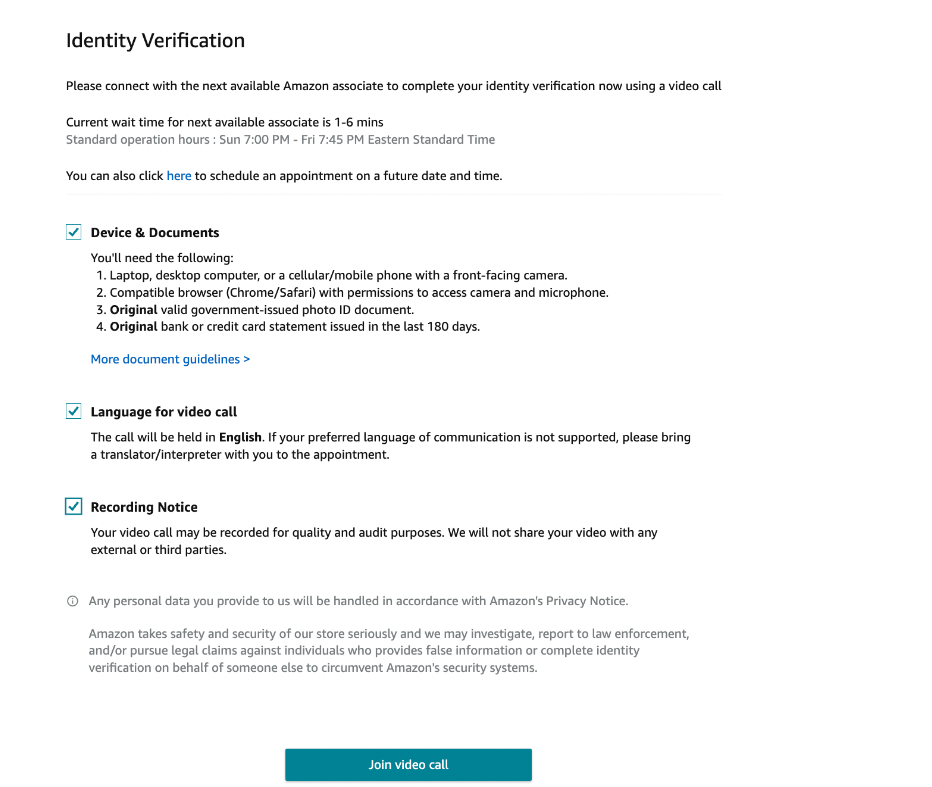
Identity Verification page
Related: How to Create an Amazon Seller Central Account
How to Sell on Amazon as an Individual Seller - Complete Guide
How to Find Products for Amazon?
One of the challenging tasks of FBA sellers is to find profitable deals for Amazon FBA. To do so, you must conduct product research. You can do that effectively with Seller Assistant — a popular product sourcing platform that helps find profitable products to sell on Amazon.
Here’s what products to look for and how with Seller Assistant.
High-demand products
Identify trendy products currently in high demand and popular but have less competition. To do this, check the Best Sellers Rank (BSR), Buy Box offer, competition, and potential sales figures using the Seller Assistant. These figures are displayed on the Amazon product and search pages for easy estimation.
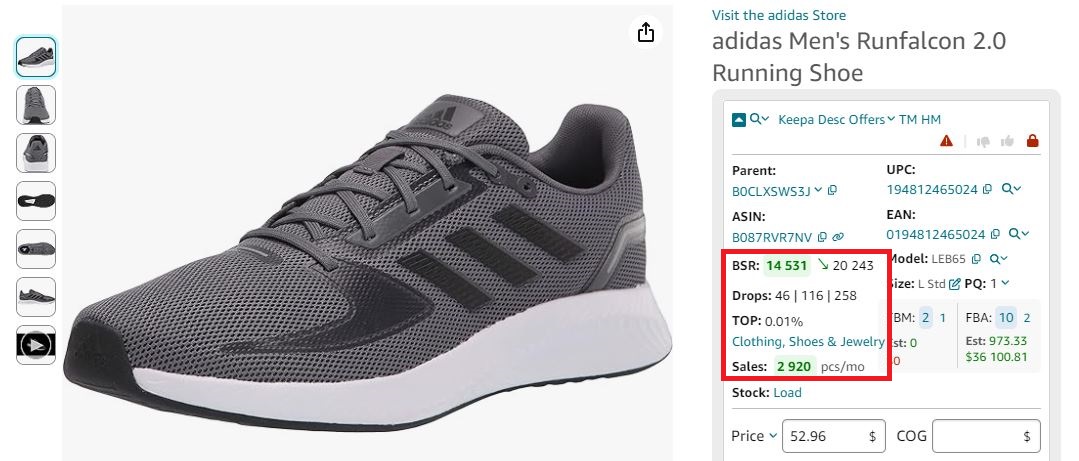
Seller Assistant shows BSR, trend. drops, and monthly product sales in units
The BSR must be low (below 100,000). Buy Box prices shouldn’t go up and down all the time to avoid intense competition. The Buy Box’s current selling price must give you enough profit margin.
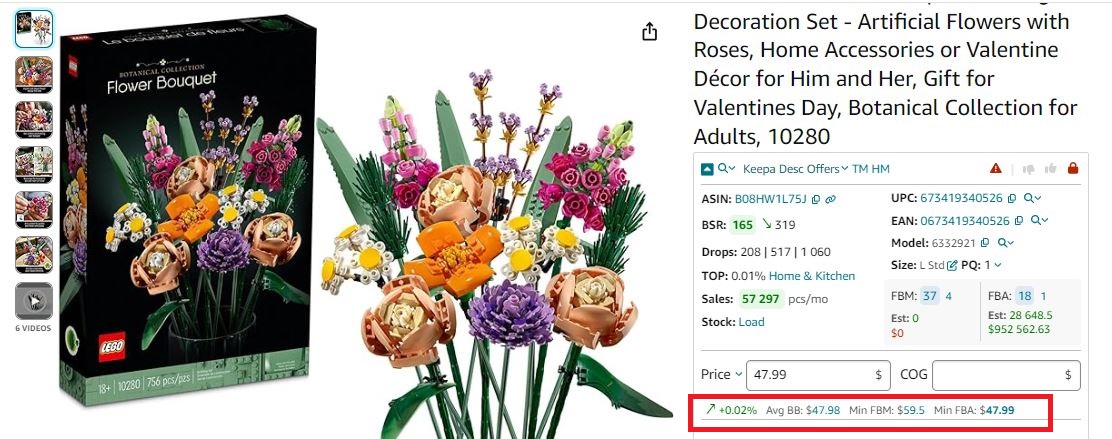
Seller Assistant shows the average Buy Box price (Avg BB), and if it goes up or down compared to a 90-day price (green arrow up or red arrow down). It also shows the lowest FBA (Min FBA) and lowest FBM (Min FBM) prices.
The FBA seller count must range from 3 to 15 so that the product is not too competitive.
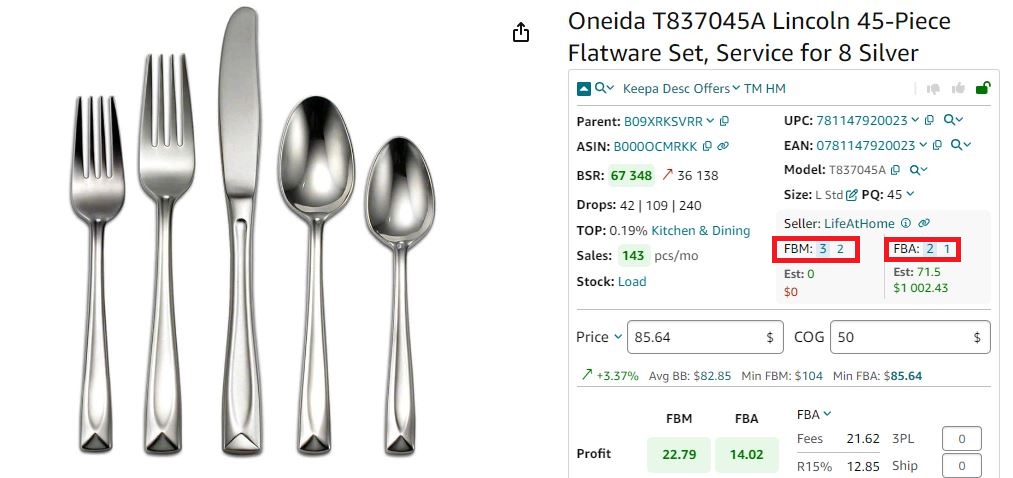
Seller Assistant shows the number of FBA and FBM offers
Ensure profit
To ensure a good profit margin, focus on items that can be sold for a higher price than you paid for them. Use the FBM&FBA profit calculator in the Seller Assistant to determine the product profit, margin, and ROI. A product with an ROI of over 10% is suitable for selling.
Related: The Most Important Amazon Seller Metrics for FBA Businesses
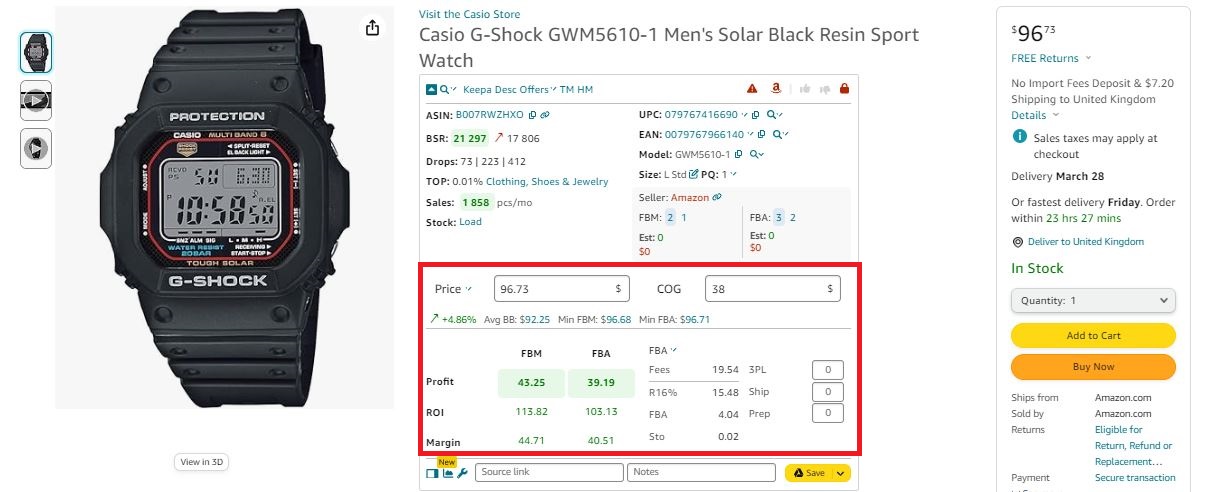
Seller Assistant’s FBM&FBA profit calculator displays product profit, margin, and ROI.
Avoid IP complaints
Avoid selling products that have intellectual property or other complaints, which can lead to issues and financial losses. Check for IP complaints about the product and its type using the IP Alert feature in the Seller Assistant. A red triangle icon indicates an IP complaint and a red lock icon indicates a restriction.
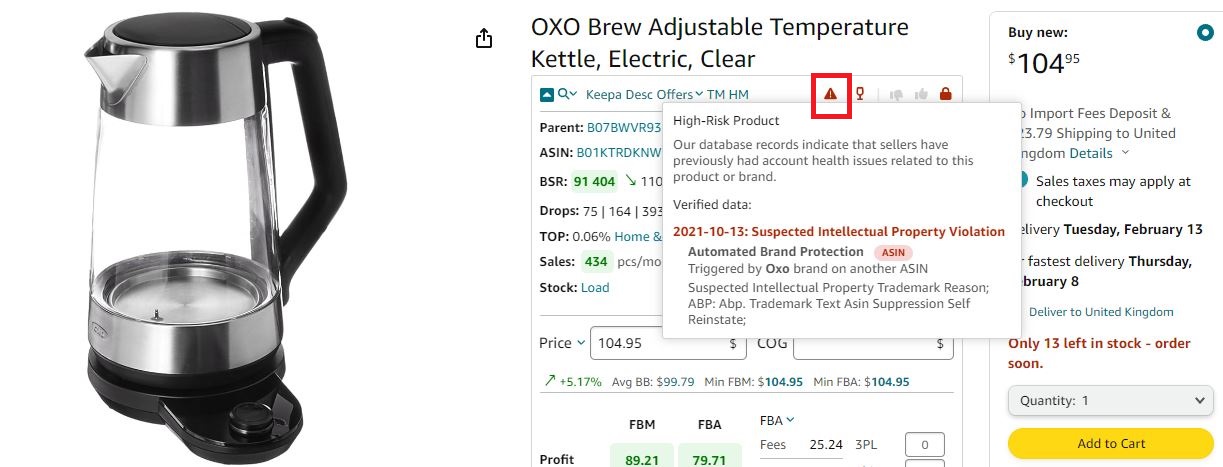
Seller Assistant’s advanced IP Alert feature shows the red triangle icon if a product has IP complaints and explains why
Related: What Products to Avoid Selling on Amazon?
Stick to easy-to-sell products
Choose easy-to-sell products in high demand and simple to ship without special requirements such as oversize or meltable goods. Seller Assistant’s alerts marked by corresponding icons provide information on such products.
Note. Seller Assistant is an Amazon Trusted Partner. You can find Seller Assistant in Amazon’s Selling Partners Appstore.
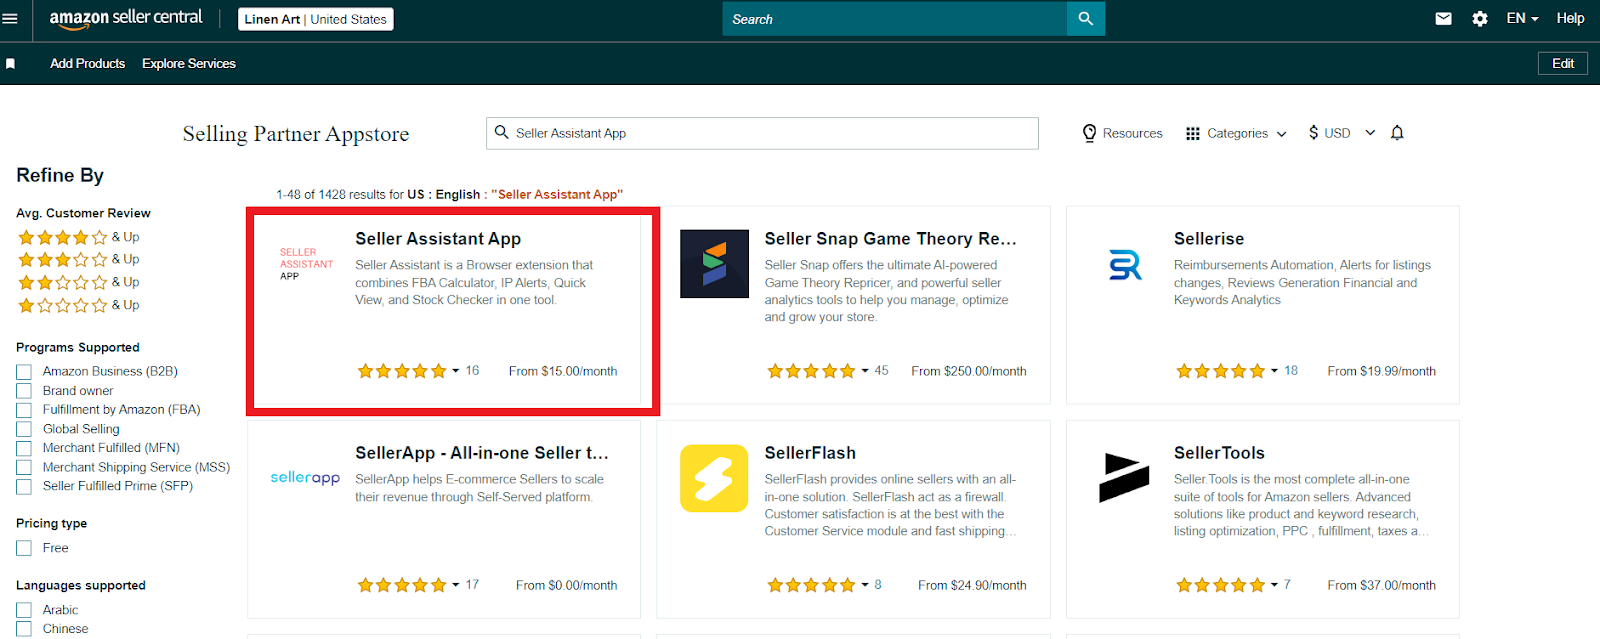
You can find Seller Assistant in the Amazon’s Selling Partners Appstore
How to Add Products to Seller Central?
There are two types of products on Amazon — those that already exist in the Amazon catalog and those that don’t exist on Amazon. You must list these types of products in different ways.
Listing existing Amazon products
Existing products are added to the listings already created on Amazon. If you resell other brands through online arbitrage, retail arbitrage, wholesale, or dropshipping, your products likely already exist on Amazon. According to Amazon rules, you can’t create duplicate listings of the same product. Your offer must be added to the same listing alongside other sellers’ offers.
Related: How to Add a Variation to an Existing Amazon Listing
Listing existing products step-by-step
Step 1. Go to your Seller Central account. In the side navigation menu, select Catalog > Add Products.’
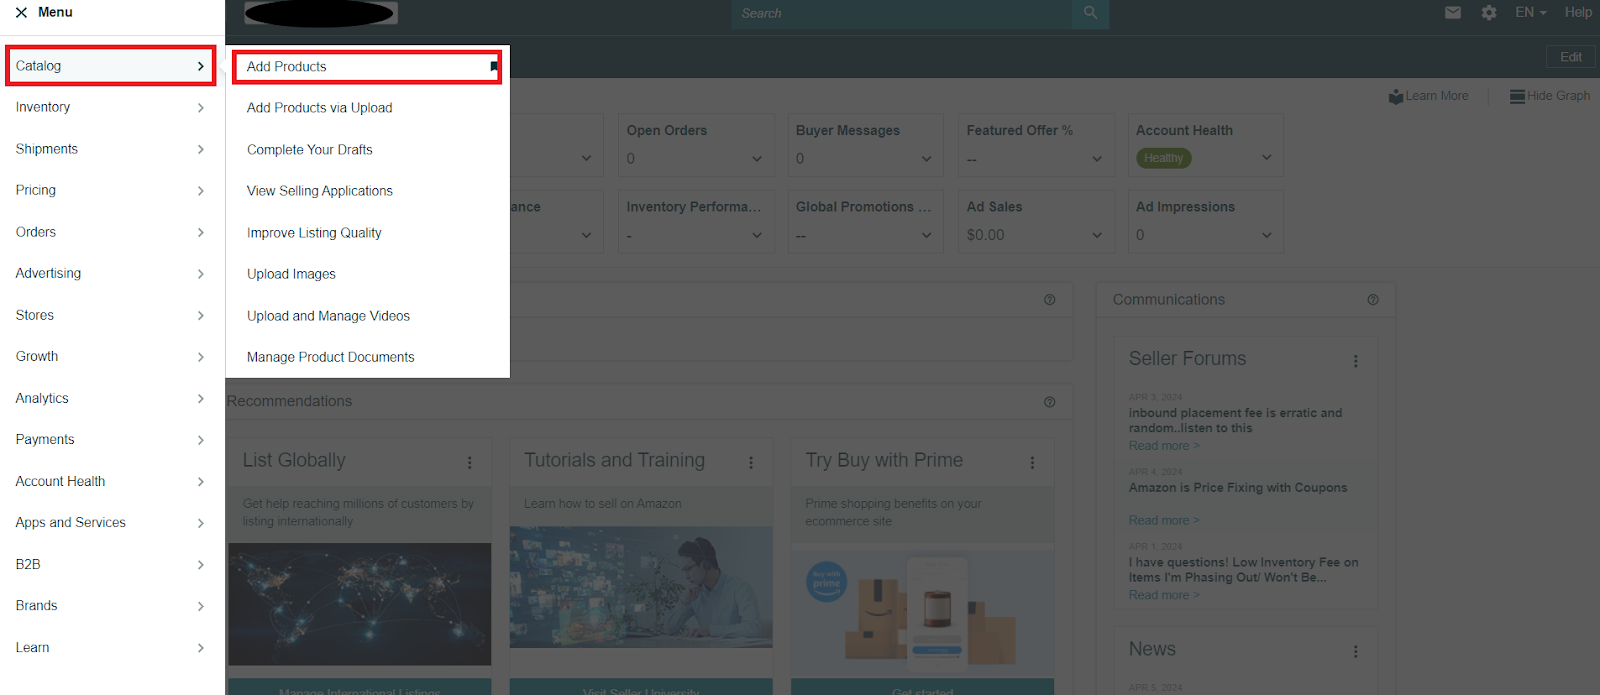
Go to your Seller Central account. In the menu, select Catalog > Add Products.’
Step 2. In the search bar under ‘Find your products in Amazon’s catalog,’ find your product by title, description, or keywords.
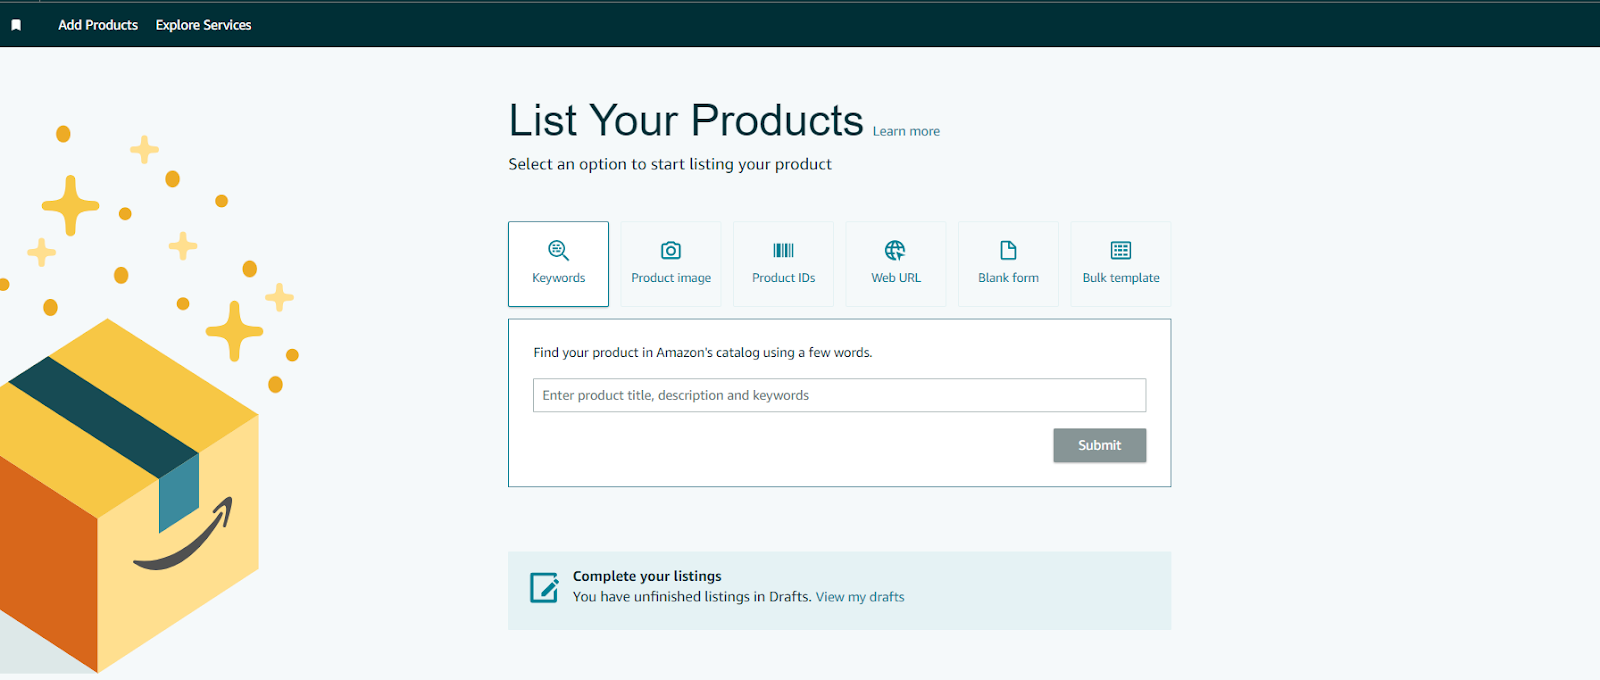
In the search bar under ‘Find your products in Amazon’s catalog,’ find your product by title, description, or keywords.
Step 3. Find your product in the list, select a condition, and click ‘Sell this product.’
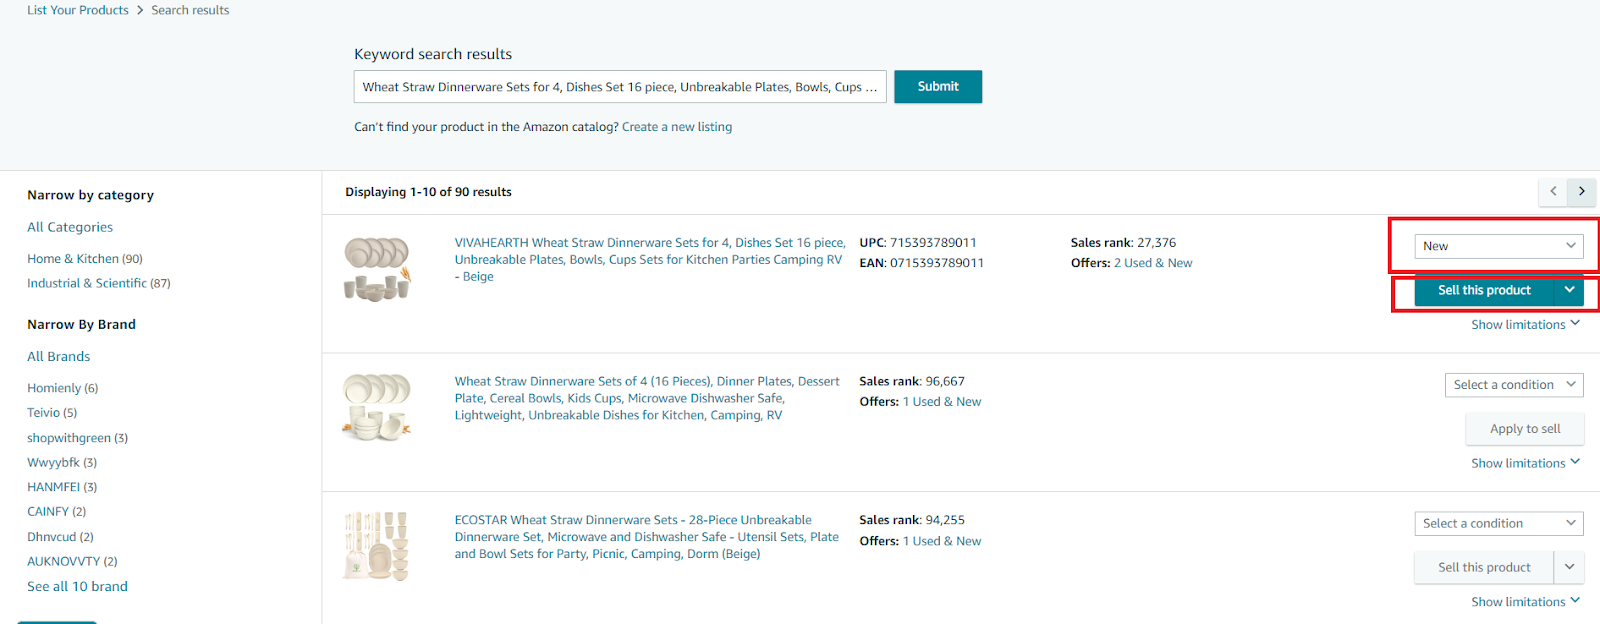
Find your product in the list, select a condition, and click ‘Sell this product.’
Step 4: Create your offer: add your selling price (Standard Price), product condition (Offering Condition Type), and fulfillment channel (Fulfillment by Merchant — FBM, where you fulfill products yourself, or Fulfillment by Amazon — FBA, where Amazon picks, packs, and ships your products for a fee).
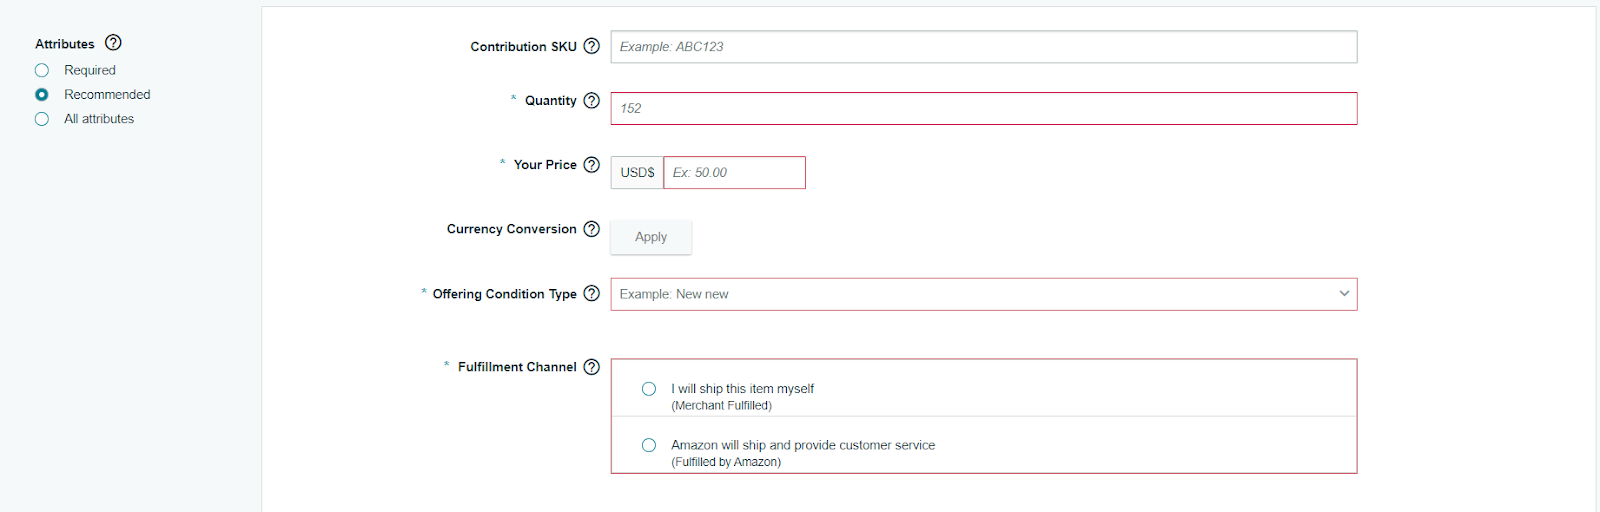
Create your offer by filling in all necessary fields
Step 5. Click ‘Save and finish.’
Related: Amazon FBA Selling Tips
Amazon Global Selling: How to Sell Internationally
How to list new products on Amazon?
If you’re going to sell a product that doesn’t exist on Amazon, you have to create a brand-new listing. Majorly, new products are private label.
Listing new products on Amazon step-by-step
Step 1. Go to your Seller Central account. In the side navigation menu, select ‘Catalog’ > ‘Add Products’ > ‘List Your Products.’ Click the ‘Blank form’ button above the search bar and the ‘Start’ button below.
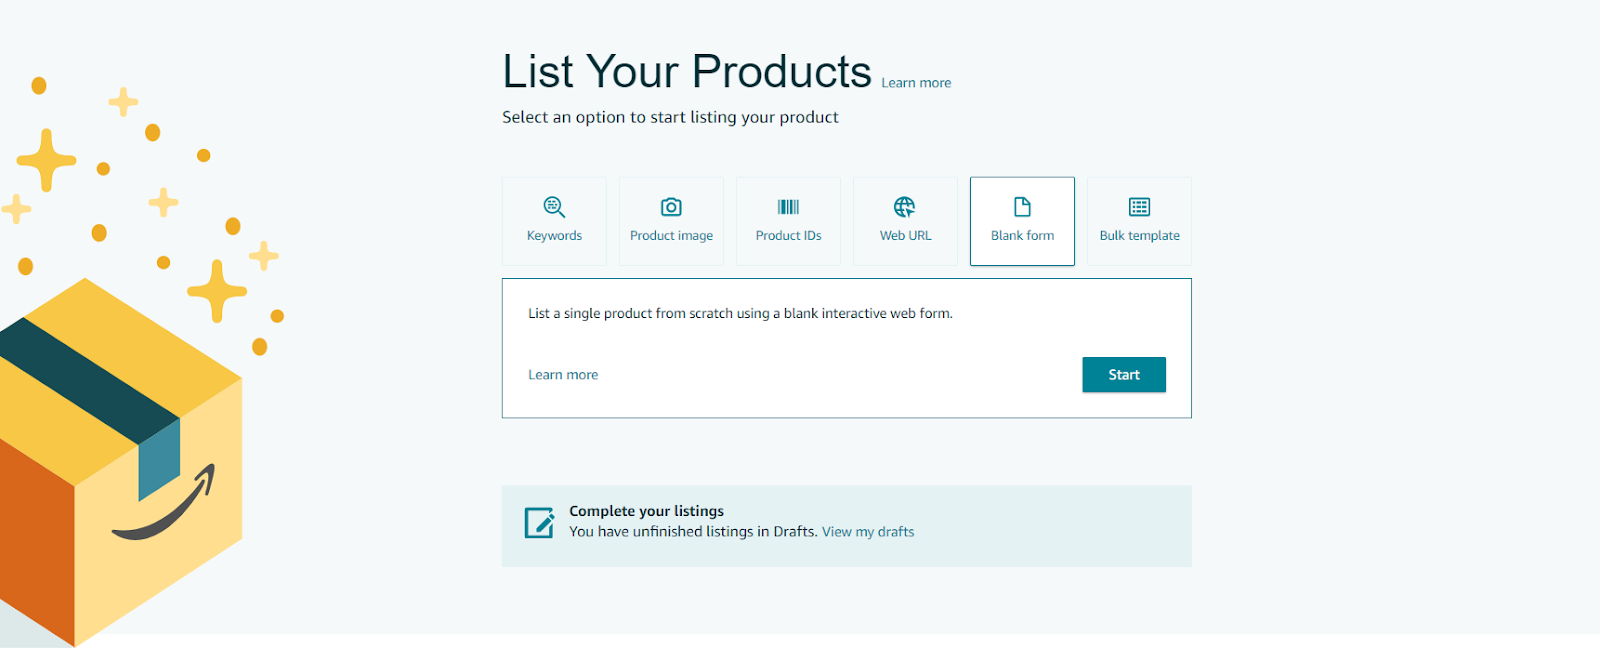
Go to your Seller Central account. In the menu, select ‘Catalog’ > ‘Add Products’ > ‘List Your Products.’ Click the ‘Blank form’ button above the search bar
Step 2: Enter the product name and confirm the primary product category specified by Amazon (or change it).
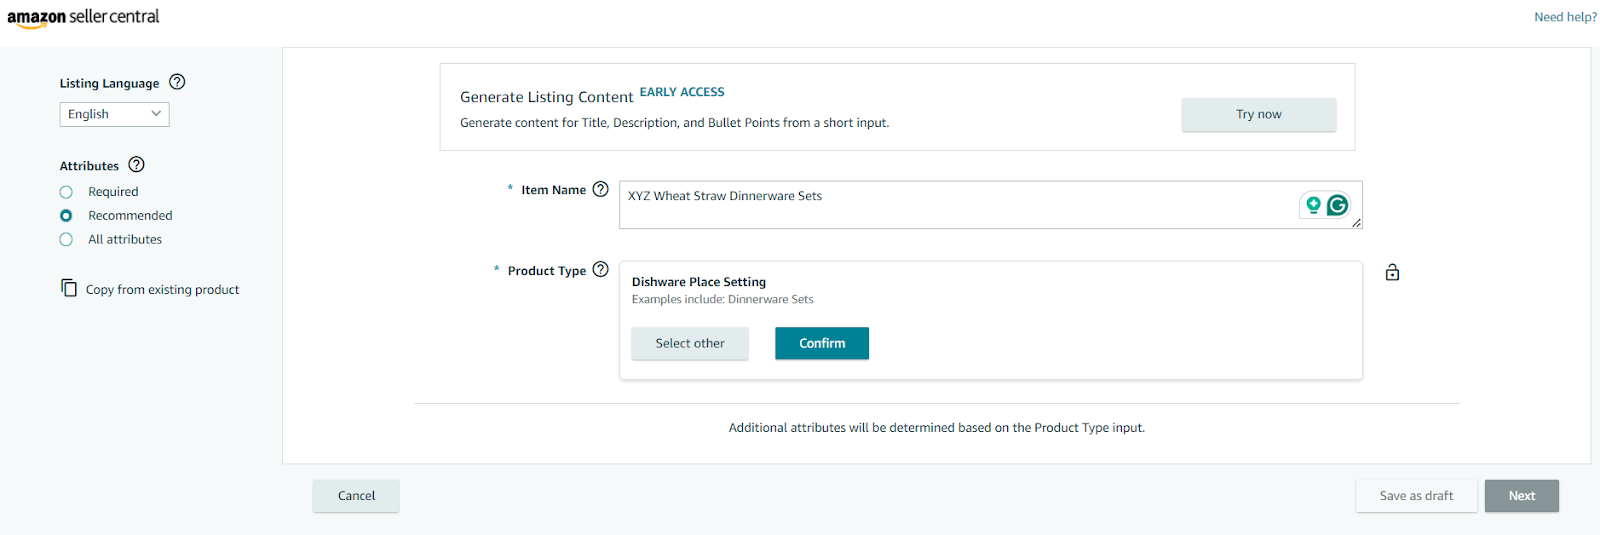
Enter the product name and confirm the primary product category specified by Amazon (or change it).
Step 3. Add a brand and product ID, and click ‘Next.’
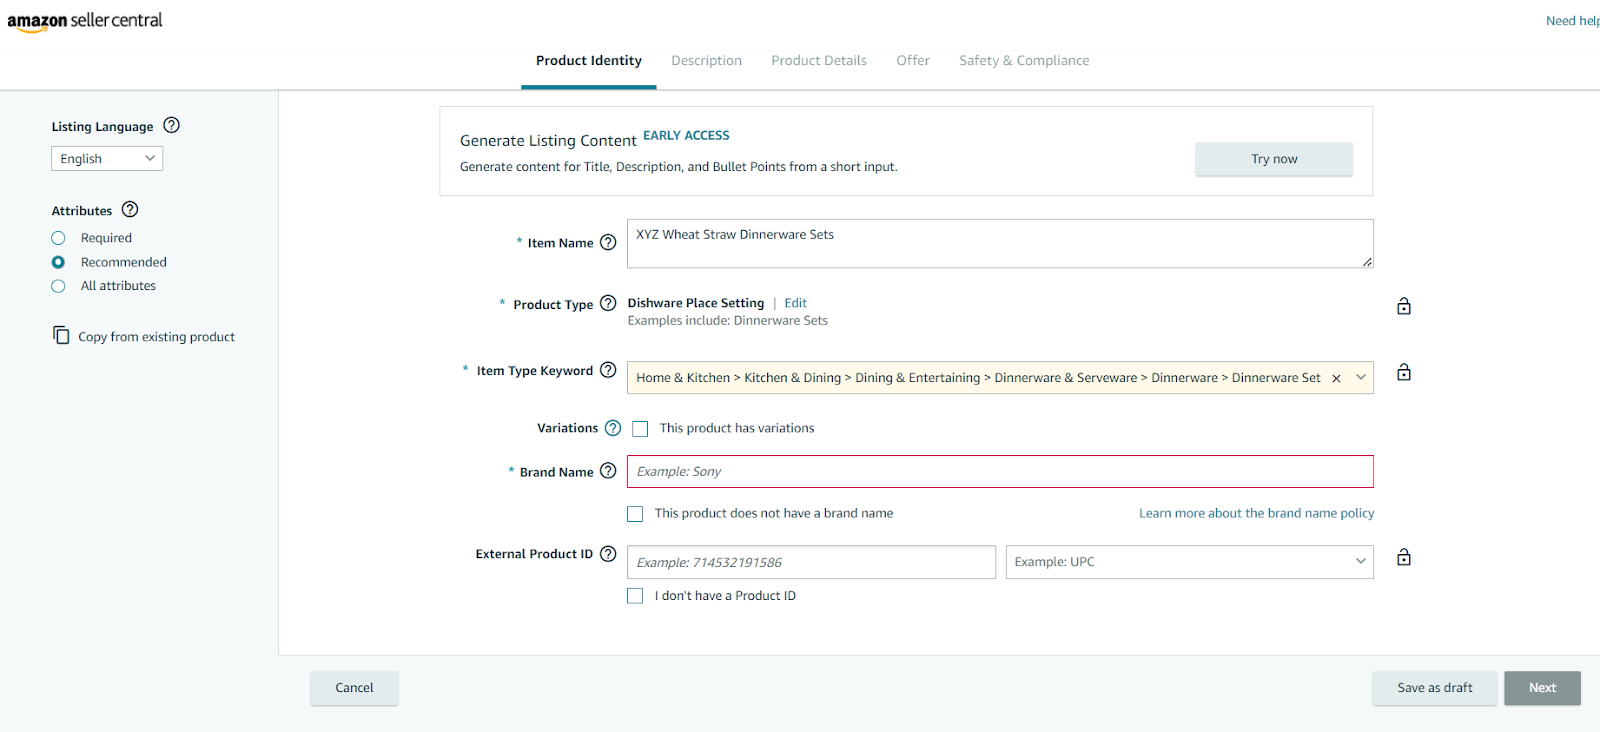
Add a brand and product ID, and click ‘Next.’
Step 4. Amazon will ask you to get brand authorization. Click ‘Apply to Sell’ and provide the necessary information. Wait for approval.
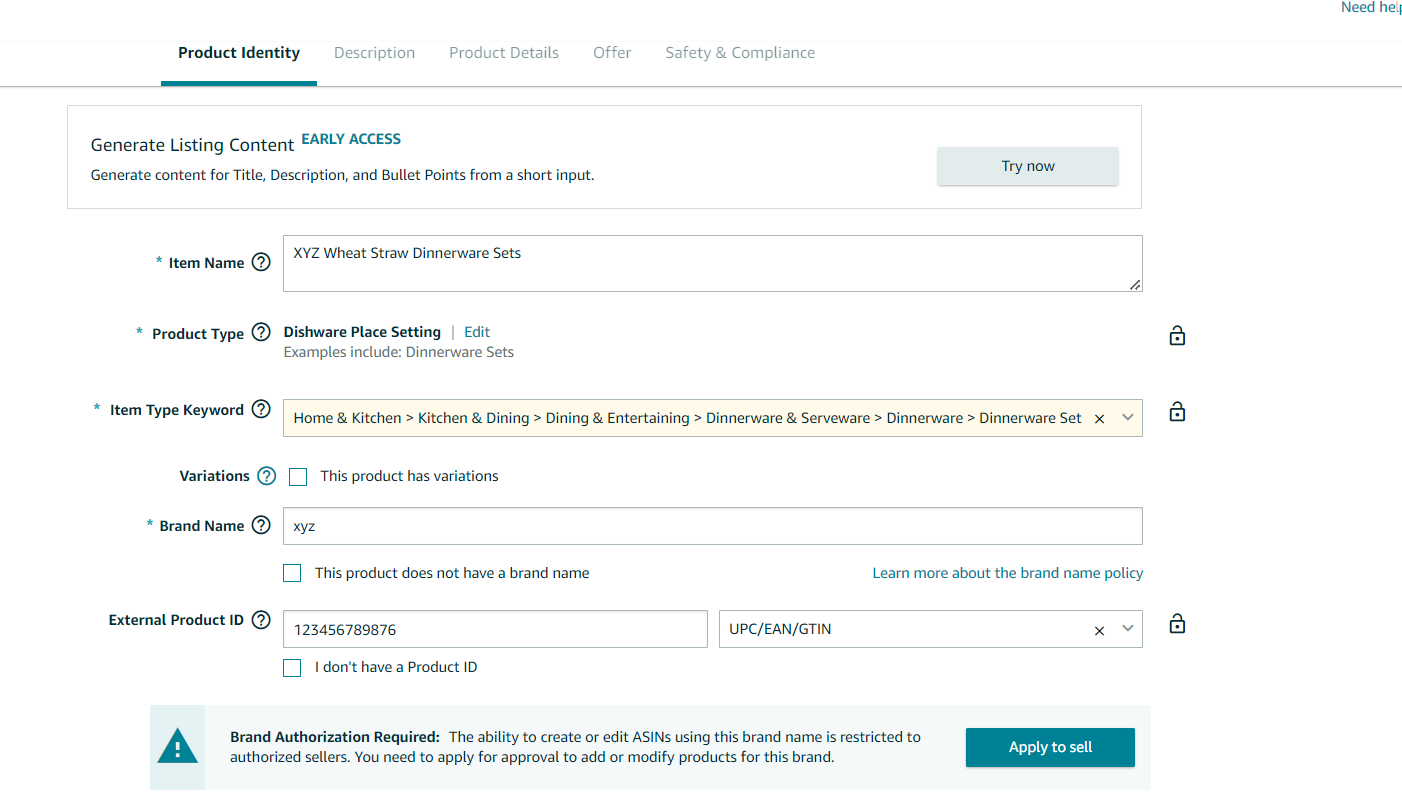
Amazon will ask you to get brand authorization. Click ‘Apply to Sell’ and provide the necessary information. Wait for approval.
Step 5. When you get the approval, fill in the description, product, and offer details, and add safety and compliance documents, if necessary.
Step 6. Click ‘Save and finish.’
How to Manage Orders in Seller Central?
In your Seller Central, there are two types of orders: FBM, or Fulfillment by Merchant, and FBA, or Fulfillment by Amazon.
FBM is when you, as the seller, handle the packing and shipping of orders yourself. When you use the FBM fulfillment method, it is essential to ship orders out as soon as possible to avoid delays or negative customer feedback.
FBA is when you send your inventory to Amazon’s warehouses, and the platform handles the picking, packing, order shipping, and customer service on your behalf for a fee.
With FBA, Amazon handles your logistics, saving you time and hassle. However, keeping track of your inventory levels and ensuring you’re sending enough stock to Amazon’s warehouses to meet demand is still important. Also, you must take care of shipping inventory to Amazon’s fulfillment centers.
Related: Amazon Seller Central vs. Vendor Central
How to List Products on Amazon - Complete Guide
How to Create an Amazon Best Product Description that Ranks High in Search
Managing FBM orders steps by step
Step 1. Click ‘Orders’ in the navigation menu and select ‘Manage Orders.’
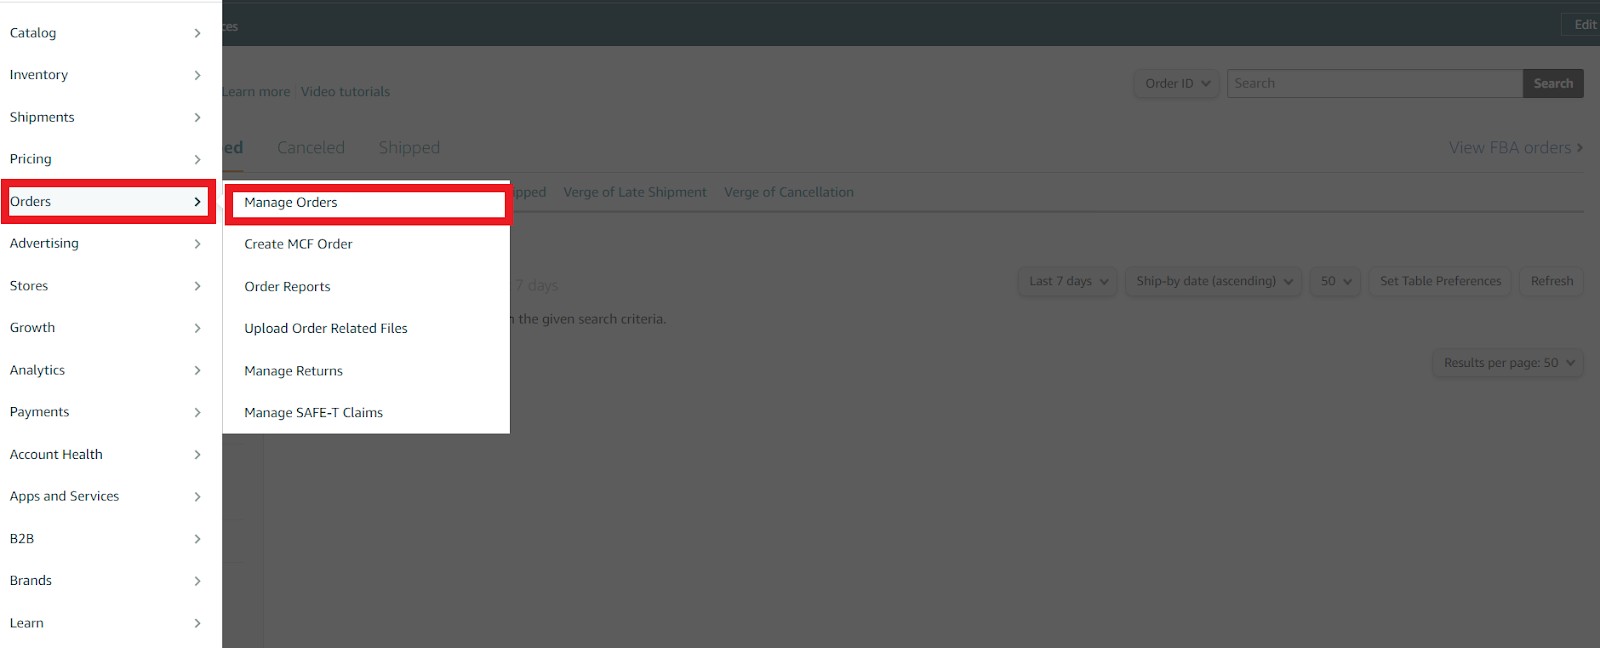
Click ‘Orders’ in the navigation menu and select ‘Manage Orders.’
Step 2. Here, you’ll see a list of your orders’ current status (pending, shipped, canceled, etc.).
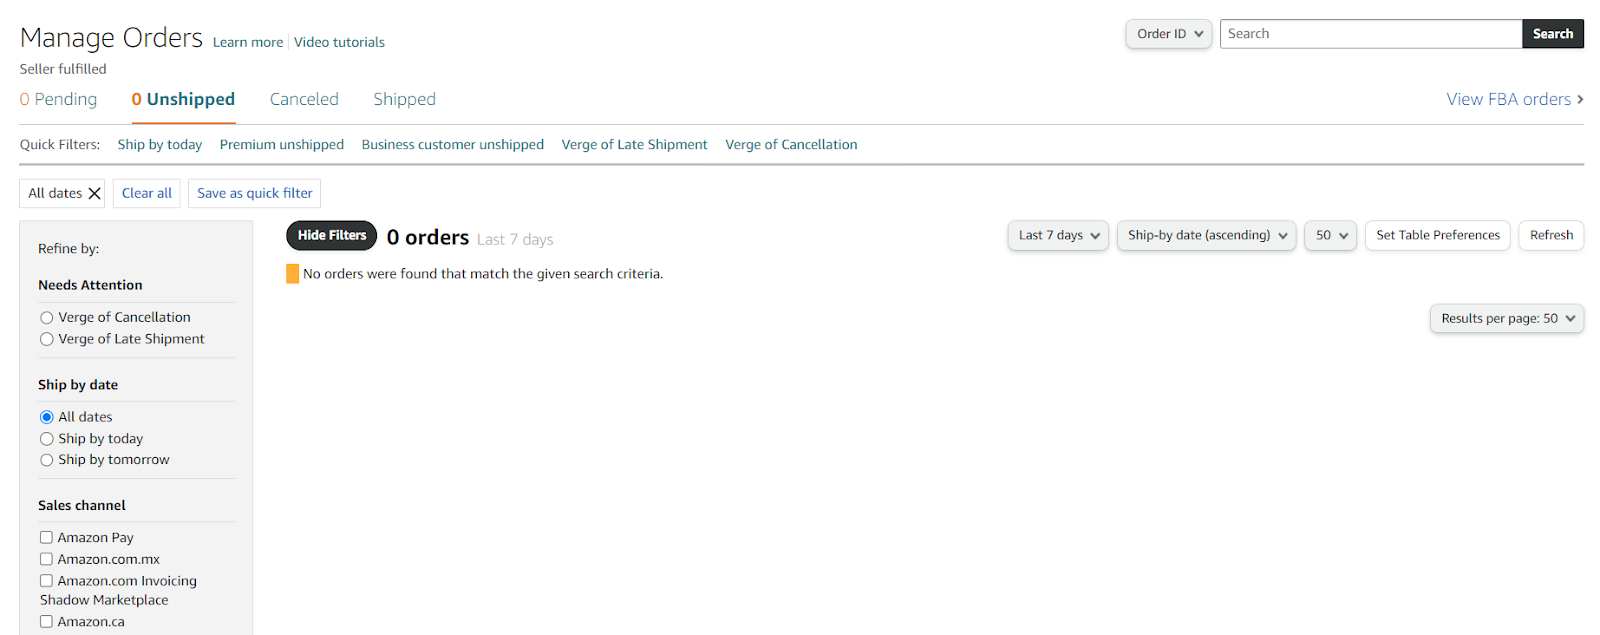
Here, you’ll see a list of your orders’ current status (pending, shipped, canceled, etc.).
Related: FBA vs FBM: Which is Better for Amazon Sellers?
13 Ways to Make Money on Amazon
Sending FBA inventory to Amazon step-by-step
Step 1. If you want to send inventory to Amazon’s fulfillment centers, click ‘Shipments’ in the side navigation menu and select ‘Send to Amazon.’
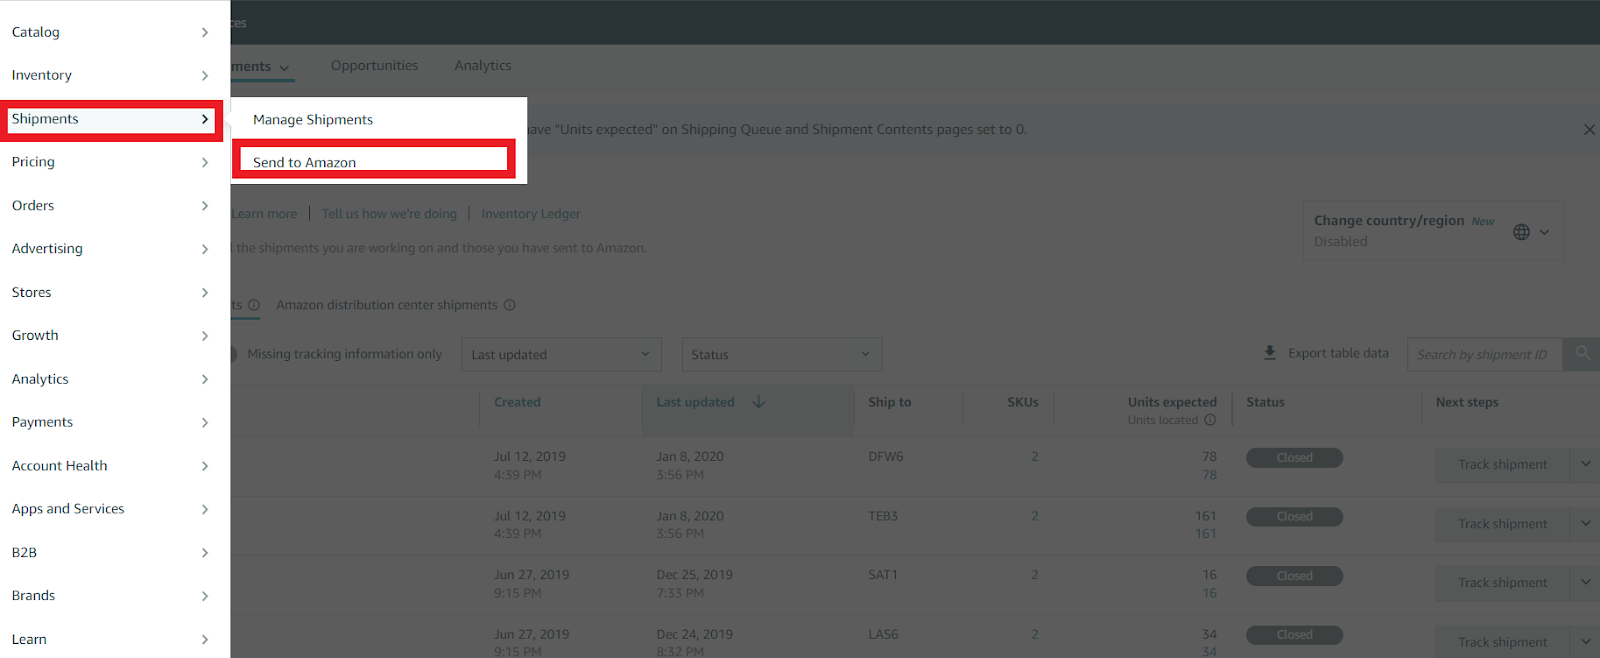
If you want to send inventory to Amazon’s fulfillment centers, click ‘Shipments’ in the side navigation menu and select ‘Send to Amazon.’
Step 2. In the Send to Amazon page, create a shipping plan. Select the items you want to send, and the number of units, and add a prep guidance.
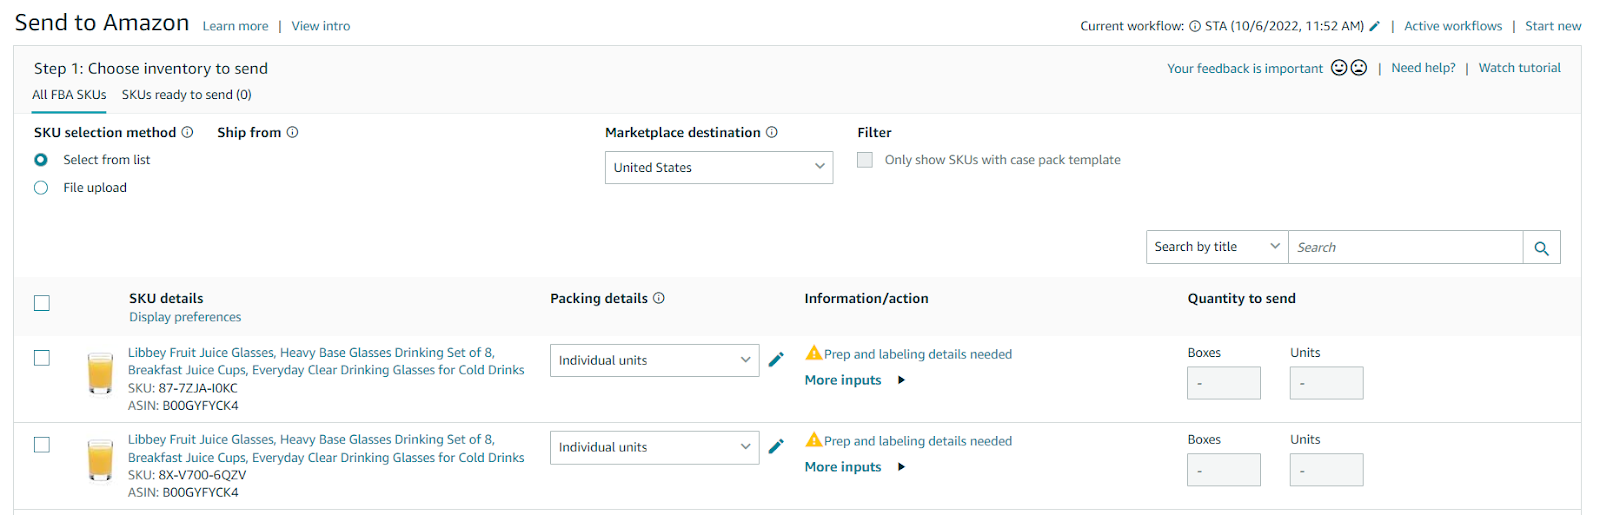
In the Send to Amazon page, create a shipping plan.
Managing FBA orders step-by-step
Step 1. Click ‘Shipments’ in the side navigation menu and select ‘Manage Shipments.’
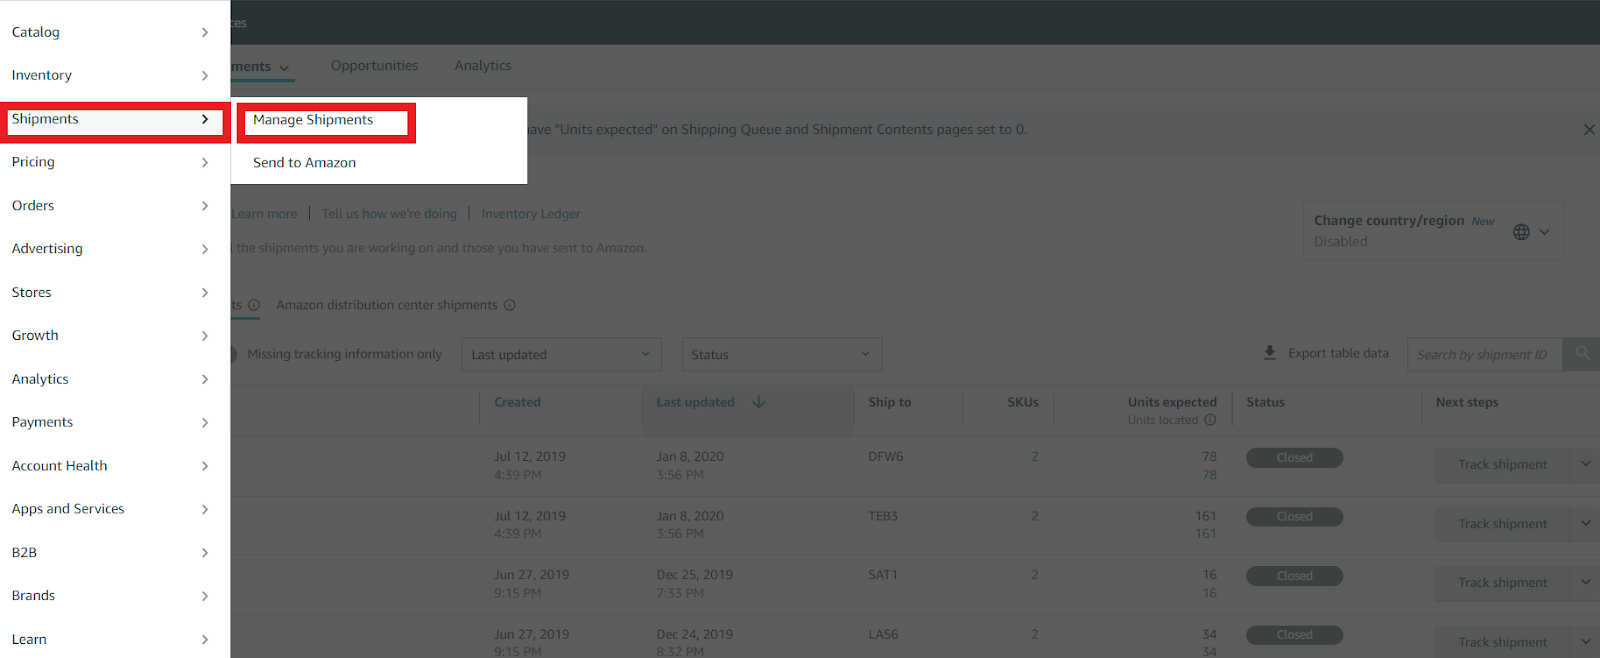
Click ‘Shipments’ in the side navigation menu and select ‘Manage Shipments.’
Step 2. Here, you’ll see a shipping queue and can track your FBA order status.
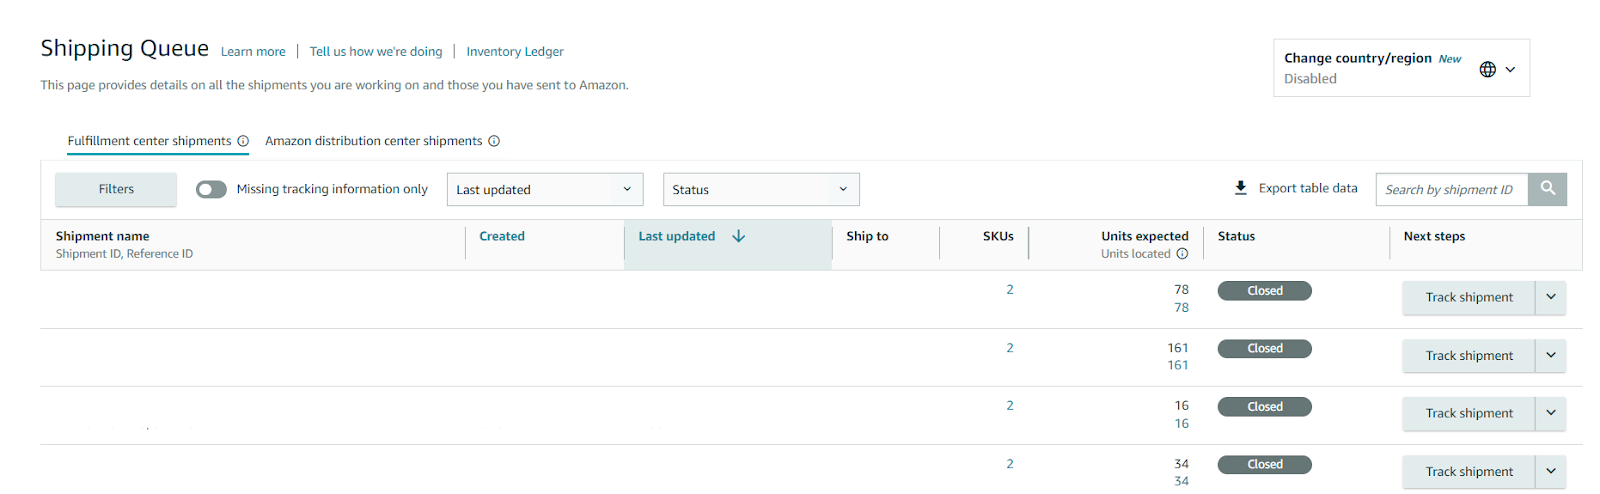
Here, you’ll see a shipping queue and can track your FBA order status.
Related: 13 Rules of OA Product Research Tested by Pain and Gain of Amazon Seller Amazon Wholesale: All You Need To Know
New Dropshipping Strategy That Complies With Amazon’s Policy
How to Manage Inventory in Seller Central?
Inventory management is the backbone of a successful Amazon business. It ensures you have enough stock to meet customer demand without getting stuck with excess products. In your Seller Central, you can closely track and manage your inventory levels.
Monitoring your inventory step-by-step
Step 1. Click ‘Inventory’ in the side navigation menu and select ‘Manage All Inventory.’
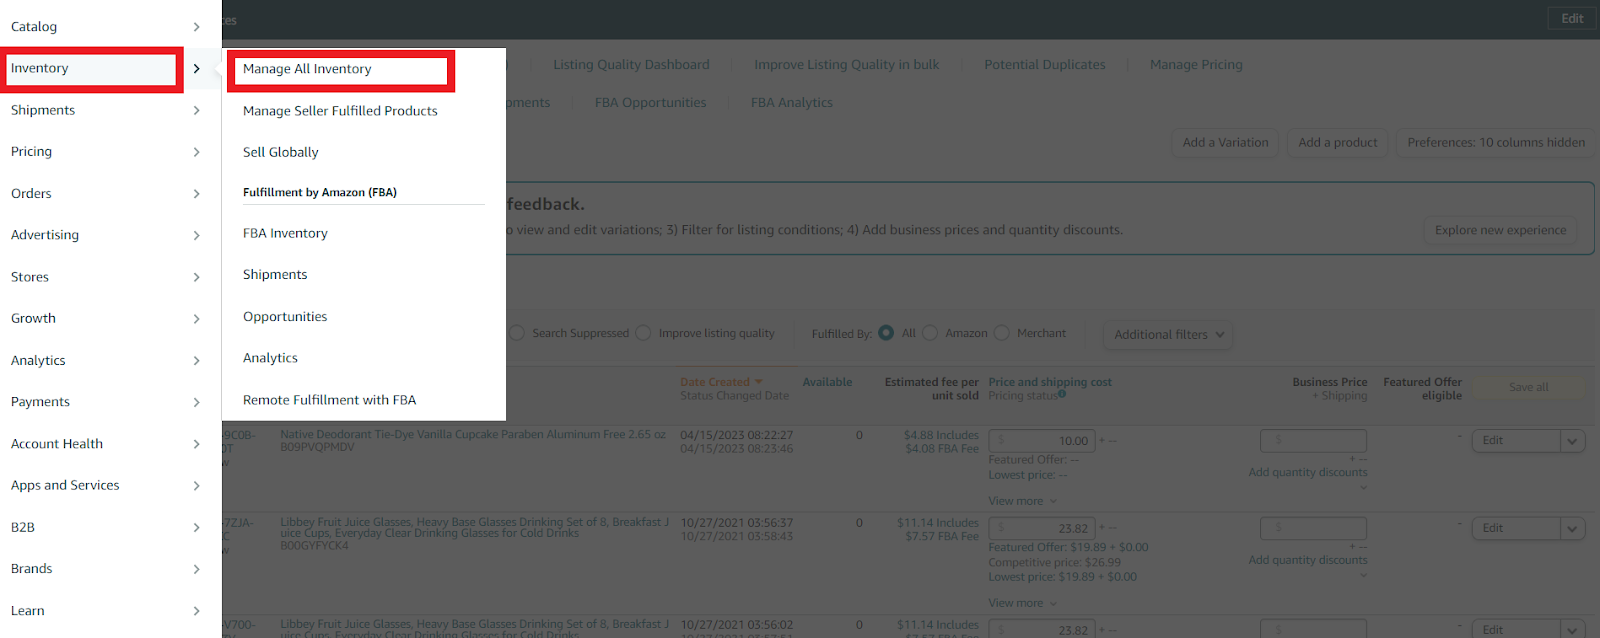
Click ‘Inventory’ in the side navigation menu and select ‘Manage All Inventory.’
Step 2. On the Manage Inventory page, get access to essential product data.some text
- Inventory data available in Manage Inventory
- Status;
- Image;
- SKU;
- Condition;
- Product title;
- ASIN;
- Creation date;
- Date of status change;
- Available inventory;
- Estimated fee per unit sold;
- Price and shipping cost;
- Pricing status;
- Business Price + shipping;
- Buy Box (Featured Offer) eligibility.
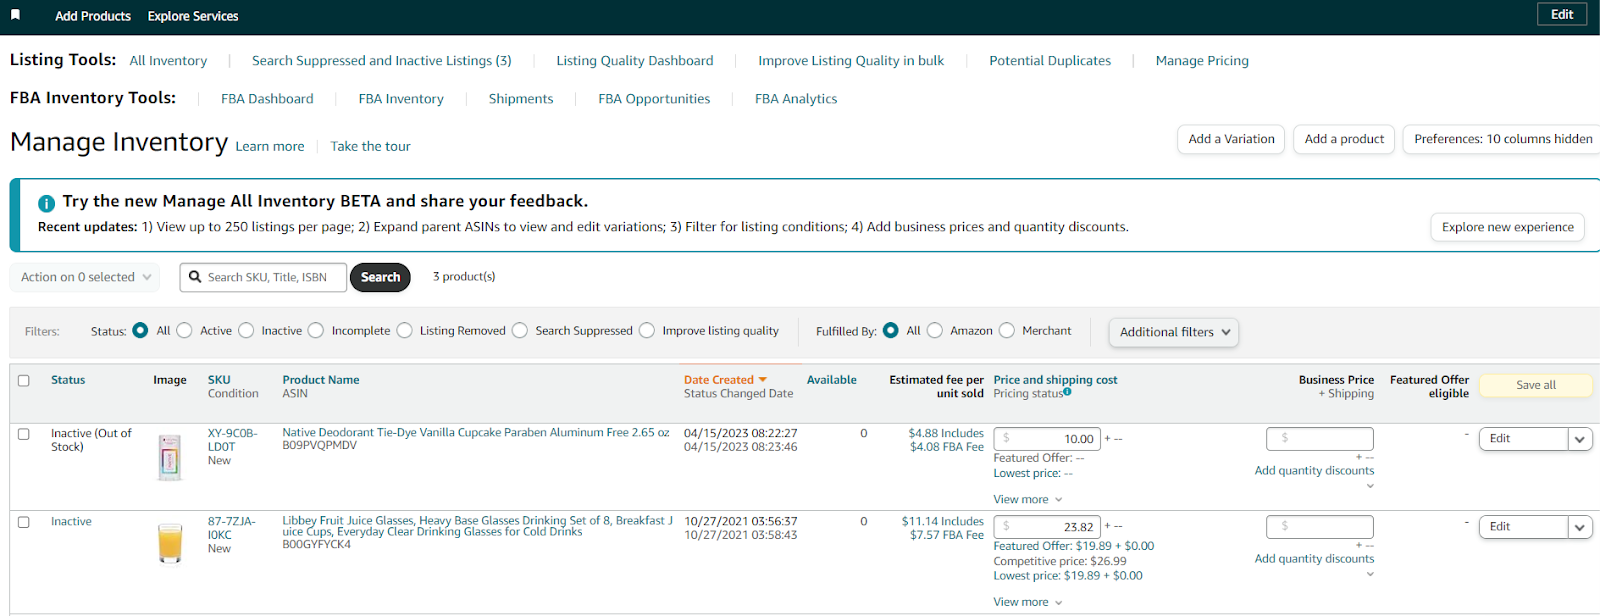
On the Manage Inventory page, get access to essential product data
What Can You Do in Seller Central After the Sale?
Making a sale on Amazon is a great first step, but there’s more to do to keep your business profitable. Here’s what you can do in Seller Central after the sale to grow sales, and optimize your performance.
After-sale steps in Seller Central
Step 1. Create deals and promotions
- Incentivize purchases by offering targeted deals and promotions. This can encourage customers to explore your other products and increase your average order value;
- Seller Central allows you to create deals, coupons, Prime exclusive discounts, and promotions.
Step 2. Advertise strategically
- Leverage targeted advertising campaigns to reach new customers who might be interested in similar products;
- Seller Central provides advertising tools to create PPC (pay-per-click) campaigns;
- Use customer data and purchase history to create targeted campaigns and increase your return on ad spend (ROAS) and advertising cost of sales (ACOS).
Step 3. Monitor performance and analytics
- Seller Central offers comprehensive reports and analytics. Track key metrics like sales trends, conversion rates, and customer reviews to understand what’s working and what needs improvement.
- Analyze data to identify top-selling products, profitable categories, and areas for improvement.
- Look for ways to optimize your sales, pricing strategies, and inventory management based on these insights.
Step 4. Manage returns efficiently
- If you are an FBM seller, Seller Central allows you to manage return requests, issue refunds, and track returned items;
- If you are an FBA seller, respond to customer inquiries promptly and professionally to resolve any return-related issues.
How to Create Deals, Promotions, and Coupons in Seller Central?
Deals, promotions, and coupons can be a great way to attract customers and boost sales. However, you must remember that discounts should be used strategically and not too frequently, as you want to avoid training your customers to only buy from you when there’s a sale.
Creating deals, promotions, and coupons step-by-step
Step 1. Click ‘Advertising’ in the navigation menu and select ‘Deals, Promotions, or Coupons.’
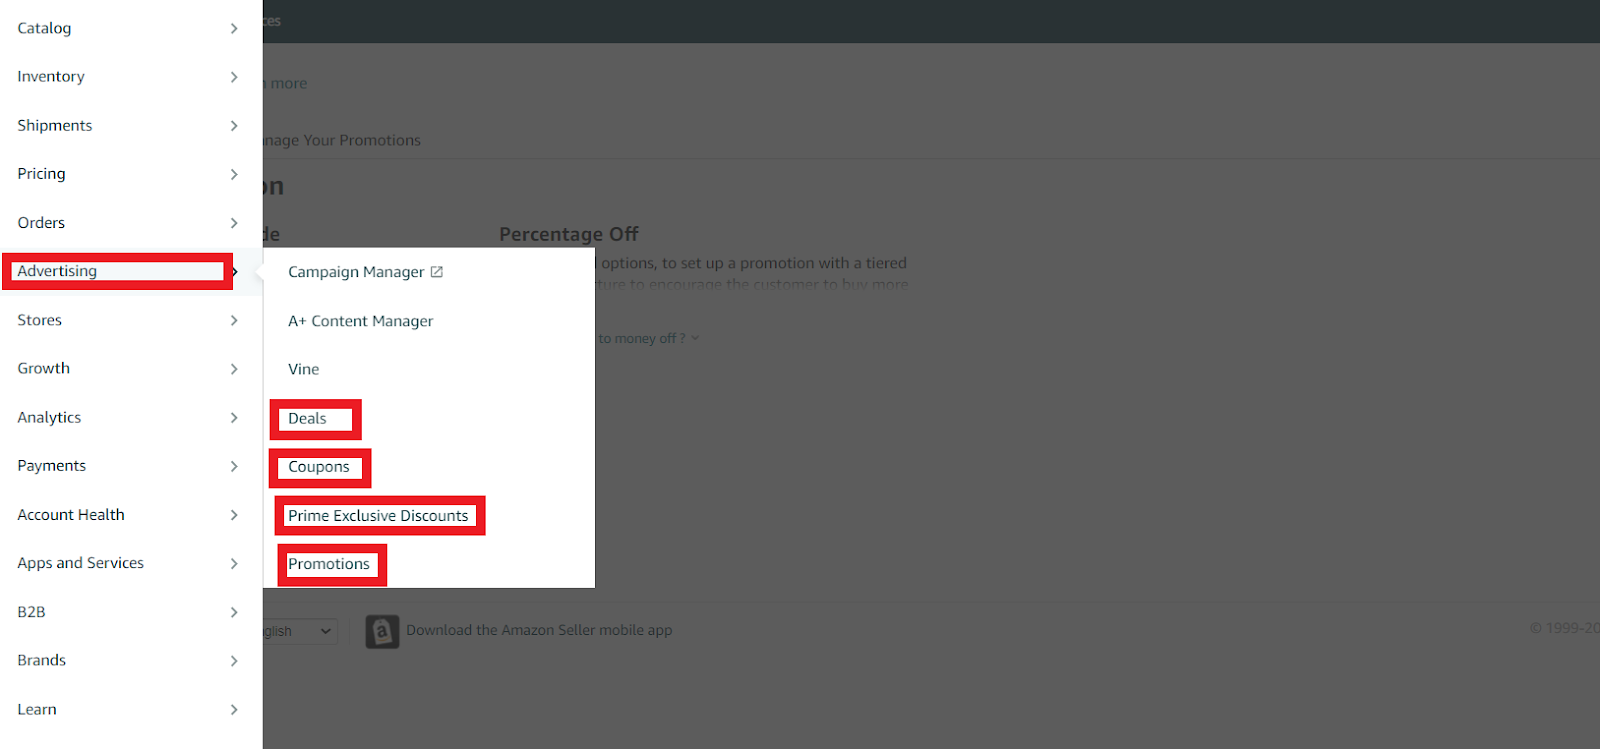
Click ‘Advertising’ in the top navigation menu and select ‘Deals, Promotions, or Coupons’
Step 2. To create a promotion, choose the type of promotion you want to create (money off, percentage off, buy one get one, etc.) and set the details (discount amount, minimum purchase amount, start and end dates, etc.). Preview the promotion, submit it for review, and wait for approval.
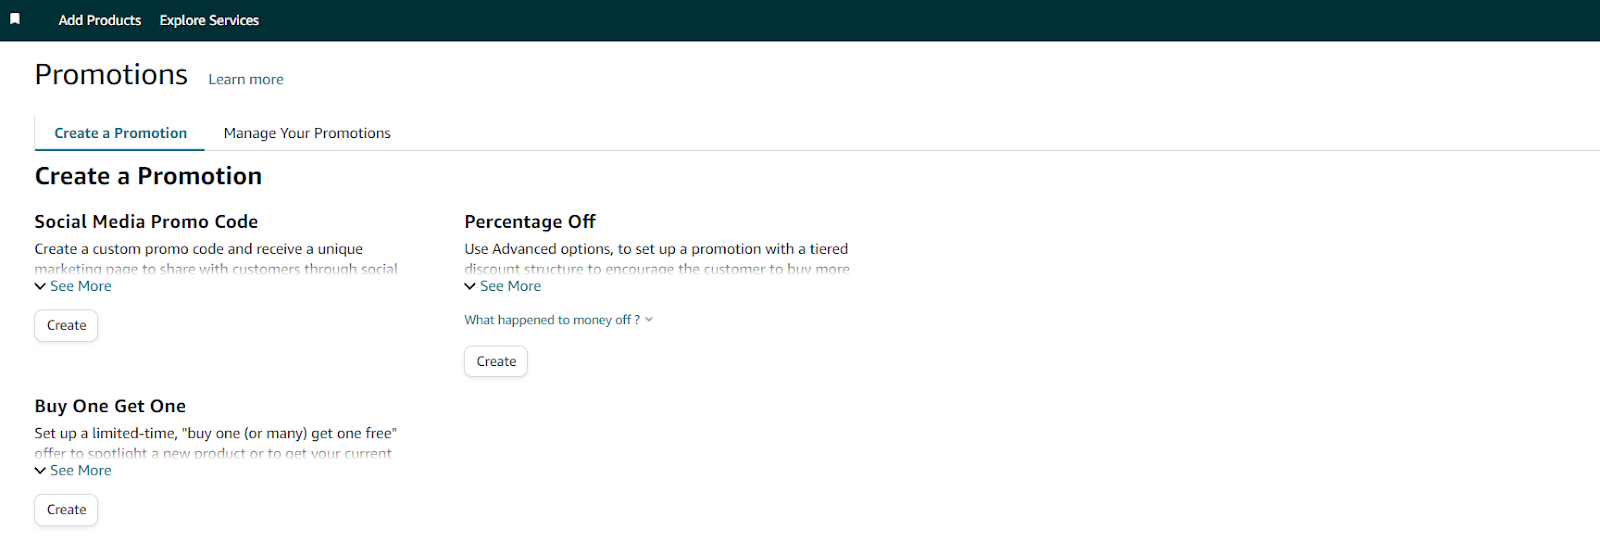
To create a promotion, choose the type of promotion you want to create (money off, percentage off, buy one get one, etc.) and set the details
Step 3. To create a deal (Best Deal or Lightning Deal) for a specific Amazon event, review the events where you are eligible to create deals. Select products involved, schedule, and configure the deal. Submit it for review, and wait for approval.
Step 4. To create a coupon, in the ‘Coupons’ page, select ‘Create a new Coupon’ in the upper right-hand corner, choose a product, title, and ASIN, fill in the details, and submit.

To create a coupon, in the ‘Coupons’ page, choose a product, title, and ASIN, fill in the details, and submit.
Related: 10 Reasons Why People Fail With Amazon FBA Online Arbitrage
Online Arbitrage for Beginners
How to Access Advertising in Seller Central?
Advertising is a great tool to promote your products and grow sales. On Amazon, you can create Sponsored Products ads. The brand-registered sellers can also create Sponsored Brands ads and Sponsored Display ads.
Creating ad campaign step-by-step
Step 1. In the ‘Advertising’ tab of your Seller Central side navigation menu, go to ‘Campaign Manager.’
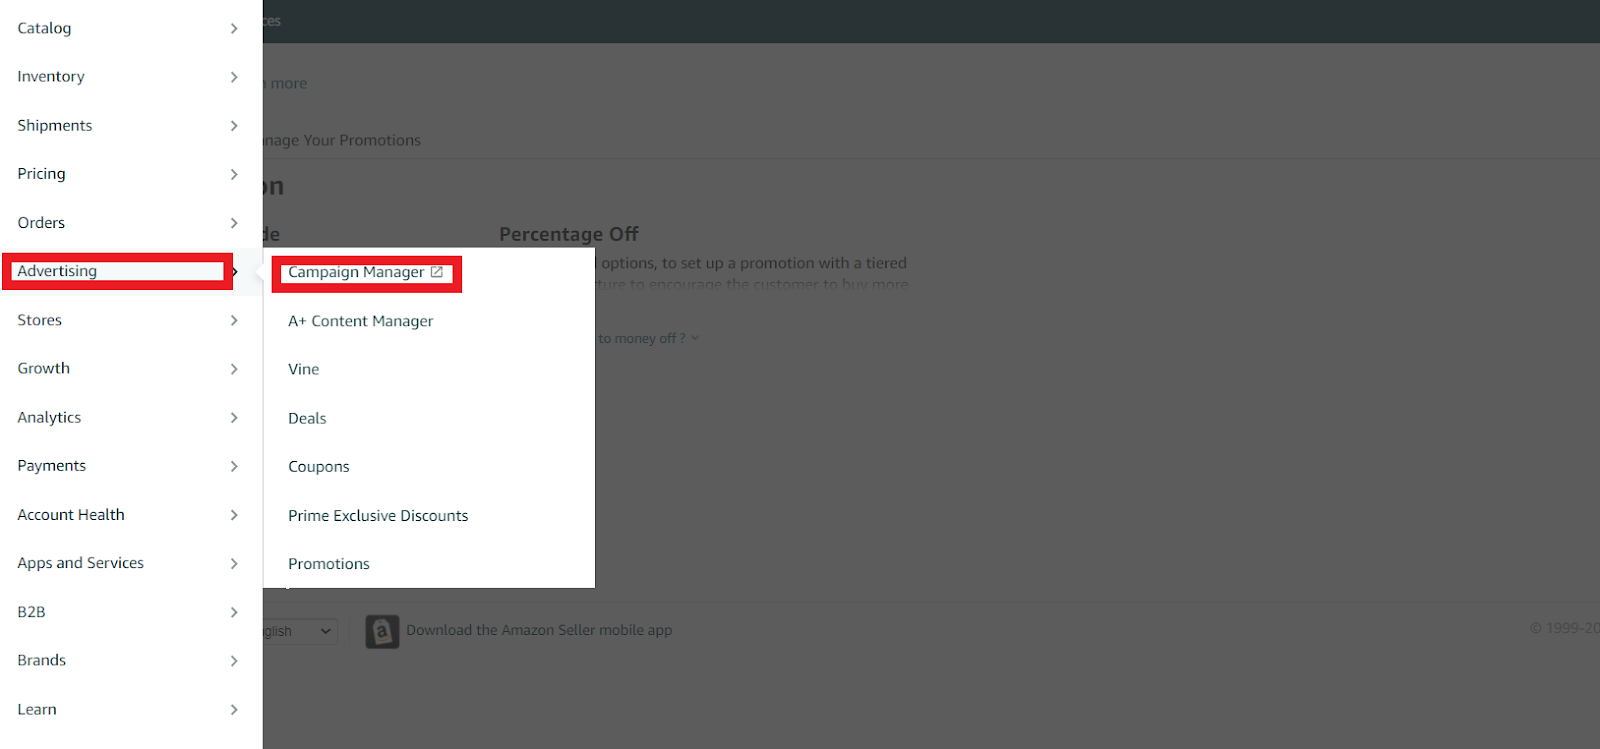
To access advertising, in the ‘Advertising’ tab, go to ‘Campaign Manager’
Step 2. Choose Single or Multiple countries where you want to create the campaign and click ‘Create Campaign’.
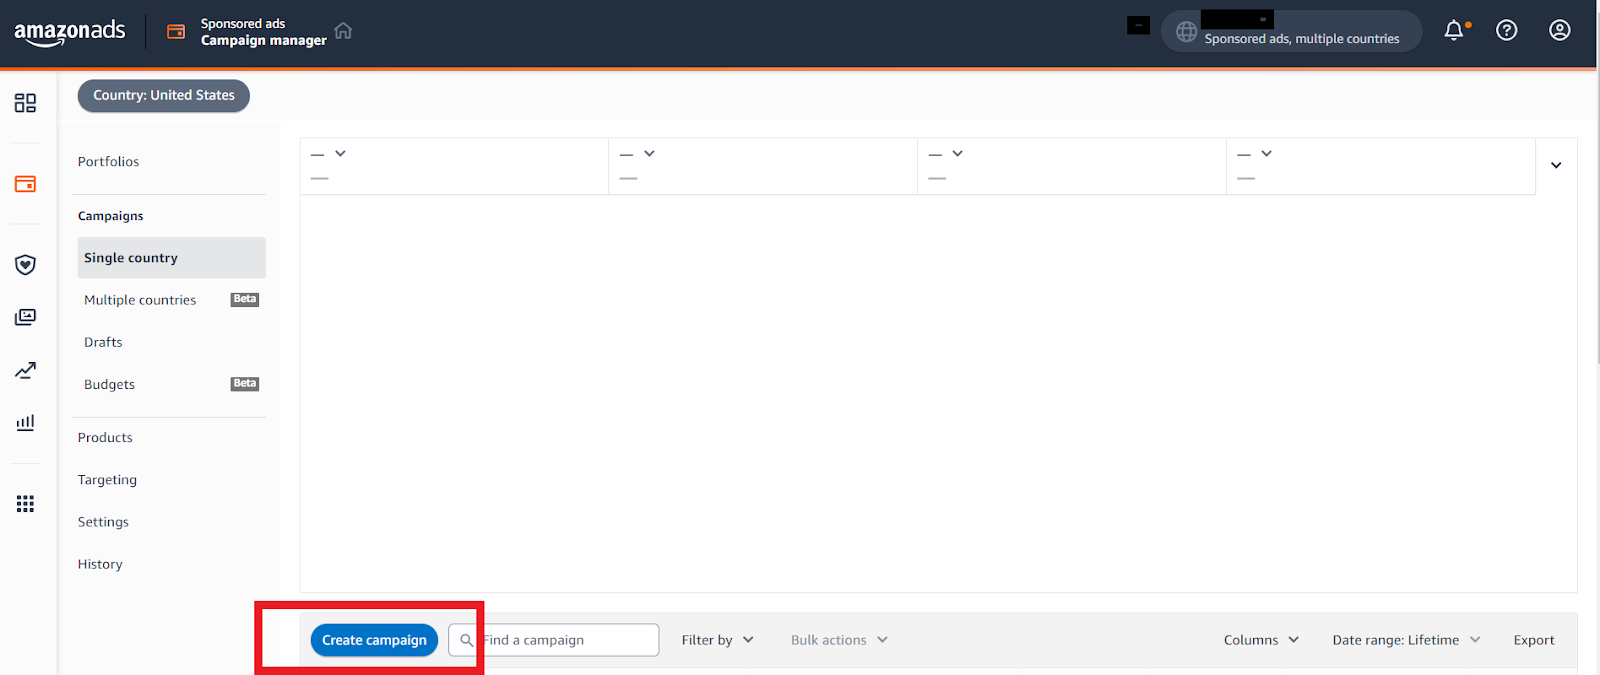
Choose Single or Multiple countries where you want to create the campaign, and click ‘Create Campaign’
Step 3. Specify your campaign type (Sponsored Products, Brands, or Sponsored Display ads).
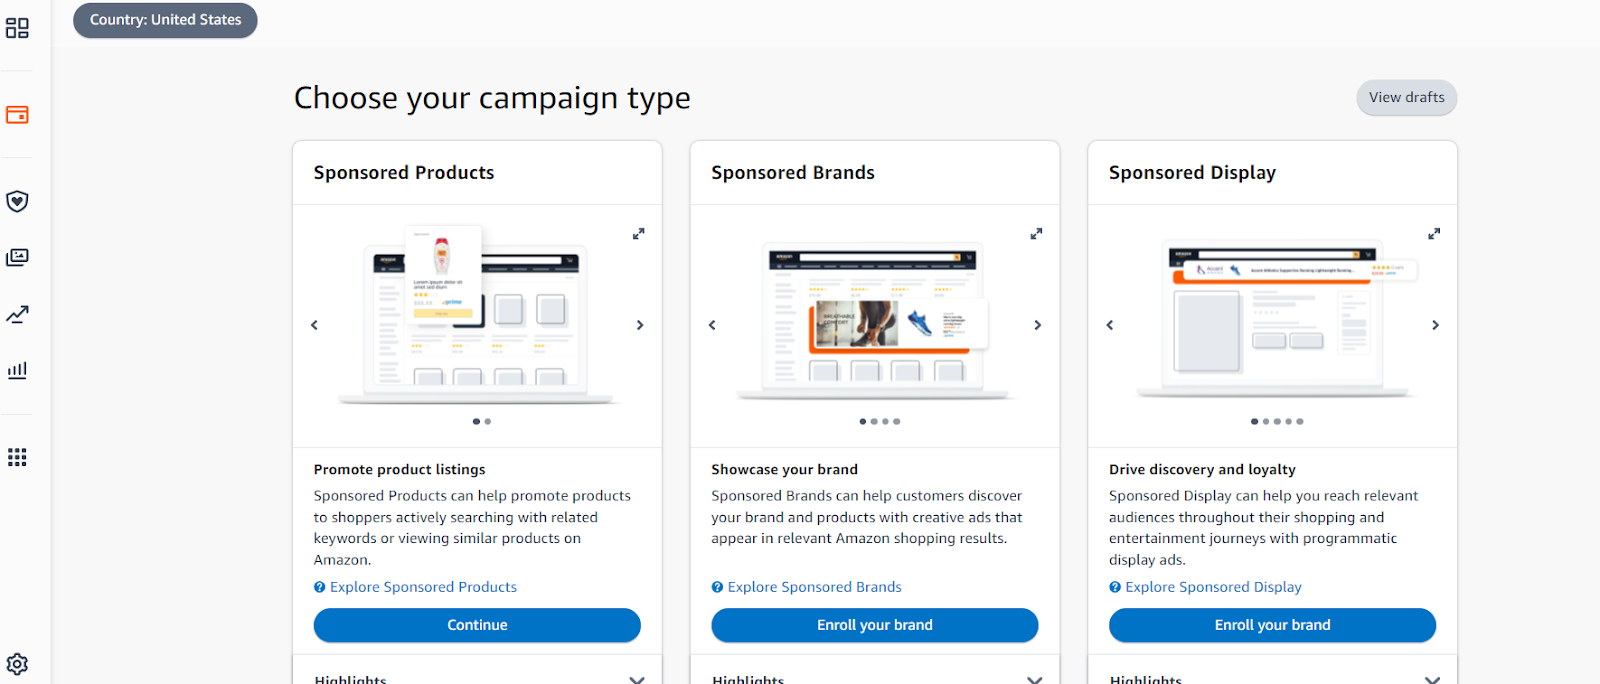
Specify your campaign type (Sponsored Products, Brands, or Sponsored Display ads)
Step 4. Choose a product, bid, campaign strategy, and other details, and click ‘Launch Campaign’ in the upper right-hand page corner.
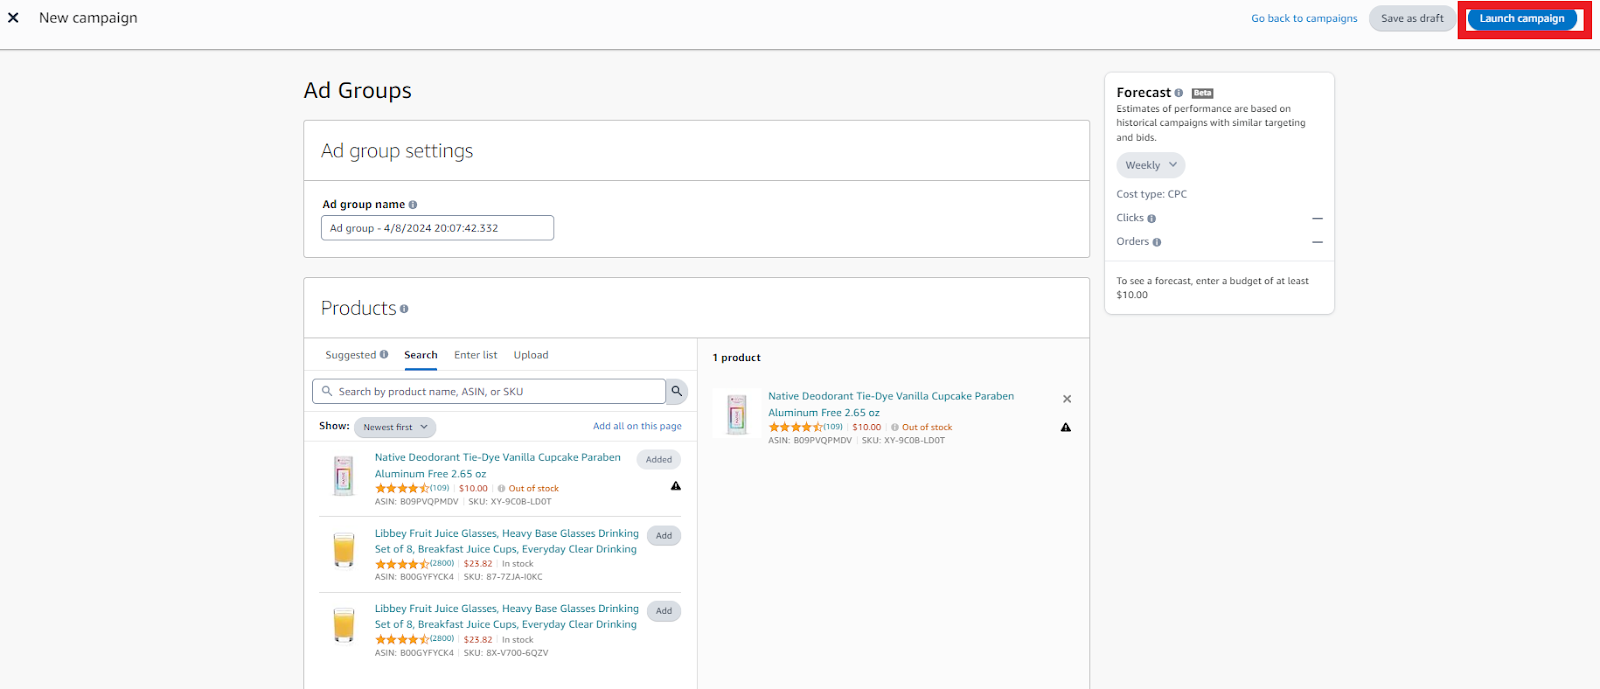
Choose a product, bid, campaign strategy, and other details, and click ‘Launch Campaign’ in the upper right-hand page corner
How to Use Reports in Seller Central?
Business reports can provide valuable insights into your sales, inventory, fulfillment, advertising, and returns. Amazon Seller Central offers a variety of reports to help sellers track their performance and identify trends.
Valuable Seller Central reports
Sales Dashboard
This report overviews your sales performance, including total orders, units sold, and revenue. You can view this data by day, week, or month and filter by product or marketplace.
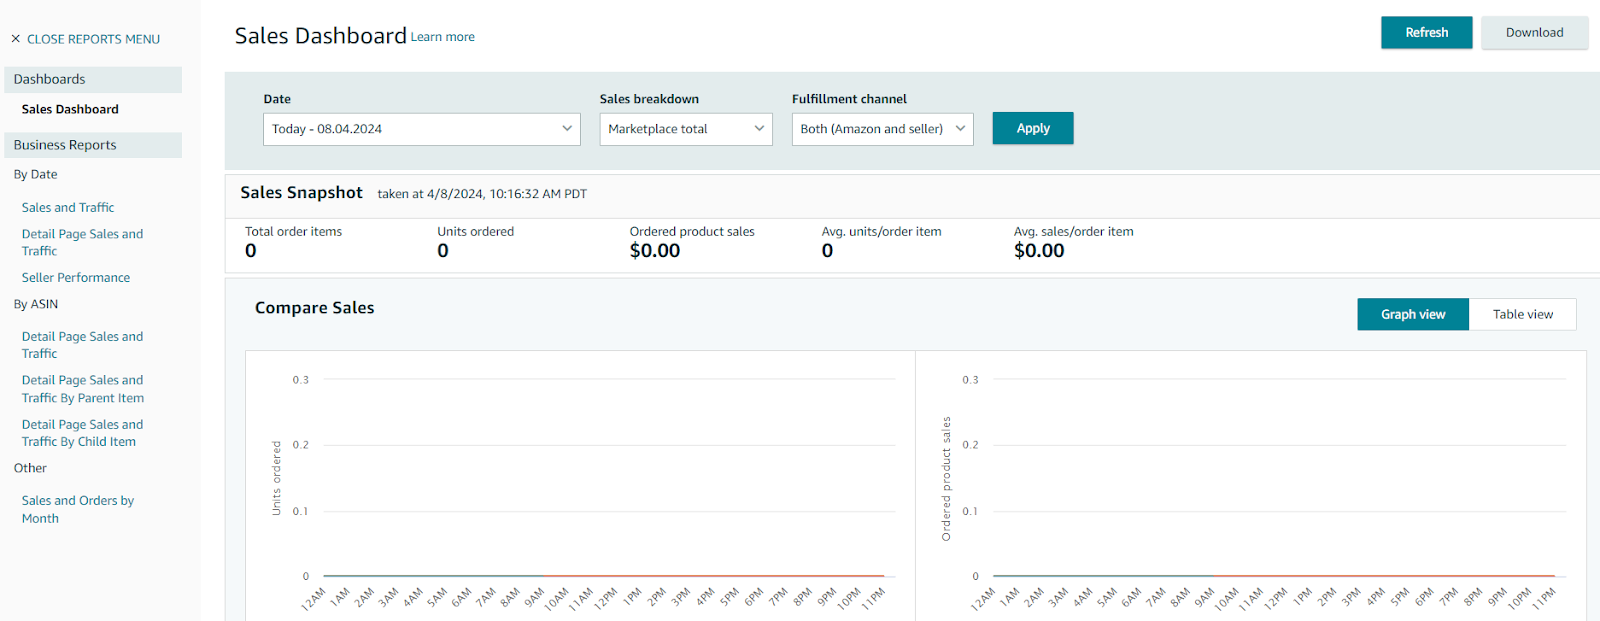
Sales Dashboard
Amazon Fulfillment Reports
These reports are created for FBA sellers. Reports include Inventory, Sales, Payments, Customer Concessions, and Removals. You can download reports in (.csv) or in text (.txt) format.
Advertising Reports
These reports provide data on your advertising campaigns, including impressions, clicks, and conversions. You can use this data to optimize your ad spend and improve your Return on Investment (ROI ).
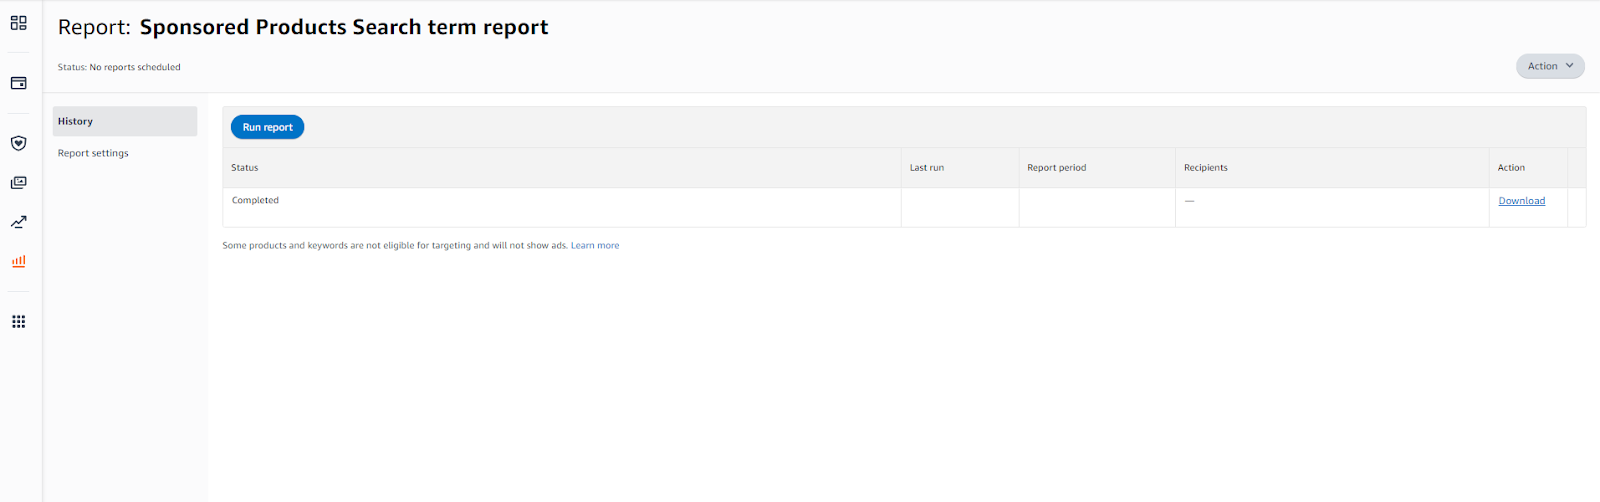
Advertising Reports provide data on your advertising campaigns
Returns Report
The Returns report provides detailed insights into customer returns. It specifies the return date,
product information, return reason, and detailed description.
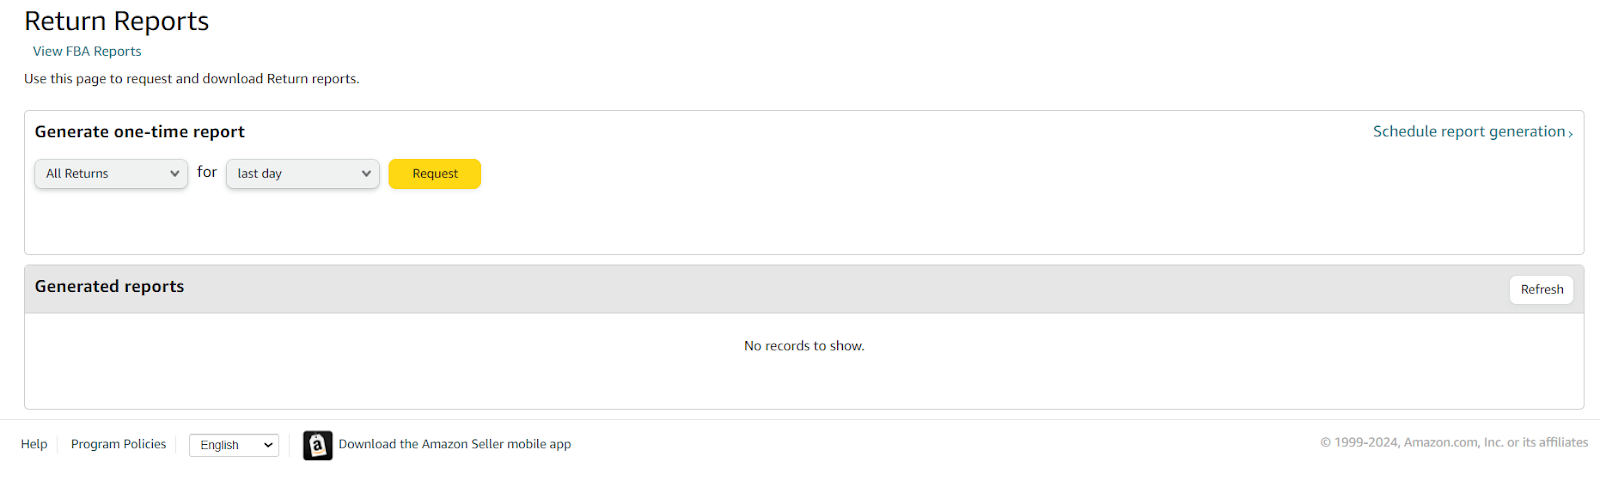
Returns report
Fulfillment Reports
Fulfillment Reports include many different reports regarding your inventory, fees, and listings. The reports show the products you listed at the time the report is run. They include Inventory Report, Active Listings Report, Amazon-Fulfilled Inventory, etc. You can select and download the specific report you are interested in.
Accessing Seller Central reports
To access Seller Central reports, in the navigation menu, click ‘Analytics’ and select the type of report you want to view.
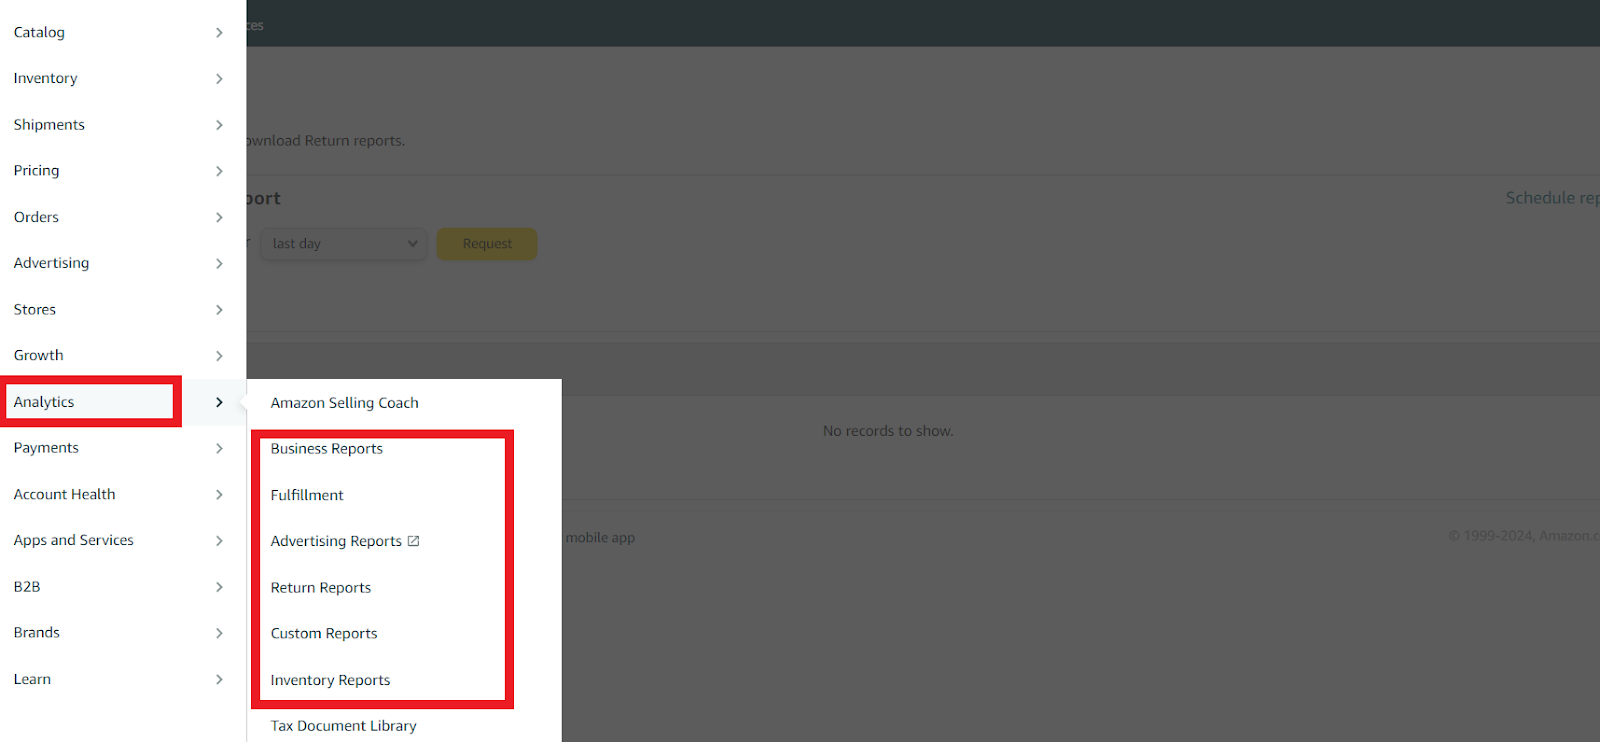
In the navigation menu, Click ‘Analytics’ and select the type of report you want to view
Related: Amazon 3PL - Complete Guide for Sellers
Best AI Tools for Amazon Sellers
How to Check Account Health on Seller Central?
Account Health is Amazon’s policy that helps sellers measure and improve their performance and compliance. It is measured by a set of metrics in the Account Health Dashboard in your Seller Central.
Amazon Account Health Dashboard displays your service performance, Amazon policy compliance, and shipping performance. These metrics show merchants whether they are compliant with Amazon’s selling policies.
Related: Amazon Product Policy Compliance - Guide For Sellers
Amazon Seller Compliance Documents
Accessing the Account Health Dashboard step-by-step
Step 1. To access the Account Health Dashboard, in the side navigation menu, click ‘Account Health,’ then click ‘Account health.’
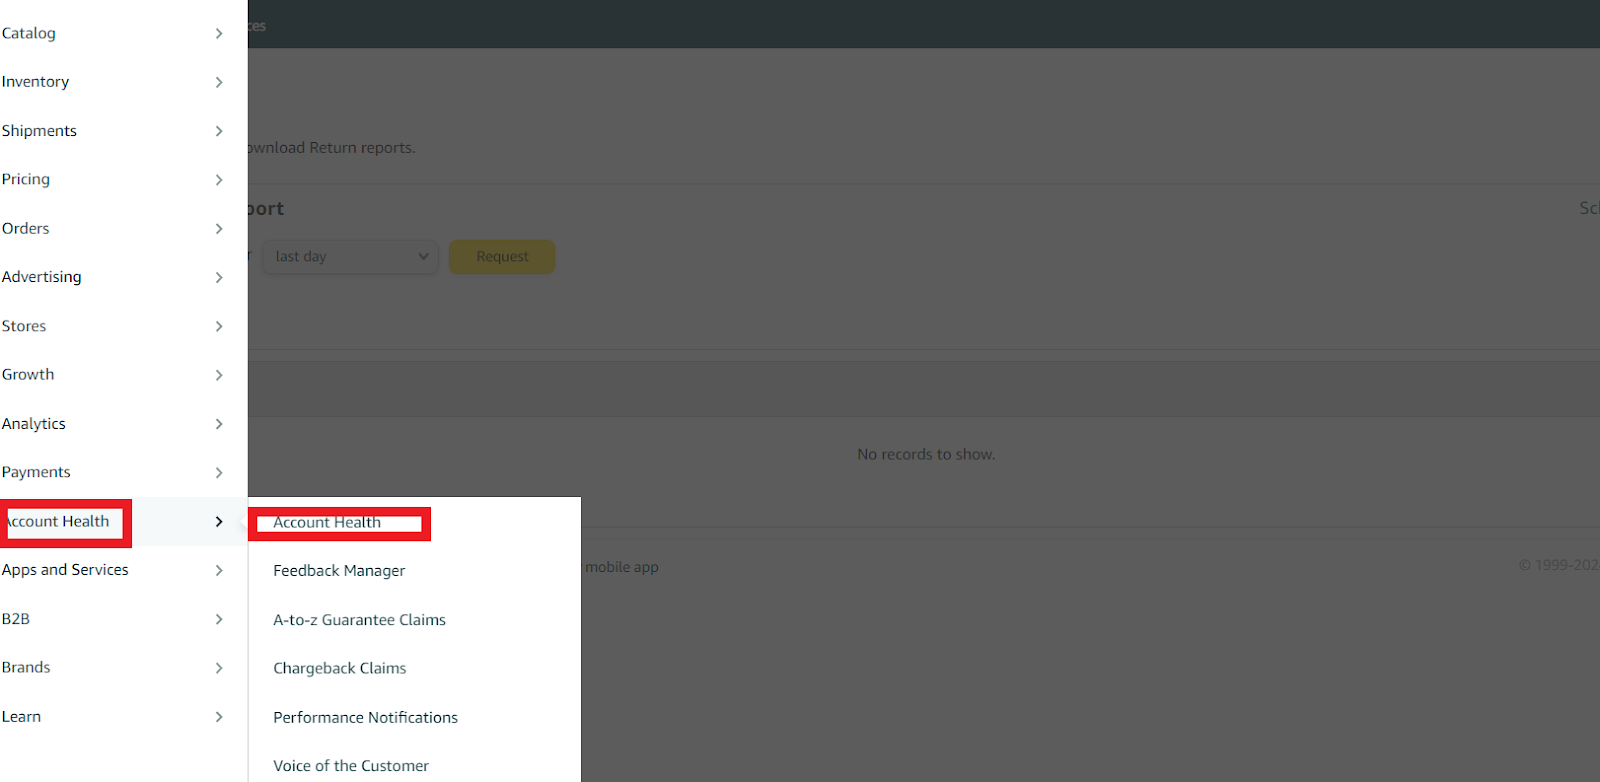
To access the Account Health Dashboard, in the side navigation menu, click ‘Account Health,’ then click ‘Account health’
Related: Amazon Account Health: A Guide for FBA Sellers
What is Amazon Seller Account Health Rating?
Step 2. You will get to the Account Health Dashboard.
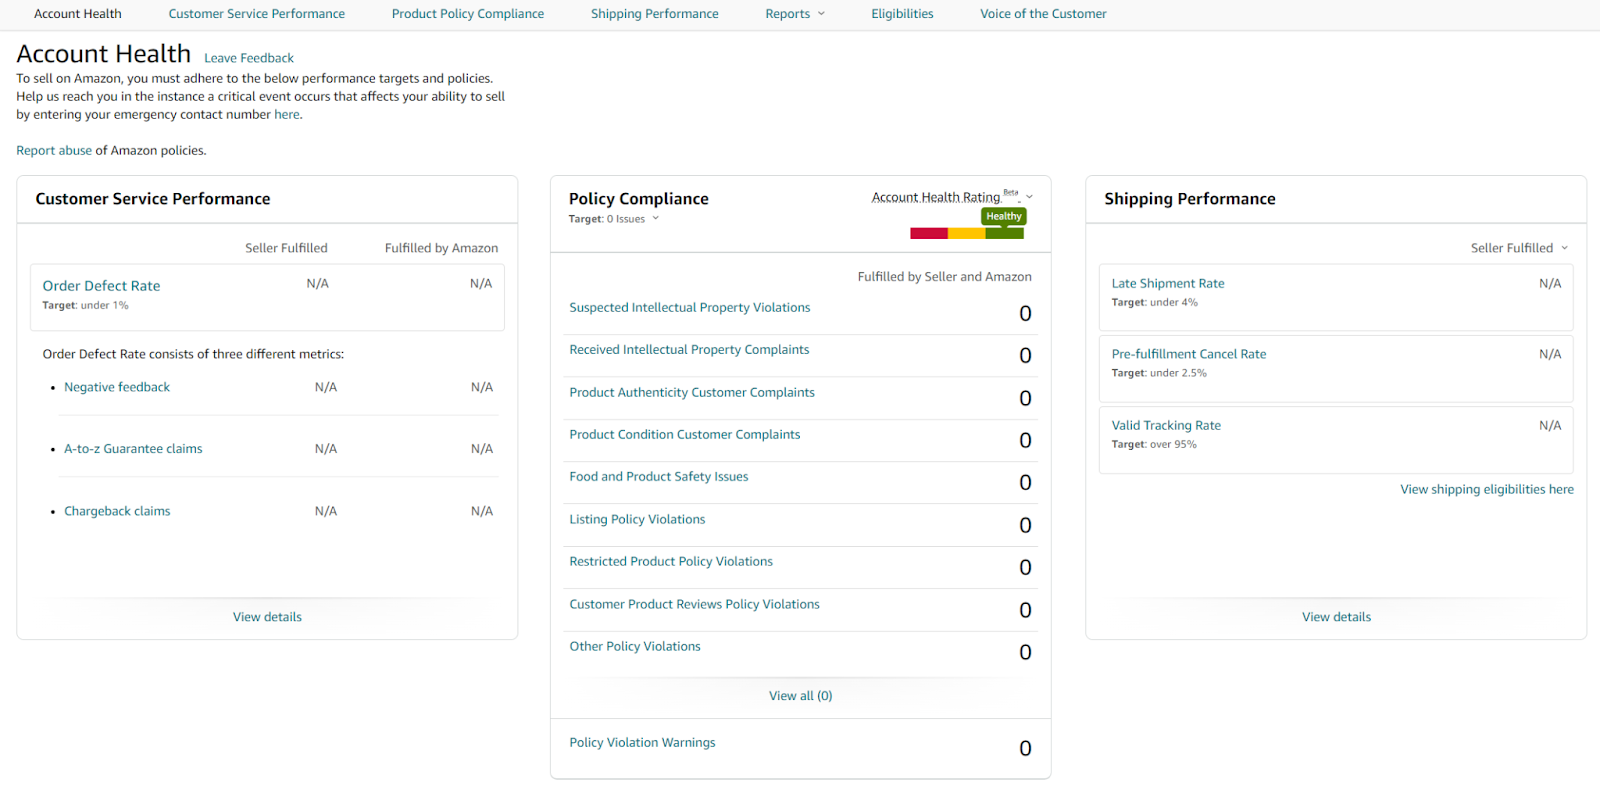
Amazon account health dashboard
Related: Amazon IP Complaint: What Amazon Sellers Need to Know About
What is Amazon IP Complaint? How to Avoid IP Complaints
Other Features of Amazon Seller Central
In addition to the main navigation menu, you can find many useful options in the top right corner of your Seller Central page. That includes Settings, Messages, and Help.
Settings
In the Settings, you can find your Account Info, including your Seller ID, set Notification Preferences,
change your password in Login Settings, and manage your Return Settings and Gift Options.
You can also change your shipping address in Shipping Settings, select and modify Tax Settings, issue User Permissions, and review User Permissions History. Additionally, you can add custom data about your business and policies and certify to sell to US Government Agencies in Your Info & Policies, and choose different Fulfillment by Amazon settings.
How to Give a Child Access to Amazon Seller Central?
Giving a child access to your Amazon Seller Central account can be helpful if you want to provide third parties access to your Seller Central account. That may be needed if you use an agency, a virtual assistant, or your employees, referred to as “children,” to help with your sales. You can set permissions for the child, such as viewing or managing orders, accessing reports, or editing product listings. You can also impose limits on their access by choosing which features they can or cannot access.
Giving a child access to Amazon Seller Central step-by-step
Step 1. Log in to your Amazon Seller Central account.
Step 2. Click the ‘Settings’ tab in the screen’s top right corner. From the drop-down menu, select ‘User Permissions.’
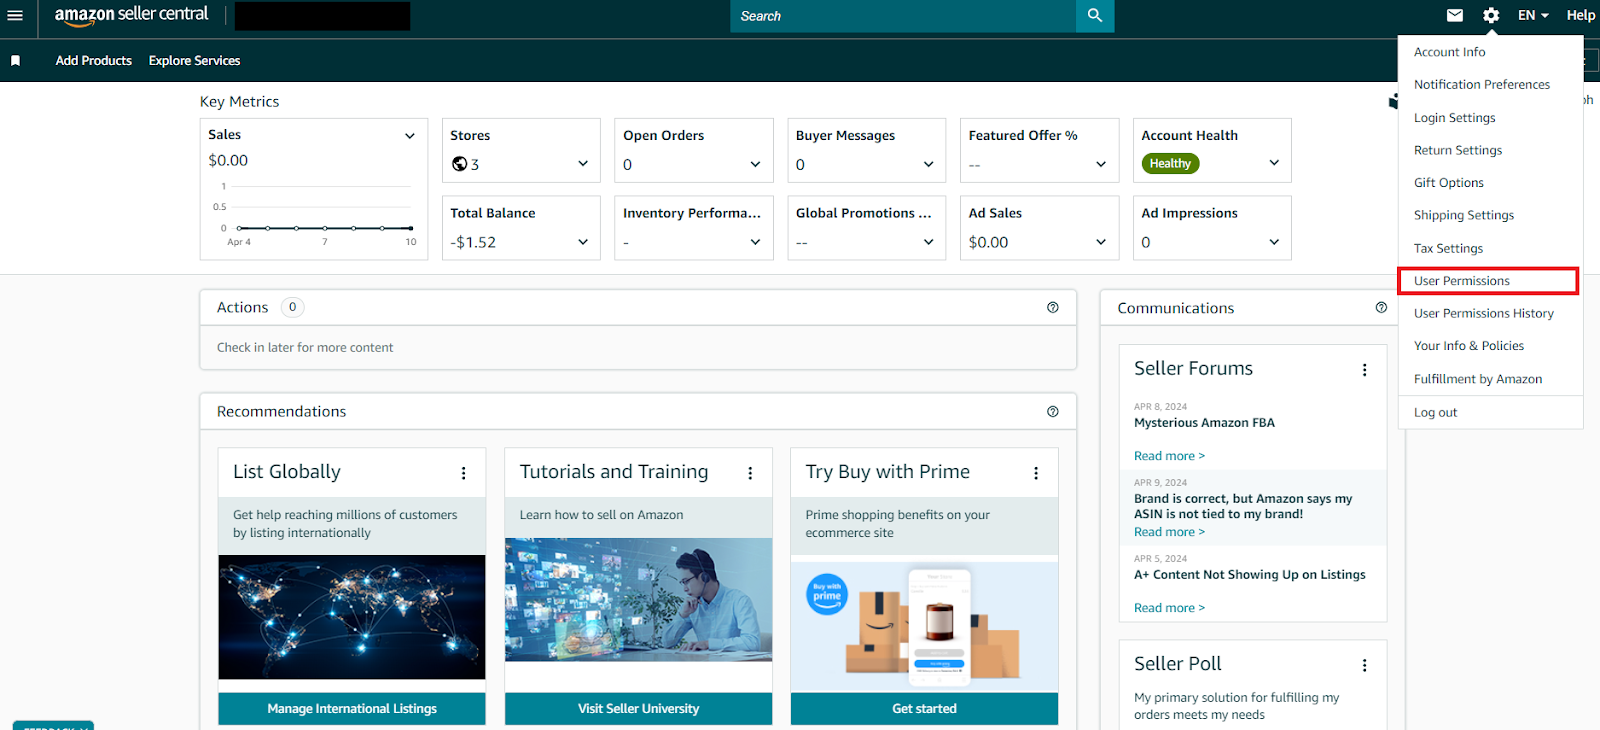
Click the ‘Settings’ tab in the screen’s top right corner. From the drop-down menu, select ‘User Permissions’
Step 3. Click the ‘Add a New User’ button on the User Permissions page. Enter the email address of the child you want to give access to and select the user type as ‘Other.’ Click the ‘Send Invitation’ button.
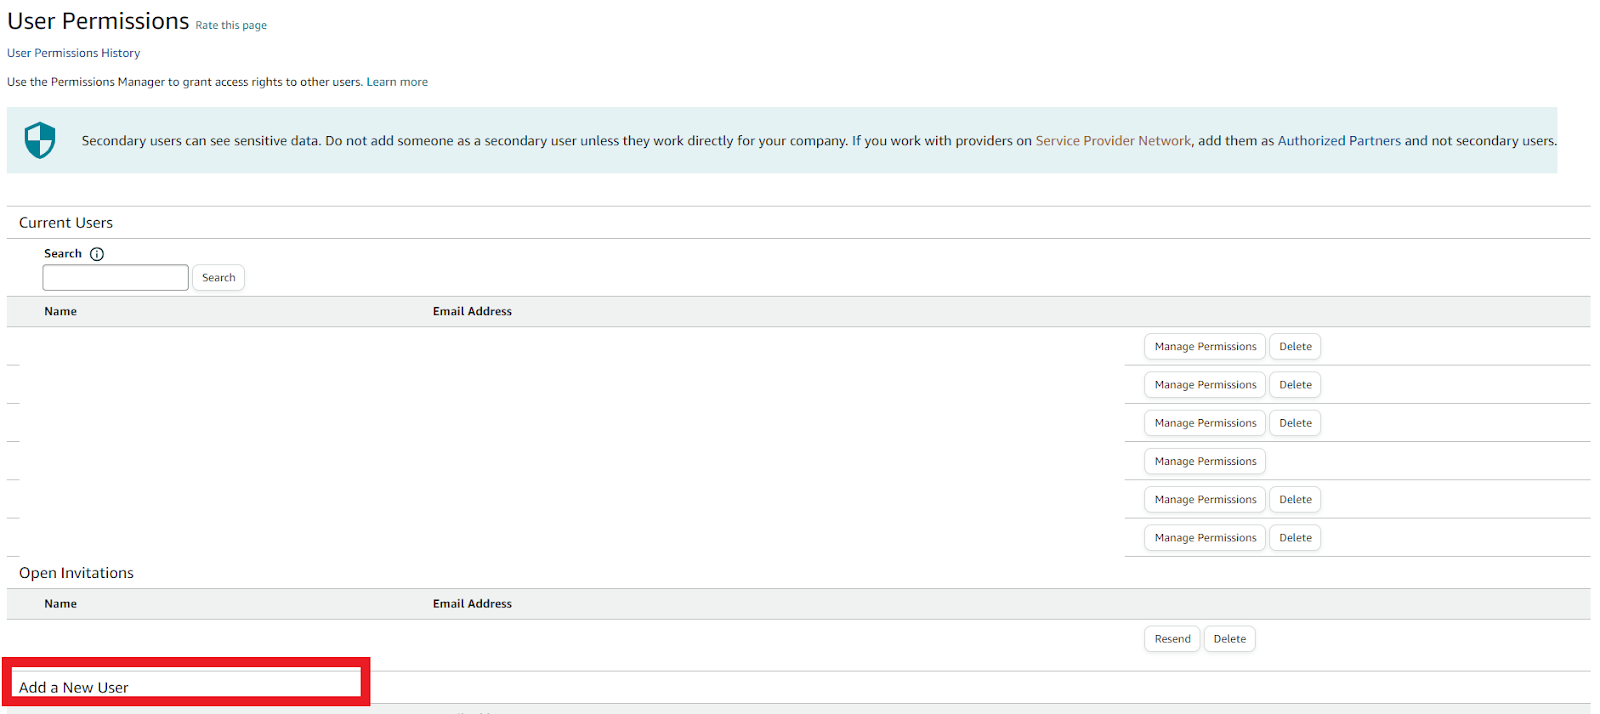
Click the ‘Add a New User’ button on the User Permissions page. Enter the email address of the child you want to give access to and select the user type as ‘Other.’ Click the ‘Send Invitation’ button
Step 4. Amazon will email the child with instructions on how to access the account. The child must accept the invitation and create a new Amazon account if they don’t have one already.
Step 5. Once the child accepts the invitation, they can access your Amazon Seller Central account with the permissions you have granted them.
Step 6. To manage the child’s access to your account, you can go to the User Permissions page and make changes as needed.
Note: It’s essential to give access only to the individuals you trust and to limit their permissions to ensure the security of your Amazon account.
Related: Secure Way To Check Amazon Product Restrictions for Virtual Assistants
How to Become an Amazon Virtual Assistant
Messages
Messages help facilitate customer communication, manage customer inquiries, and resolve issues promptly. Seller Central equips you with a dedicated tool for communication – Buyer-Seller Messaging.
This messaging system allows you to communicate directly with customers who have purchased your products on Amazon.
With Messages, you can respond to customer inquiries about products, orders, or returns, address customer concerns, and provide order updates and shipping information.
Help / Contact Seller support
Sellers needing help with their accounts can contact Amazon Seller Support by opening a support ticket. Seller Support will assist you and provide links to help pages on the matter.
To contact Amazon Seller Support, in the top right-hand corner of the Seller Central homepage, click the ‘Help’ button. That will allow you to open a support ticket and view your open cases.
Related: Customer Service by Amazon: All You Need to Know
When Should Amazon Seller Email Jeff Bezos?
What is the Amazon Buyer-Seller Messaging Service?
Amazon Seller University
Amazon offers sellers numerous options to enhance their sales knowledge through participating in its seller training videos and webinars. The training is called Seller University. You can access this dedicated page from the Seller Central homepage by visiting ‘Tutorials, and Training’ > ‘Visit Seller University’ or clicking the following link.
FAQ
What do I need to know about Amazon Seller Central?
Amazon Seller Central is your all-in-one hub for managing your Amazon sales. It provides you with a range of tools and services necessary to take care of your Amazon business, including inventory management, order fulfillment, payment processing, and customer service.
What is an Amazon seller?
An Amazon seller is a business or individual who sells their products on Amazon’s online marketplace. They use Seller Central to manage their listings, inventory, fulfillment, and customer service.
What are the special features of Amazon Seller Central?
Seller Central goes beyond just listing products. It offers special features like managing FBA (Fulfillment by Amazon) for storage and shipping, and in-depth analytics to track sales and optimize your business for success on Amazon.
What are the different types of Amazon Seller Central?
Seller Central itself isn’t categorized into types, but it offers two main selling plans: Individual (ideal for casual sellers with a low volume) and Professional (suitable for higher-volume sellers with access to advanced features).
Final Thoughts
Amazon Seller Central is a powerful tool for sellers looking to reach millions of Amazon’s customers worldwide. As an Amazon seller, knowing how to navigate and effectively use Amazon Seller Central is essential. That helps manage your orders, inventory, and business performance.
Seller Assistant is an all-in-one product sourcing software offering all the features vital for product sourcing. It combines three extensions: Seller Assistant Extension, IP Alert, and VPN by Seller Assistant, tools: Price List Analyzer, Brand Analyzer, Seller Spy, Bulk Restrictions Checker, and API integrations, and features: Storefront Widget, Side Panel View, FBM&FBA Profit Calculator, Quick View, ASIN Grabber, UPC/EAN to ASIN converter, Stock Checker, and other features that help quickly find high-profit deals. Seller Assistant also offers integration with Zapier allowing to create custom product sourcing workflows.