Most Amazon sellers trust their ROI and profit calculations – but still lose money on deals that look solid. The issue isn’t the math. It’s the missing costs.
Expenses like shipping, VAT, prep, and FBA inbound often appear later in the workflow, after the buying decision is already made. This creates a gap between estimated and real profit.
In this post, we’ll show where that gap comes from, how it affects your margins at the SKU level, and how a connected Seller Assistant’s workflow helps you capture every cost before it turns into a loss.
Why Calculating All Costs Is the Difference Between Profit and Loss
Most Amazon sellers calculate ROI and margin during sourcing – but those numbers rarely include the full cost of getting a product ready for sale. Expenses like VAT, prep, inbound fees, and all shipping costs are often added later, after the buying decision is already made. This creates a gap between estimated and real profit.
Accounting for every cost upfront helps you avoid deals that only look profitable and make decisions based on actual margins.

Avoid misleading profit calculations
ROI and margin depend on complete cost data. If you miss VAT, shipping, or prep, your profit looks higher than it really is.
Include all shipping costs, not just supplier price
Inbound shipping, freight, and last-mile delivery are often excluded at sourcing. These costs can significantly reduce your margin per unit.
Account for VAT and additional taxes
VAT and other taxes are easy to overlook, especially when sourcing from new suppliers. They directly increase your true cost.
Factor in prep and handling costs
Labeling, packaging, bundling, and prep center fees add up per unit and quietly eat into your profit.
Capture purchase order expenses
Bulk costs like shipping, tax, and supplier fees live at the PO level. If they’re not distributed per SKU, your unit economics are inaccurate.
Reflect FBA inbound fees accurately
Inbound costs are often estimated or ignored, but they directly impact your landed cost and final margin.
Keep profit consistent as you scale
Small missed costs per unit become large losses across bigger orders. Full cost tracking keeps your margins stable as volume grows.
How Seller Assistant Tools Help You Capture Every Cost
| Cost tracking workflow summary | Description |
|---|---|
| What it is | A connected cost-tracking workflow that helps Amazon sellers account for all product and order expenses before and after buying |
| Best for | Amazon wholesale sellers, online arbitrage resellers, dropshippers |
| Core function | Combines sourcing data, supplier data, warehouse data, landed cost, and Purchase Order totals so sellers can review complete costs instead of relying on partial estimates |
| Key benefit | Helps sellers avoid missing costs such as VAT, prep, inbound fees, and shipping, and confirm real profitability before sending a purchase order |
| Where cost review happens | In Product Database through the SKUs Tool with landed cost, and in Purchase Orders Module through the cost summary panel |
| How it works | Products are analyzed in Price List Analyzer or Seller Assistant Extension, added to Product Database, reviewed in SKUs Tool with landed cost and connected cost data, and then moved to Purchase Orders Module once profitability is confirmed |
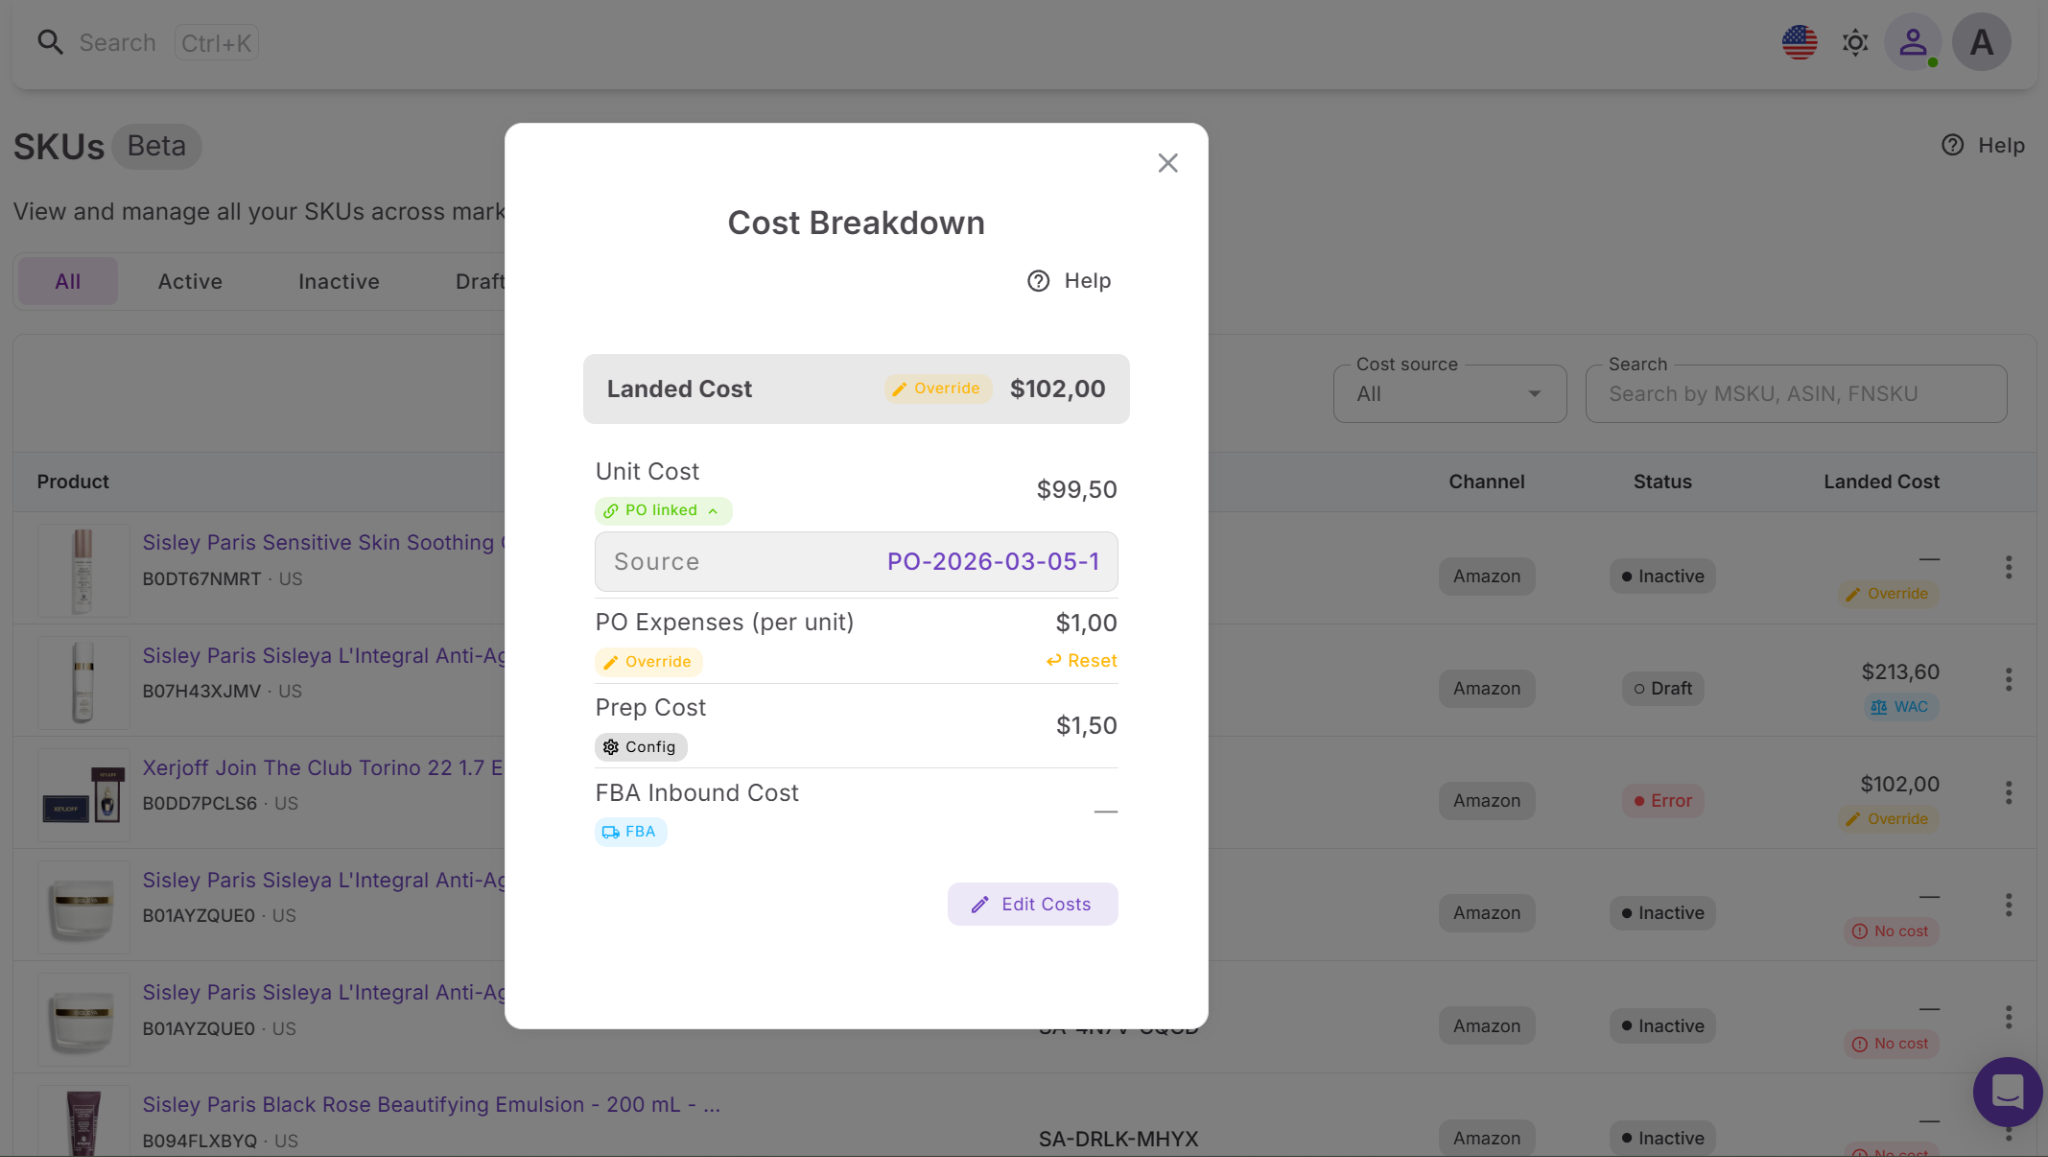
| What landed cost shows | Per-unit costs such as unit cost, Purchase Order expenses, prep cost, and FBA inbound cost |
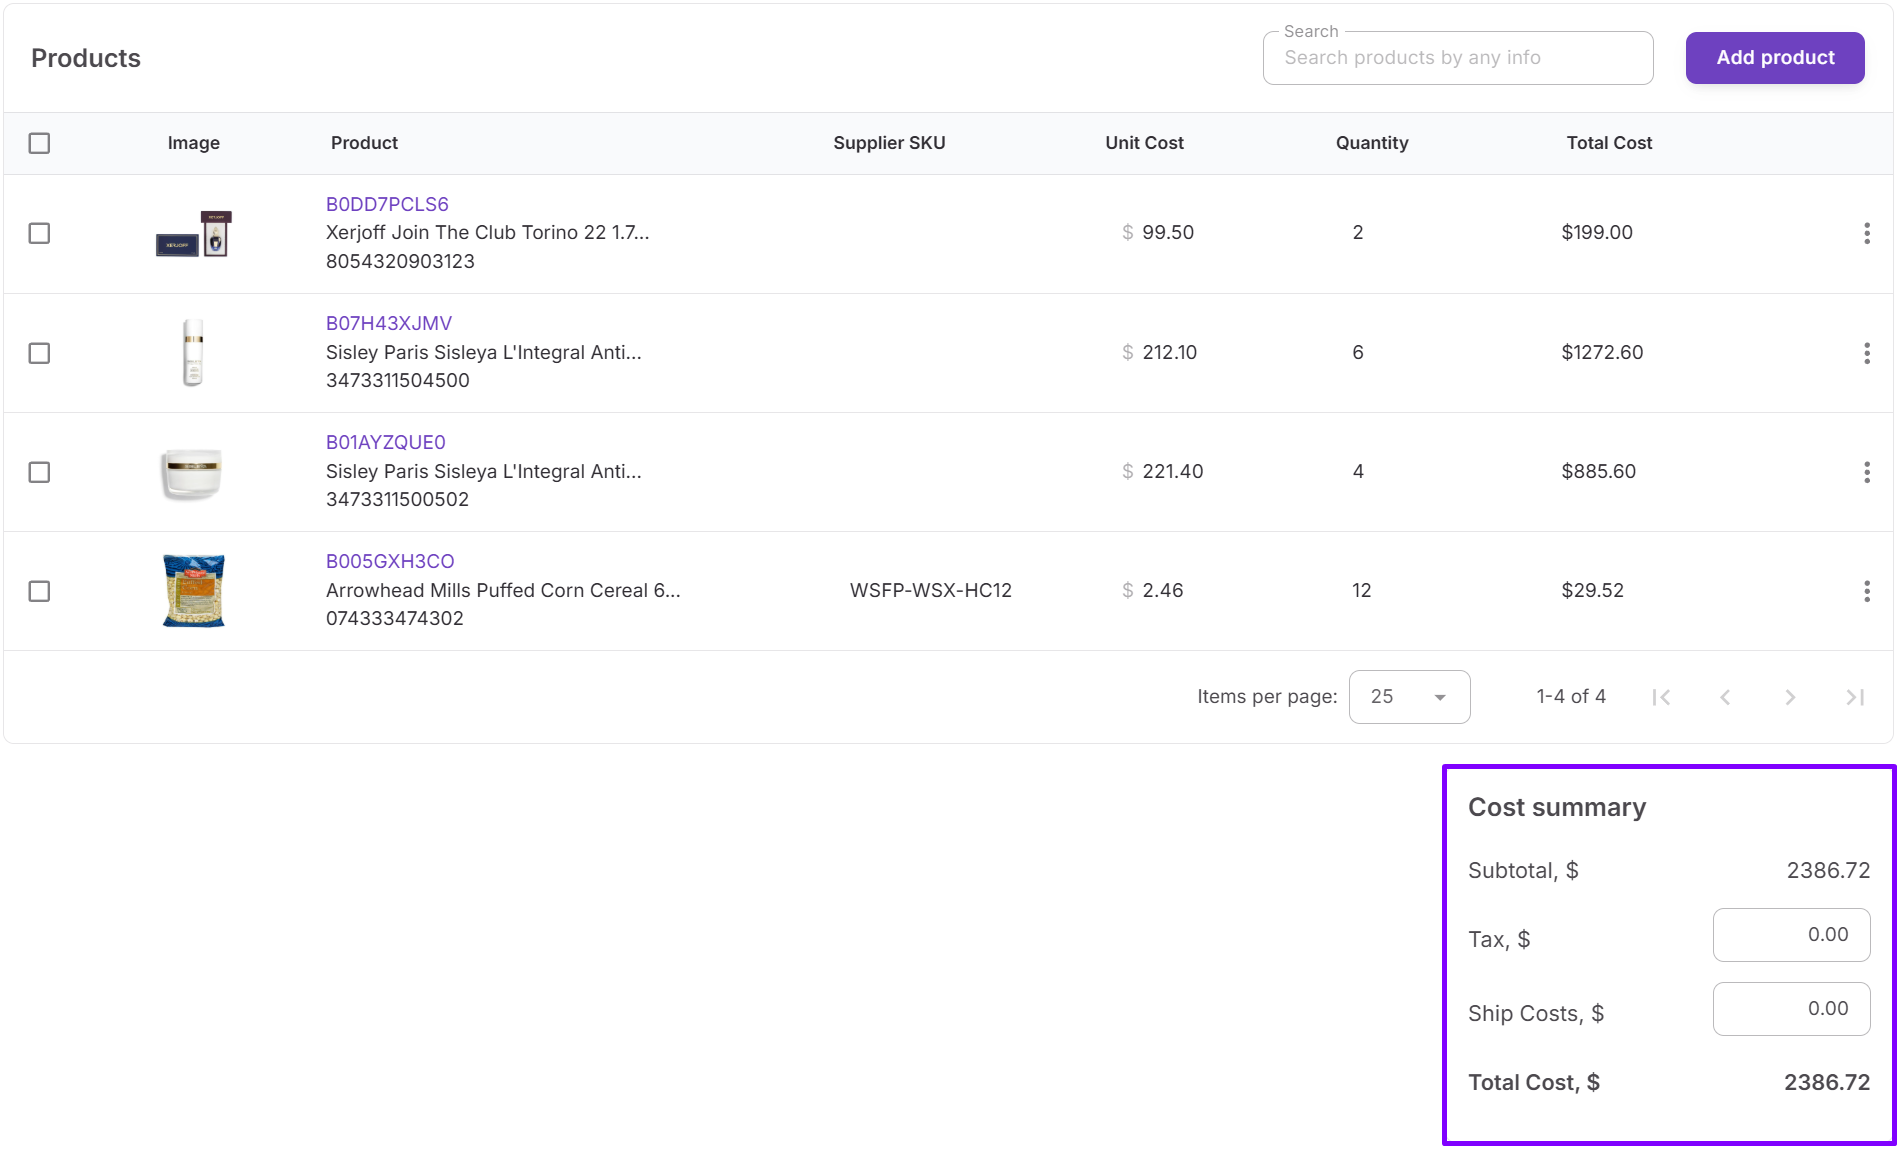
| What the cost summary panel shows | Order-level costs such as subtotal, VAT or tax, shipping costs, and total cost |
| Platform | Seller Assistant |
Seller Assistant connects your sourcing, analysis, purchasing, and SKU management into one structured workflow. Instead of adding costs randomly at different stages, each expense appears exactly where it should – and then feeds into the final per-unit calculation.
This ensures you don’t miss costs simply because they show up later in the process. Two key elements make this work – landed cost in the SKUs Tool inside Product Database and the cost summary panel in Purchase Orders Module.
Landed cost in SKUs shows true per-unit cost
Inside the Product Database, the SKUs Tool (alongside Listings) calculates landed cost for each SKU. It combines unit cost, purchase order expenses, prep cost, and FBA inbound fees into a single per-unit number. These values update as purchase orders are completed and shipment data is synced, so your cost per SKU reflects real operational data, not assumptions.
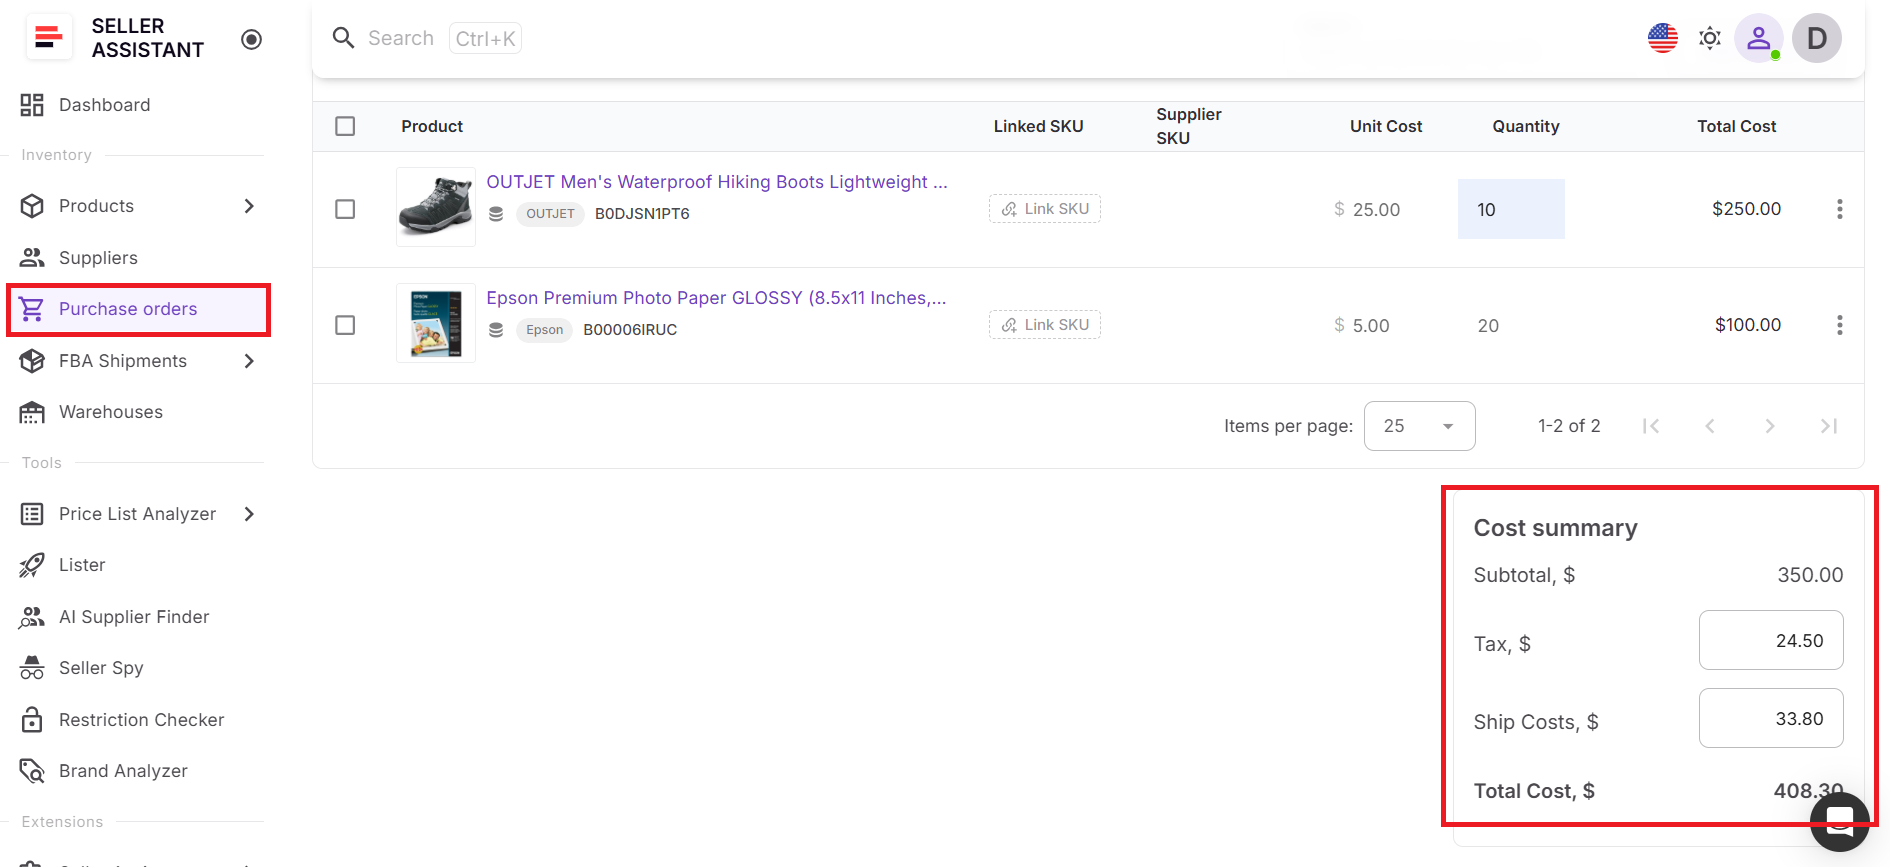
Cost summary panel captures total order costs
Once products move from analysis into purchasing, the Purchase Orders Module consolidates all bulk expenses. The cost summary panel includes product cost (COG), VAT and other taxes, and all shipping costs. This is where your total inventory cost is formed at the order level. Instead of relying on estimates, you see exactly how much you are committing before inventory reaches FBA.
Connected workflow ensures no cost is missed
Seller Assistant is built around a connected wholesale workflow, where each step – from product analysis to purchasing – is structured and linked. This matters because Amazon resellers typically work with single products, but with supplier lists, bulk orders, and multiple cost layers that appear at different stages.
Products enter the workflow during analysis in Price List Analyzer (for bulk supplier lists) or Seller Assistant Extension (for single products) and are then stored in Product Database, where all key data is collected and structured. Inside the SKUs Tool, landed cost is calculated early, combining unit cost with available expense inputs so you can evaluate real profitability before buying.
Once a product is reviewed, the best supplier is selected, and all costs are confirmed, it moves to the Purchase Orders Module. Here, the cost summary panel adds order-level expenses like shipping and VAT, showing the total cost of the purchase. Because different costs appear at different stages – sourcing, purchasing, and fulfillment – this connected workflow ensures every expense is captured and reflected in your final per-unit profitability.
Note. Seller Assistant is an end-to-end Amazon workflow management platform that integrates 15+ wholesale-focused solutions into one connected system. It combines sourcing workflow automation, bulk research and intelligence tools, and integrated Chrome extensions – giving you everything you need to streamline finding deals, managing suppliers, and creating purchase orders.

The platform aggregates: workflow management tools – Purchase Orders Module, Suppliers Database, Product DB, Warehouses Database, FBA Shipments to organize, automate, and scale every step of your wholesale and arbitrage operations; bulk research & sourcing tools – Price List Analyzer, Bulk Restriction Checker, AI Supplier Finder, Brand Analyzer, Seller Spy to evaluate supplier price lists, verify selling eligibility and restrictions, open new brands, and discover winning product ideas from competitors to expand your product catalog; Chrome extensions – Seller Assistant Browser Extension, IP-Alert Extension, and built-in VPN by Seller Assistant to deep-research products, check IP claims and compliance, and access geoblocked supplier sites directly within your browser; and integrations & team access features – seamless API connectivity and integrations with Zapier, Airtable, and Make, plus Virtual Assistant Accounts for secure, scalable team collaboration.
With Seller Assistant, every step of your Amazon wholesale and arbitrage workflow is automated and connected.
What Is Landed Cost In Seller Assistant?
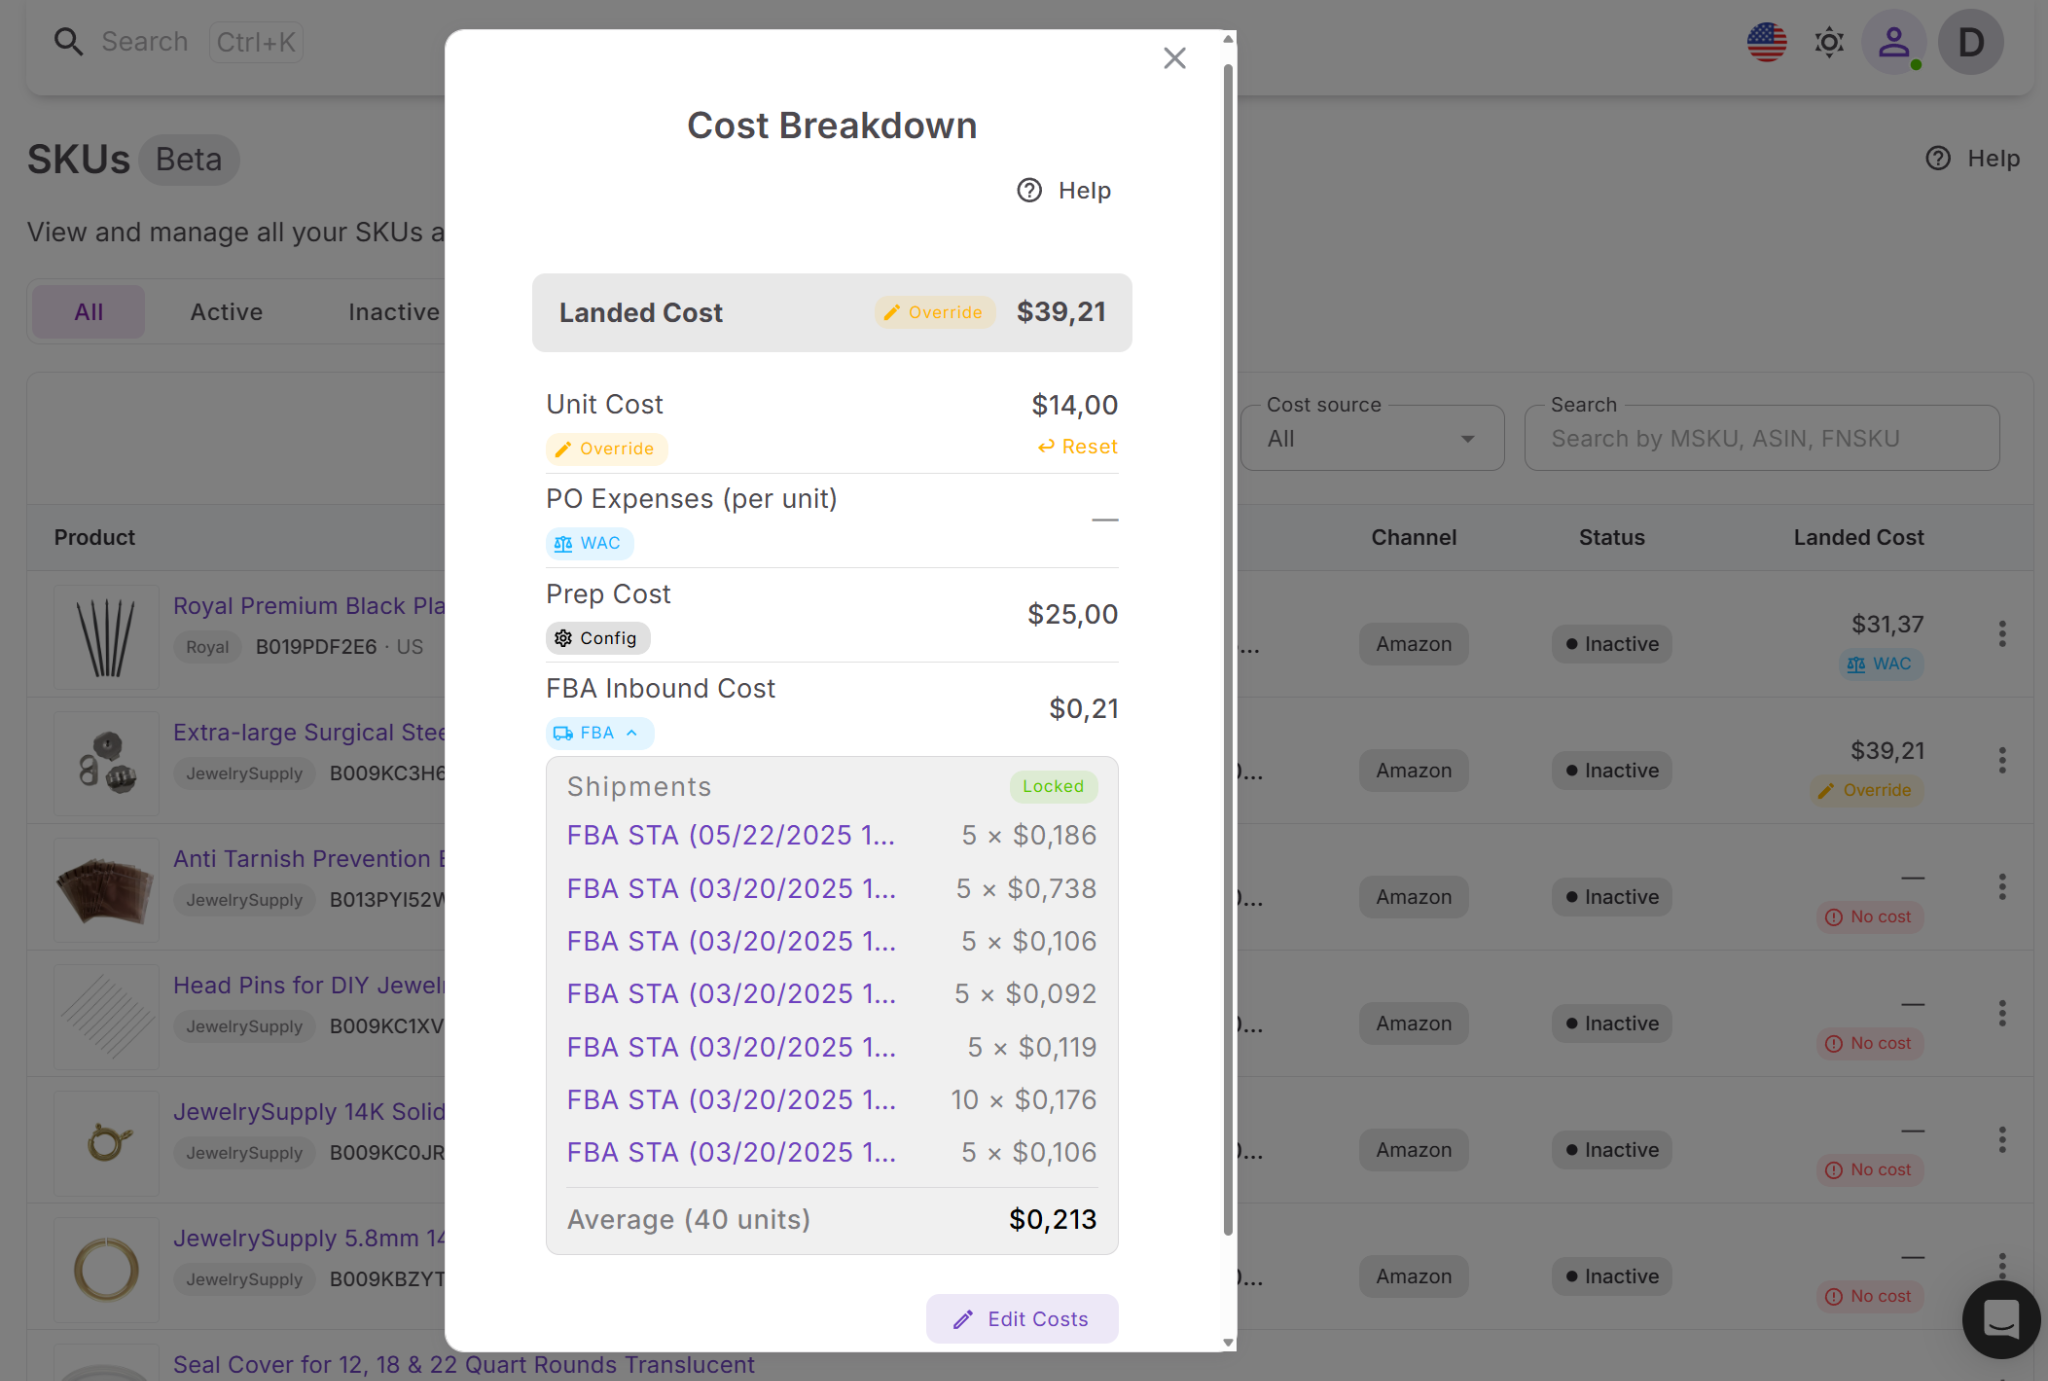
Landed cost is the per-item cost of getting a product ready for sale on Amazon. It combines all key expenses – unit cost (COG), purchase order expenses, prep cost, and FBA inbound fees – into one number at the SKU level. Instead of relying on partial estimates, landed cost shows what each unit actually costs you after all real expenses are applied.
This is critical because profit is calculated per SKU, not per order. If your per-unit cost is incomplete, your margin is misleading from the start.
What cost insights landed cost gives you
Landed cost doesn’t just show a final number – it breaks down the exact components that shape your profit and highlights where money is gained or lost.
- Unit cost (COG)
Shows the base supplier price per unit, which is often the starting point of your margin calculation but not the full picture.
- Purchase order expenses per unit
Distributes bulk costs like shipping, VAT, and additional PO expenses across each SKU, so they are no longer hidden at the order level.
- Prep cost
Includes labeling, packaging, bundling, and prep center fees that directly reduce your margin per unit.
- FBA inbound cost
Reflects the real cost of sending inventory to Amazon, which is often underestimated during sourcing.
- Cost source visibility
Each component is linked to its source – Purchase Orders, shipments, or cost settings – so you can verify where the numbers come from and adjust them if needed.
- Detailed cost breakdown and verification
You can expand any cost component to see the underlying data, including linked Purchase Orders, shipment data, and weighted average cost (WAC) calculations. This helps you understand exactly how each value is formed and verify that your costs are accurate.
By combining these metrics, landed cost removes the biggest cause of profit loss – incomplete cost data. Instead of relying on supplier price and estimated fees, you see the full per-unit cost before and after purchase. This helps you catch unprofitable deals early, avoid underpricing, and make decisions based on real margins rather than assumptions.
What you can do with landed cost
Landed cost turns scattered cost inputs into a clear, decision-ready metric. It helps you move from estimated profitability to real, actionable numbers.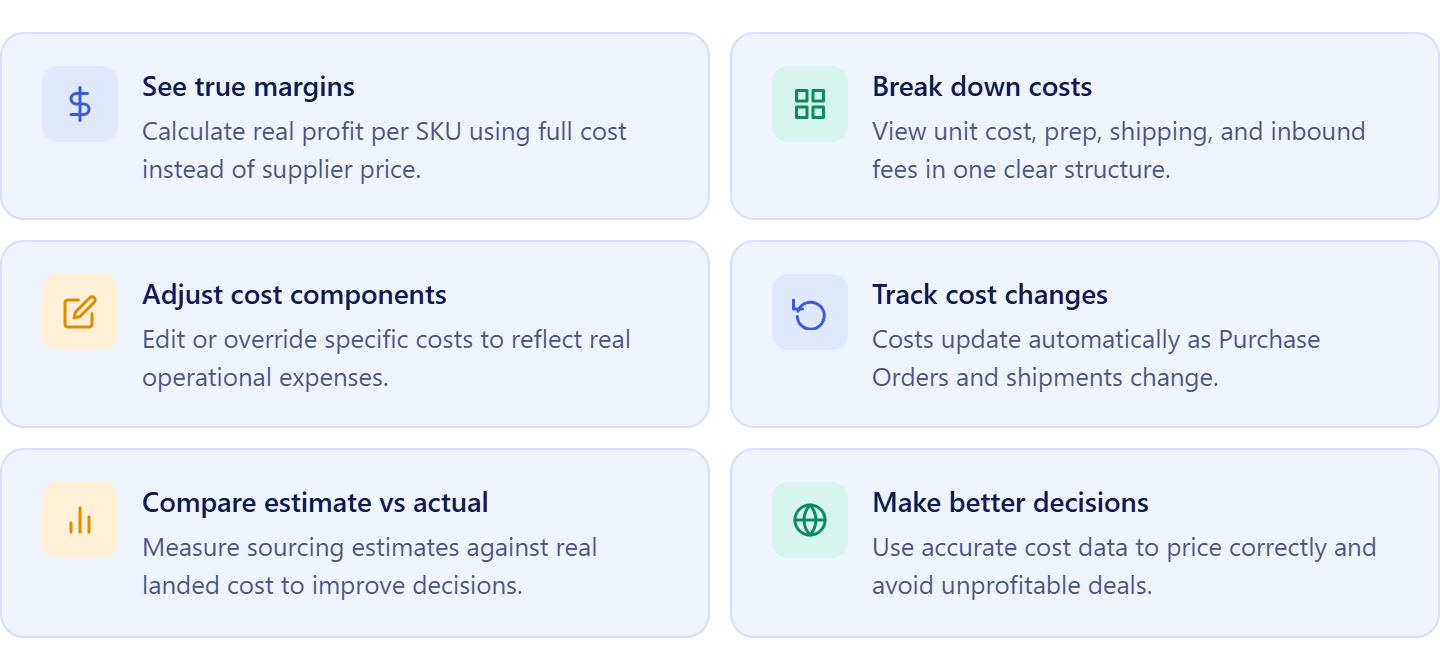
- See your true cost per unit
Combine supplier price, shipping, prep, and inbound fees into one number so you know exactly what each unit costs before pricing or buying decisions.
- Break down every cost component
View how your total cost is built – from COG to inbound fees – and identify which expenses reduce your margin the most.
- Compare estimated vs real profit
Use landed cost to validate your sourcing assumptions and see how actual costs differ from Price List Analyzer estimates.
- Adjust and control cost inputs
Edit or override cost components when needed to reflect real scenarios like updated shipping rates or prep changes.
- Track cost changes over time
As Purchase Orders are completed and shipment data updates, landed cost adjusts automatically, keeping your numbers current.
- Make accurate pricing and sourcing decisions
Base your decisions on real per-unit cost, not incomplete estimates, and avoid deals that only look profitable at sourcing.
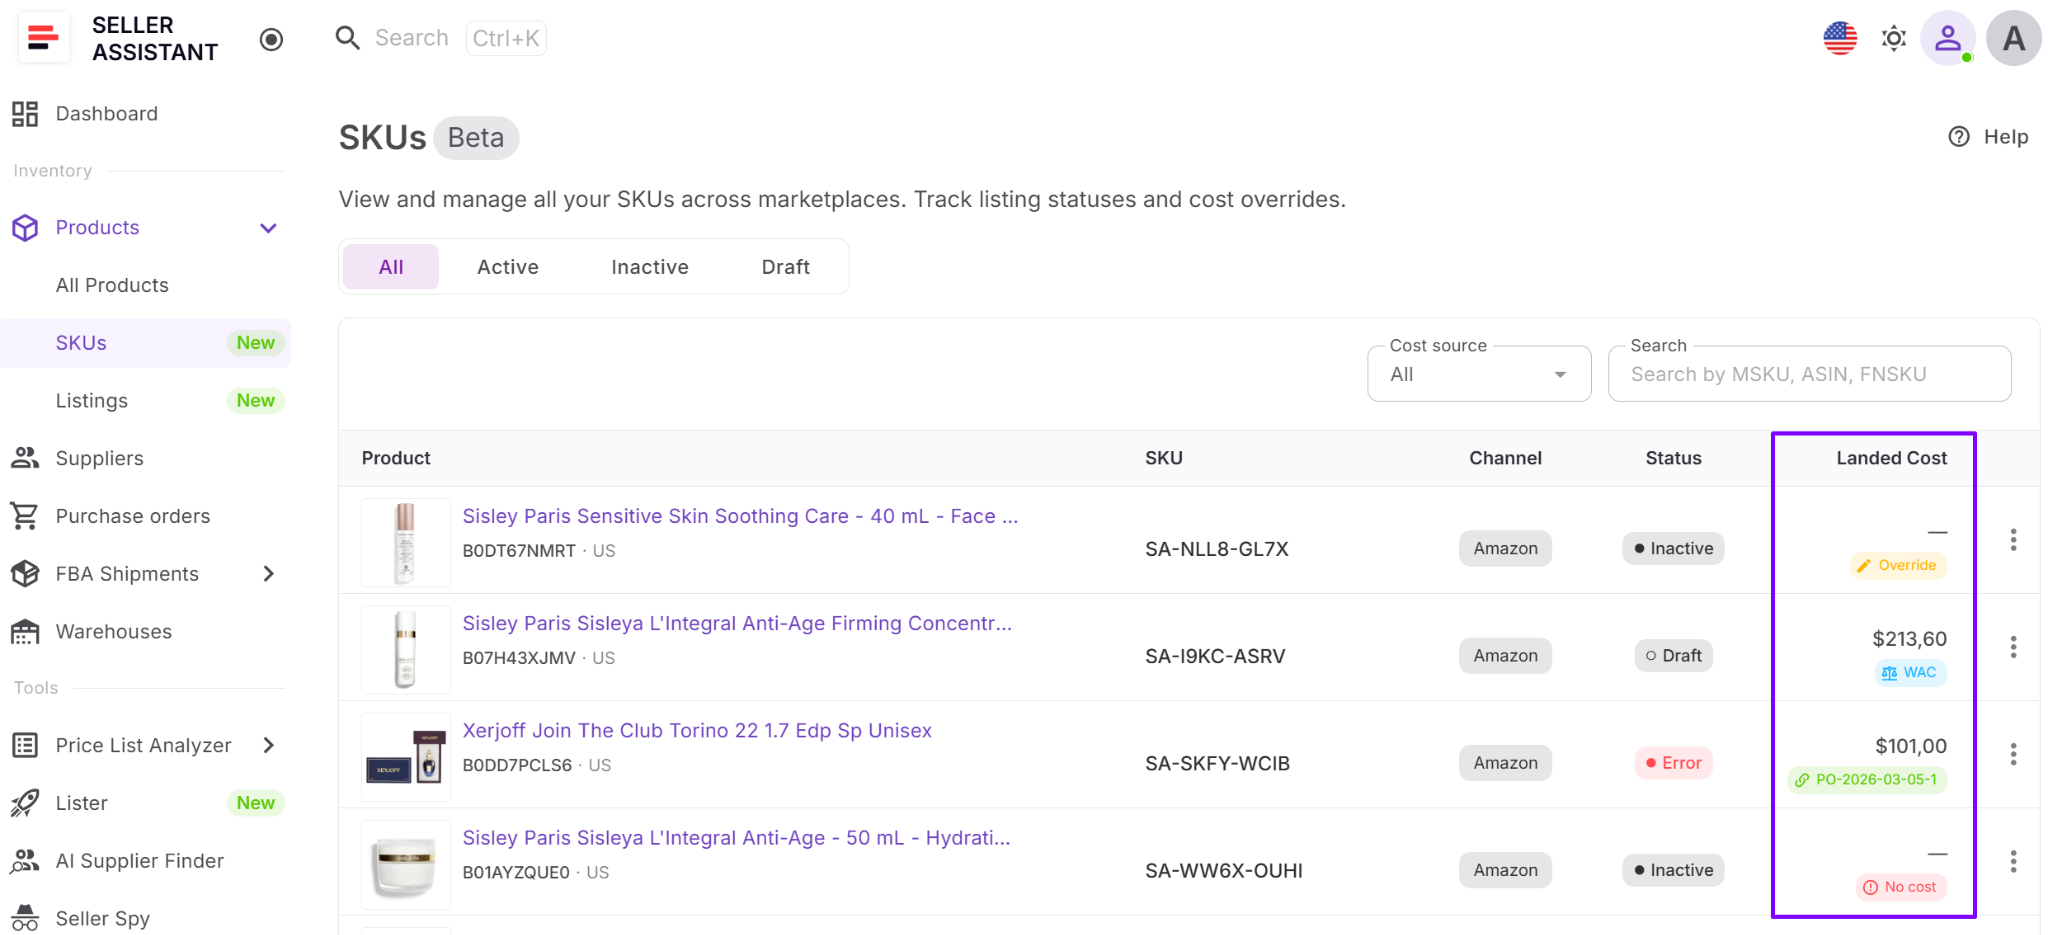
Where to find landed cost in Seller Assistant
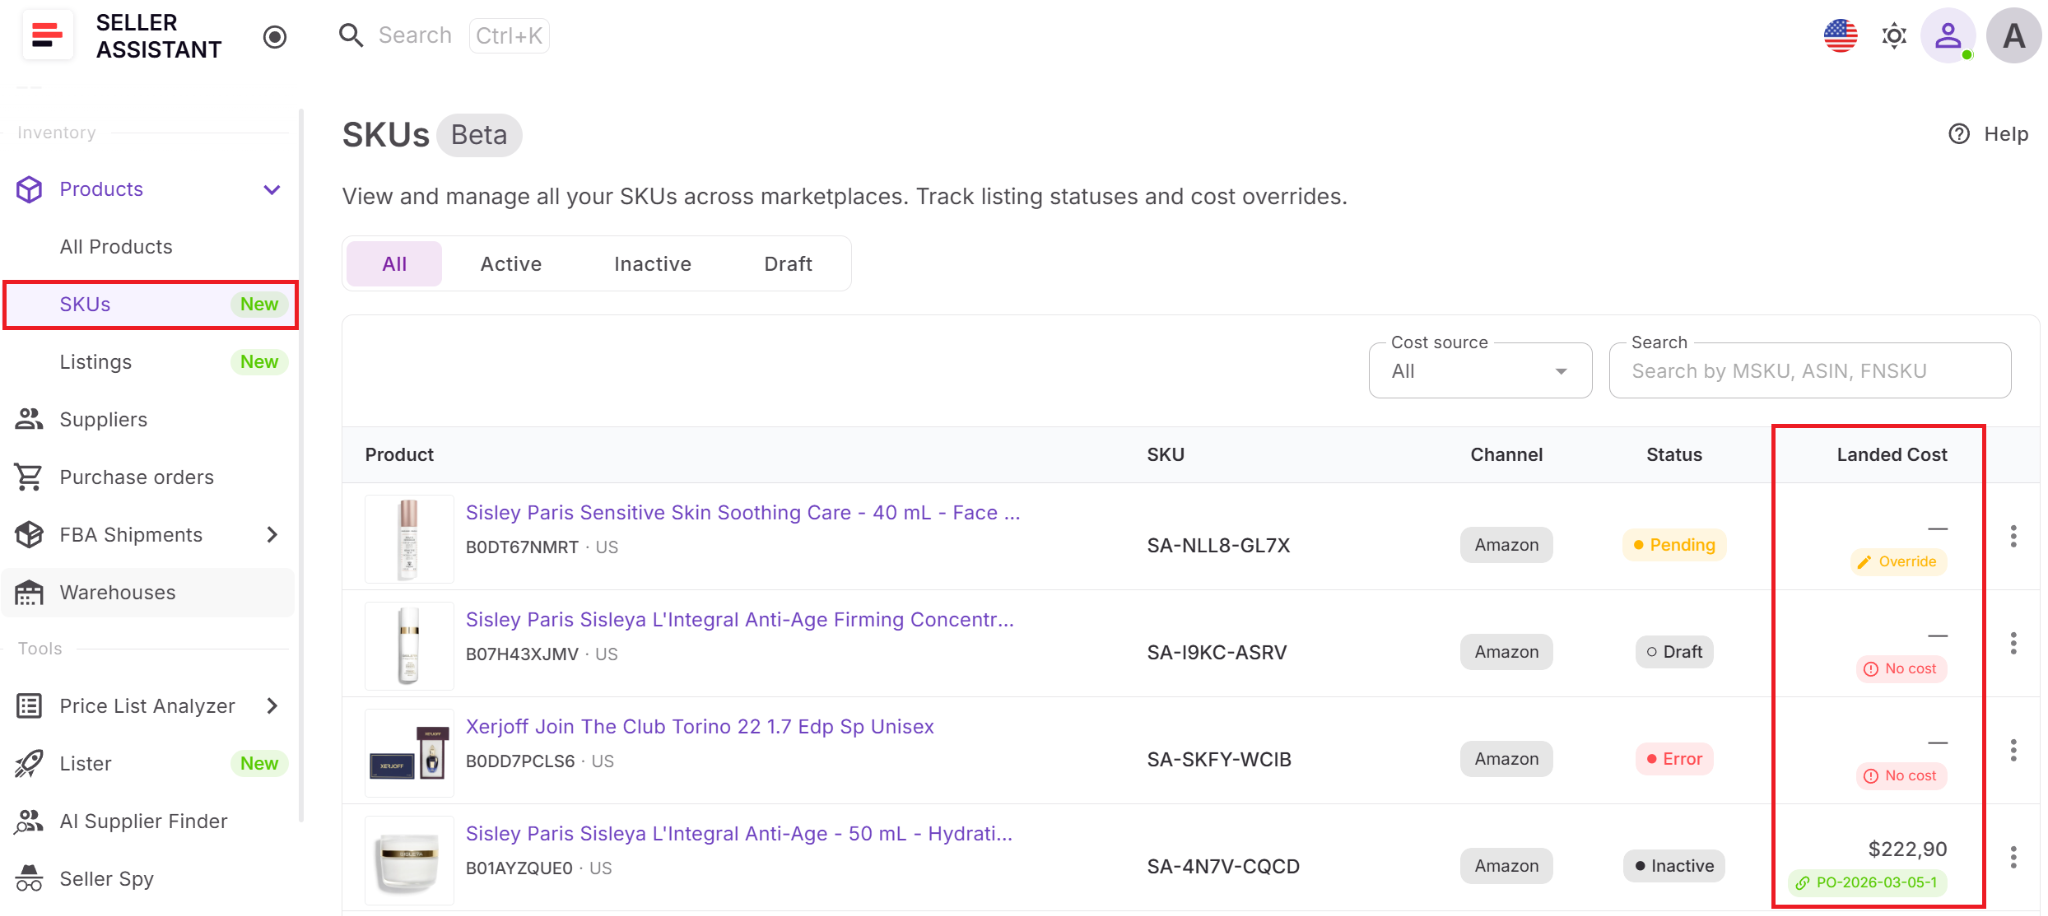
Landed cost is located in the SKUs Tool inside Product Database. Each SKU has a landed cost field – click it to open the full cost breakdown, review components, and manage values.
How landed cost fits your workflow
Landed cost is calculated early in the workflow, after products are analyzed and added to Product Database. It combines data from Price List Analyzer, supplier inputs, cost settings, and later updates from Purchase Orders Module and FBA Shipments.
This matters because different costs appear at different stages. Initial estimates come from sourcing, while actual expenses are confirmed during purchasing and fulfillment. Landed cost brings all of these inputs together at the SKU level, so your profitability reflects the full lifecycle of the product – not just the initial estimate.
What Is Cost Summary Panel in Seller Assistant?
The cost summary panel is the section inside the Purchase Orders Module that shows the total cost of a purchase order. It combines all bulk expenses – product cost (COG), VAT or tax, and shipping costs – into one final number at the order level. Instead of relying on estimates, it shows how much you actually spend on inventory before it reaches Amazon.
This is critical because purchase orders define your total investment, not your per-unit profit. If these bulk costs are incomplete or inaccurate, they will later distort your SKU-level margins and lead to wrong profitability decisions.
What cost insights cost summary panel gives you
The cost summary panel doesn’t break costs per unit – it shows how your total order cost is formed and where your money goes at the purchasing stage.

- Subtotal (COG)
Shows the total cost of goods across all products in the purchase order, based on supplier pricing and quantities.
- VAT and tax
Captures the total tax applied to the order, which directly increases your real inventory cost and is often missed during sourcing.
- Shipping costs
Includes delivery and logistics expenses for the entire order, one of the most common sources of margin loss when not accounted for early.
- Total order cost
Combines all components into a final number, giving you a clear view of how much capital is committed to this purchase.
By combining these metrics, the cost summary panel prevents another major source of profit loss – ignoring or underestimating bulk expenses. It ensures that shipping, VAT, and other order-level costs are captured before they are distributed into SKU-level profitability.
What you can do with cost summary panel
The cost summary panel turns purchase orders into a clear financial checkpoint before you commit to inventory.
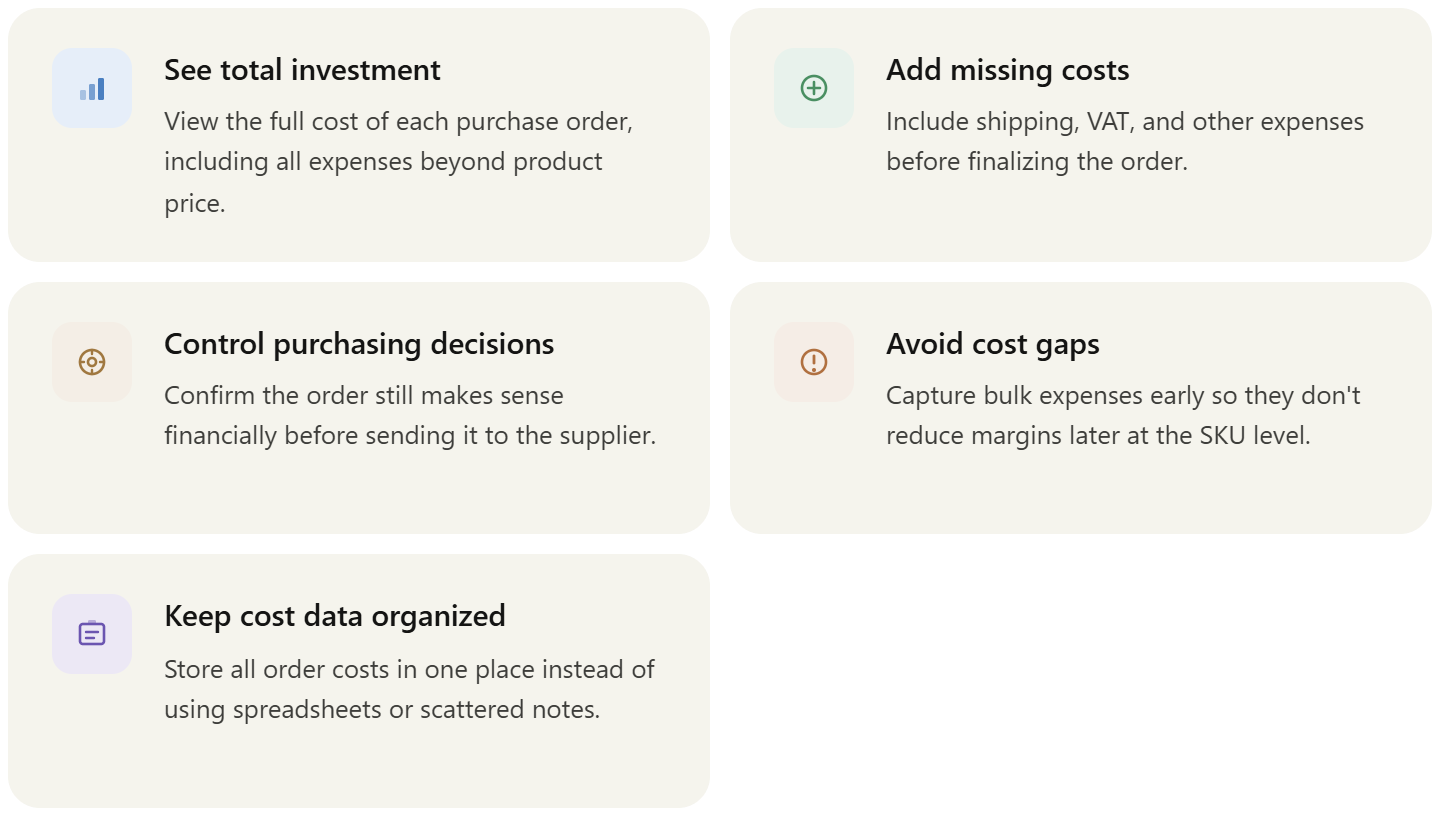
- See total investment per order
Understand exactly how much you are spending on a purchase order, including all additional costs beyond product price.
- Add and validate missing costs
Input shipping, VAT, and other expenses to ensure no cost is left out before finalizing the order.
- Control purchasing decisions
Use full cost visibility to confirm that the order still makes sense financially before sending it to the supplier.
- Prevent underestimating inventory cost
Ensure bulk expenses are included early so they don’t reduce your margins later at the SKU level.
- Keep purchasing data structured and consistent
Store all order costs in one place instead of spreading them across spreadsheets or notes.
Where to find cost summary panel in Seller Assistant
The cost summary panel is located inside purchase orders you create with the Purchase Orders Module. You can find it in each purchase order, where it displays subtotal, VAT or tax, shipping costs, and total order cost.
How cost summary panel fits your workflow
The cost summary panel comes into play after products are analyzed, added to Product Database, and confirmed as profitable at the SKU level. Once you move products into a purchase order, this panel captures all bulk expenses that were not fully defined during sourcing.
This matters because some costs only appear at the purchasing stage – especially shipping and VAT. The cost summary panel ensures these expenses are added and visible before you finalize the order. From there, these bulk costs contribute to your overall cost structure and are later reflected in SKU-level profitability through landed cost.
Together with landed cost, the cost summary panel closes the gap between estimated and real profit – making sure no cost is missed at either the unit or order level.
How Landed Cost and Cost Summary Panel Protect Your Profit
The process starts at the SKU level in Product Database. After analyzing products in Price List Analyzer or Seller Assistant Extension, each product is added with supplier offers, COG, and initial cost inputs. At this stage, landed cost in the SKUs tool already combines available data – unit cost, estimated expenses, and cost settings – so you can evaluate real per-unit profitability before buying.
Once you review the product, select the best supplier, and confirm that the SKU is profitable based on landed cost, you move it to Purchase Orders Module. Instead of recalculating costs, you build a purchase order using already structured product data. Here, the cost summary panel adds order-level expenses like shipping and VAT, showing the total investment required for that order.
This creates a complete cost picture across two levels. Landed cost shows whether each SKU is profitable per unit, while the cost summary panel confirms how much you actually spend in total. Together, they ensure that both your unit economics and your purchase decisions are based on complete, accurate cost data – so no expense is missed before or after you place the order.
How to Use Landed Cost and Cost Summary Panel Step by Step
Landed cost and the cost summary panel help you track costs at two levels – per unit and per order. Landed cost shows whether a SKU is really profitable after all item-level costs are included. The cost summary panel shows the total amount you commit when you place a purchase order. Used together, they help you review costs before buying and confirm them when the order is created.
Step 1. Open the SKUs tool
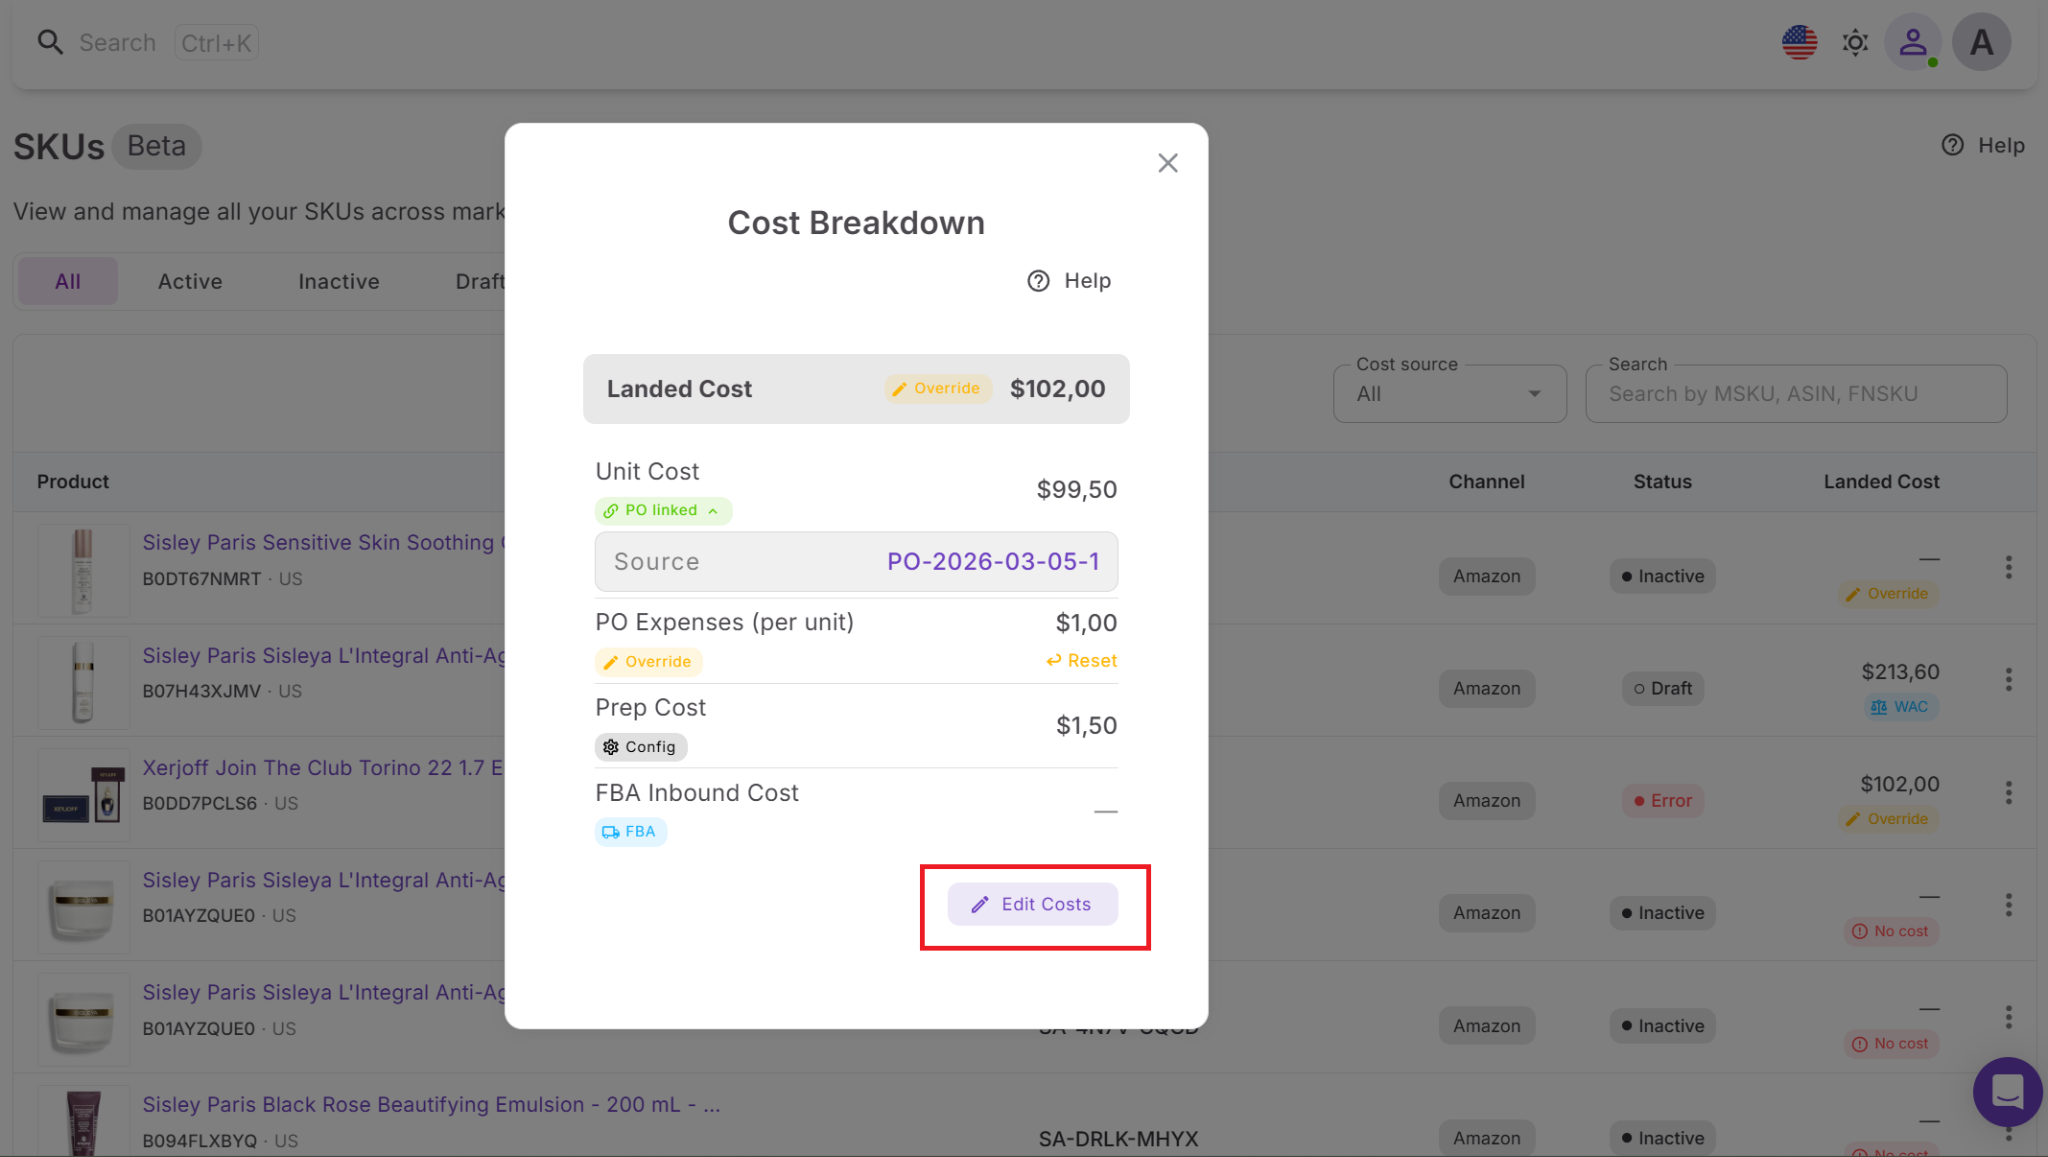
Navigate to Inventory → Products → SKUs, locate the SKU you want to check, and click the landed cost field to open the detailed cost breakdown.
Step 2. Check the landed cost structure
Go through the key components that form landed cost – unit cost, Purchase Order expenses, prep cost, and FBA inbound cost. This gives you a clear view of the true cost per unit.

Step 3. Identify cost sources
Review the source labels for each component, such as PO, WAC, Shipment, Config, or Override. This shows whether the value comes from a purchase order, weighted average cost, shipment data, system settings, or a manual change.

Step 4. Update costs when needed
Modify any component to reflect actual expenses and save your changes. If necessary, reset the field to return to the automatically calculated value.
Step 5. Confirm the product is profitable
Use the landed cost data to verify that the SKU still makes sense after all available costs are included. This helps you avoid moving forward with products that only looked profitable at sourcing.
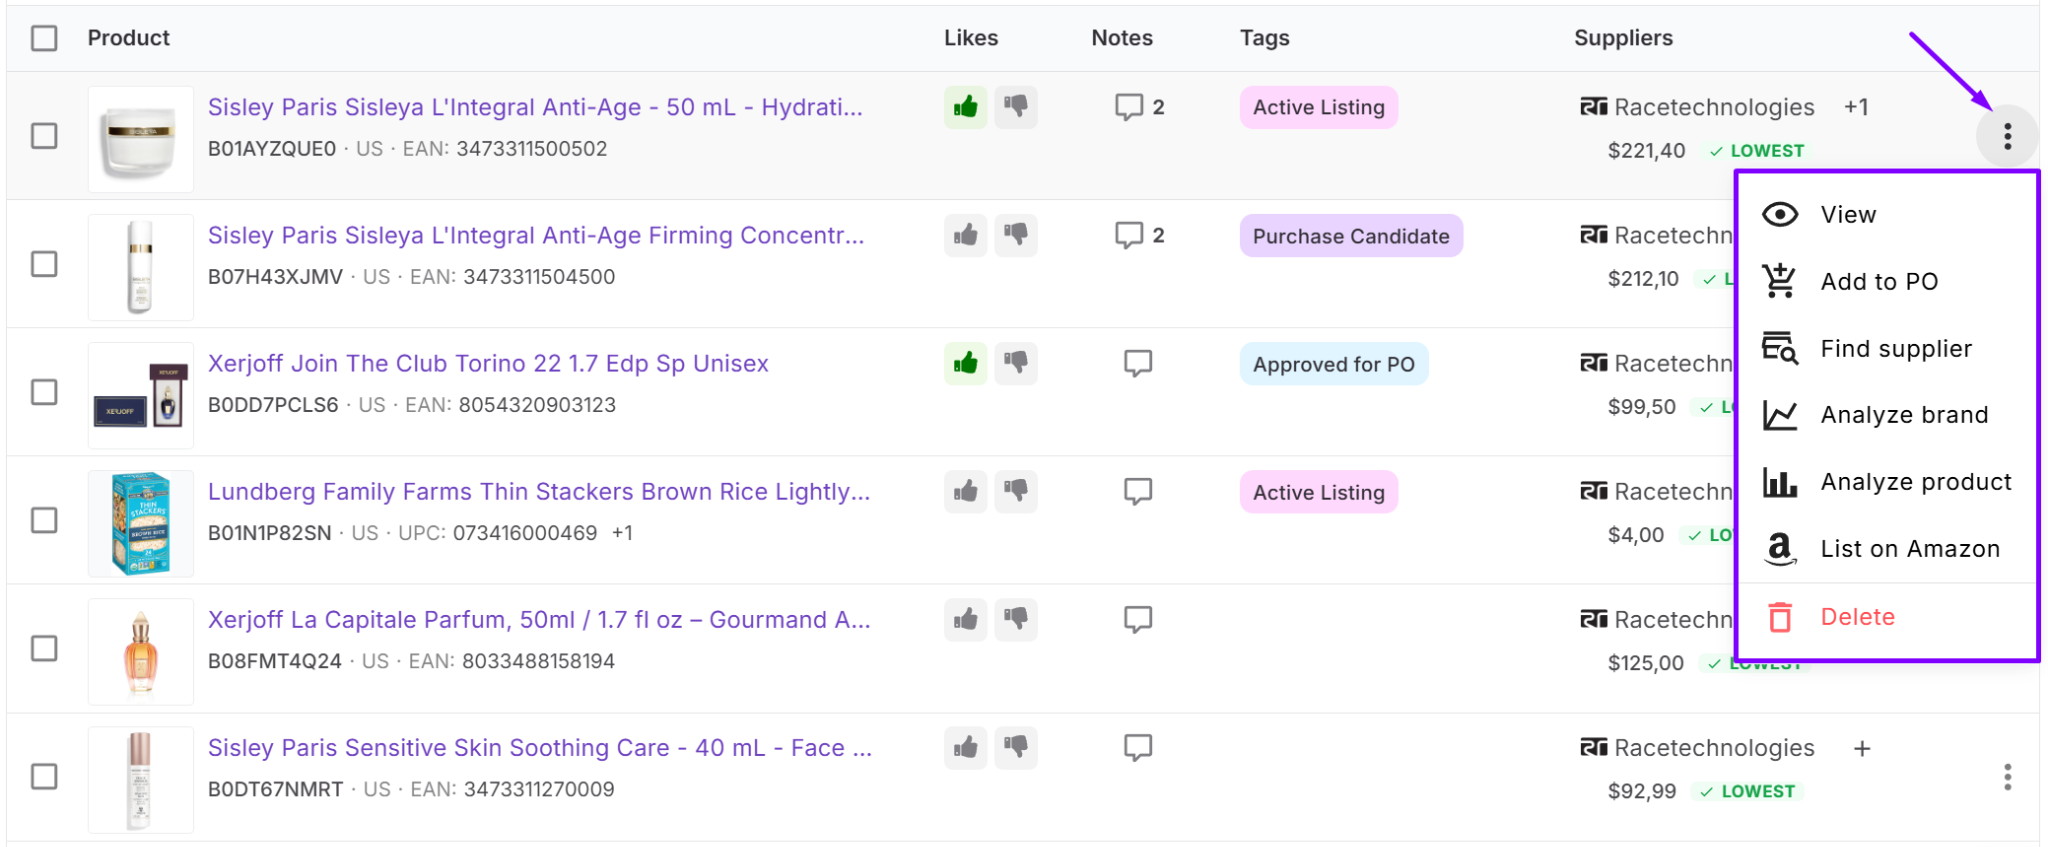
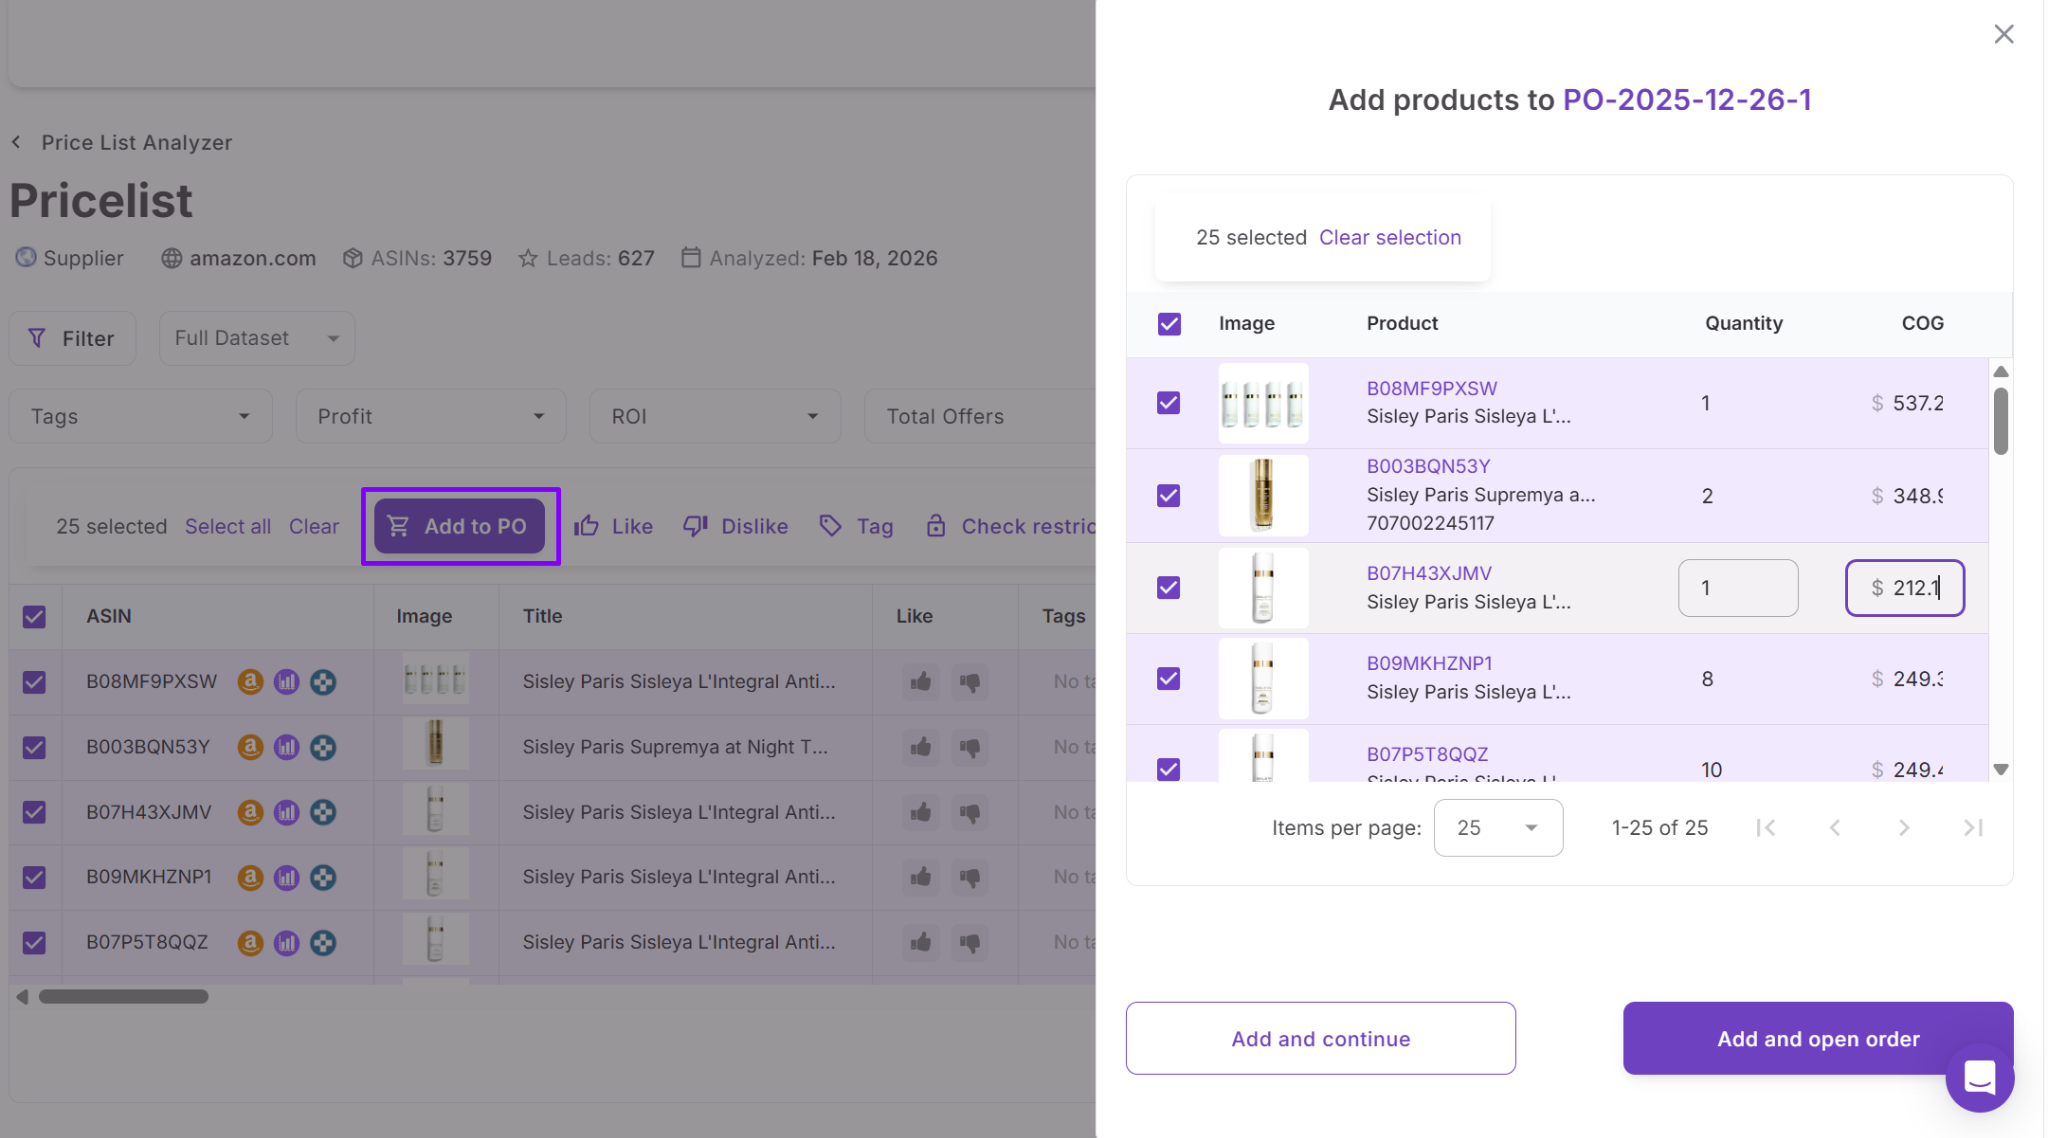
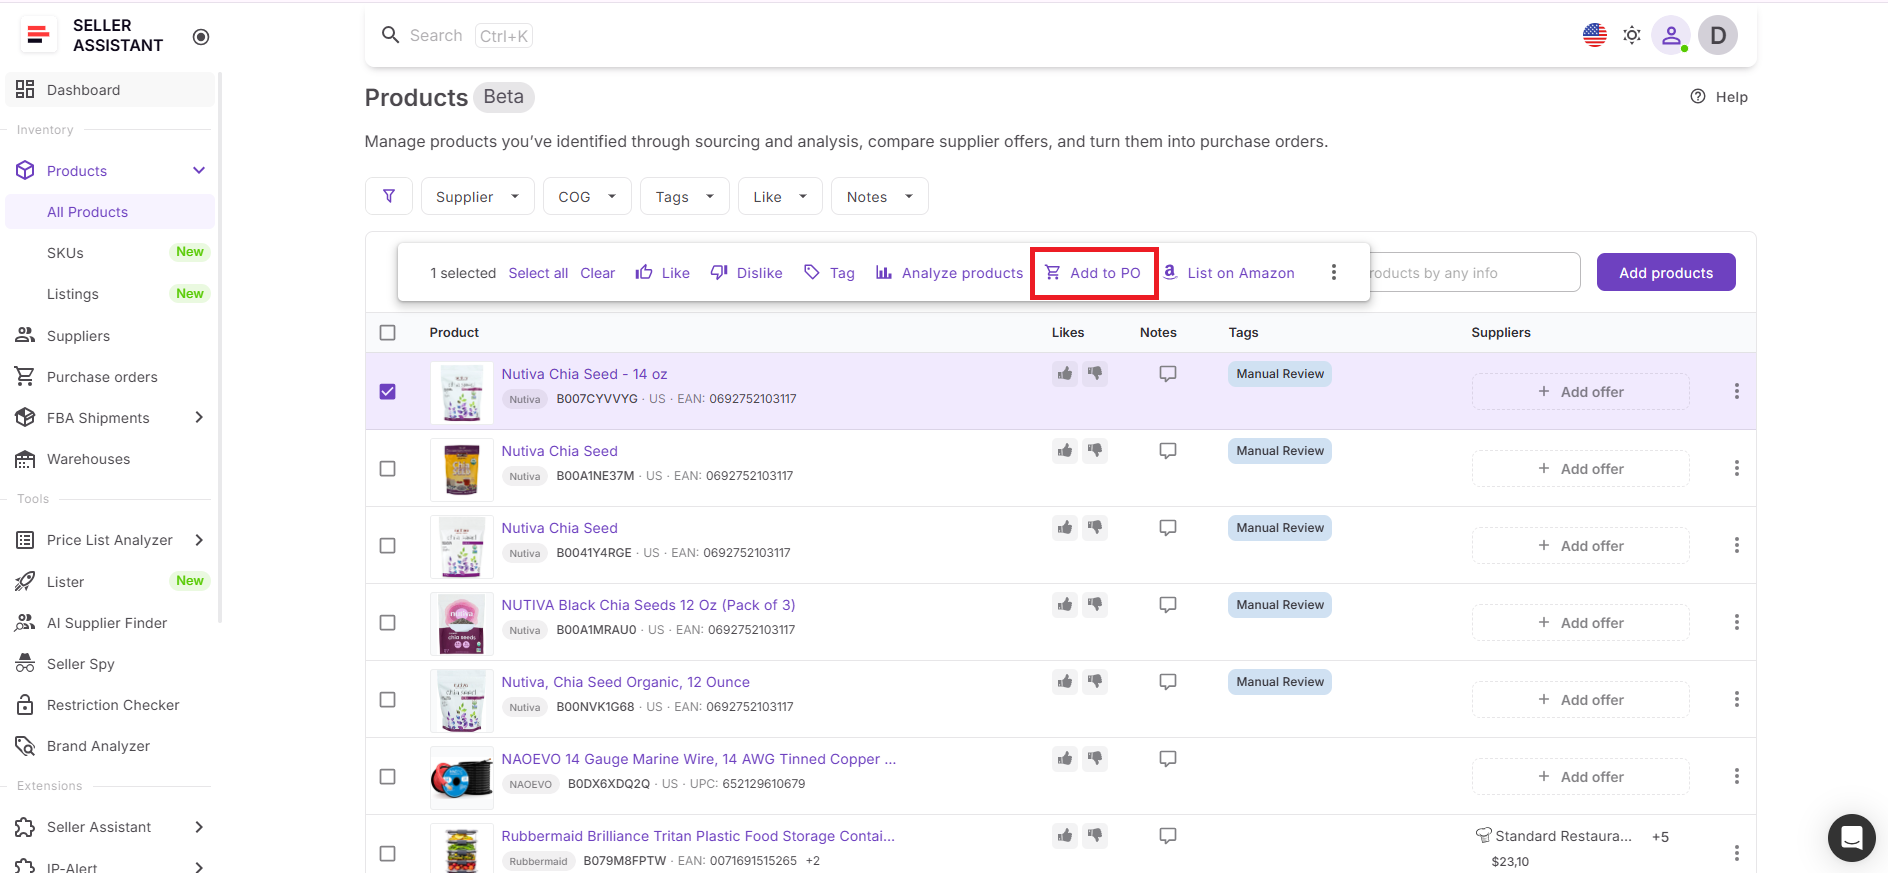
Step 6. Move the product to Purchase Orders Module
Once the SKU is approved, checkmark the product (or multiple products) and click Add to purchase order in the action menu appears above the product list. The system sends the items to Purchase Orders Module using the default supplier already set in Product Database.
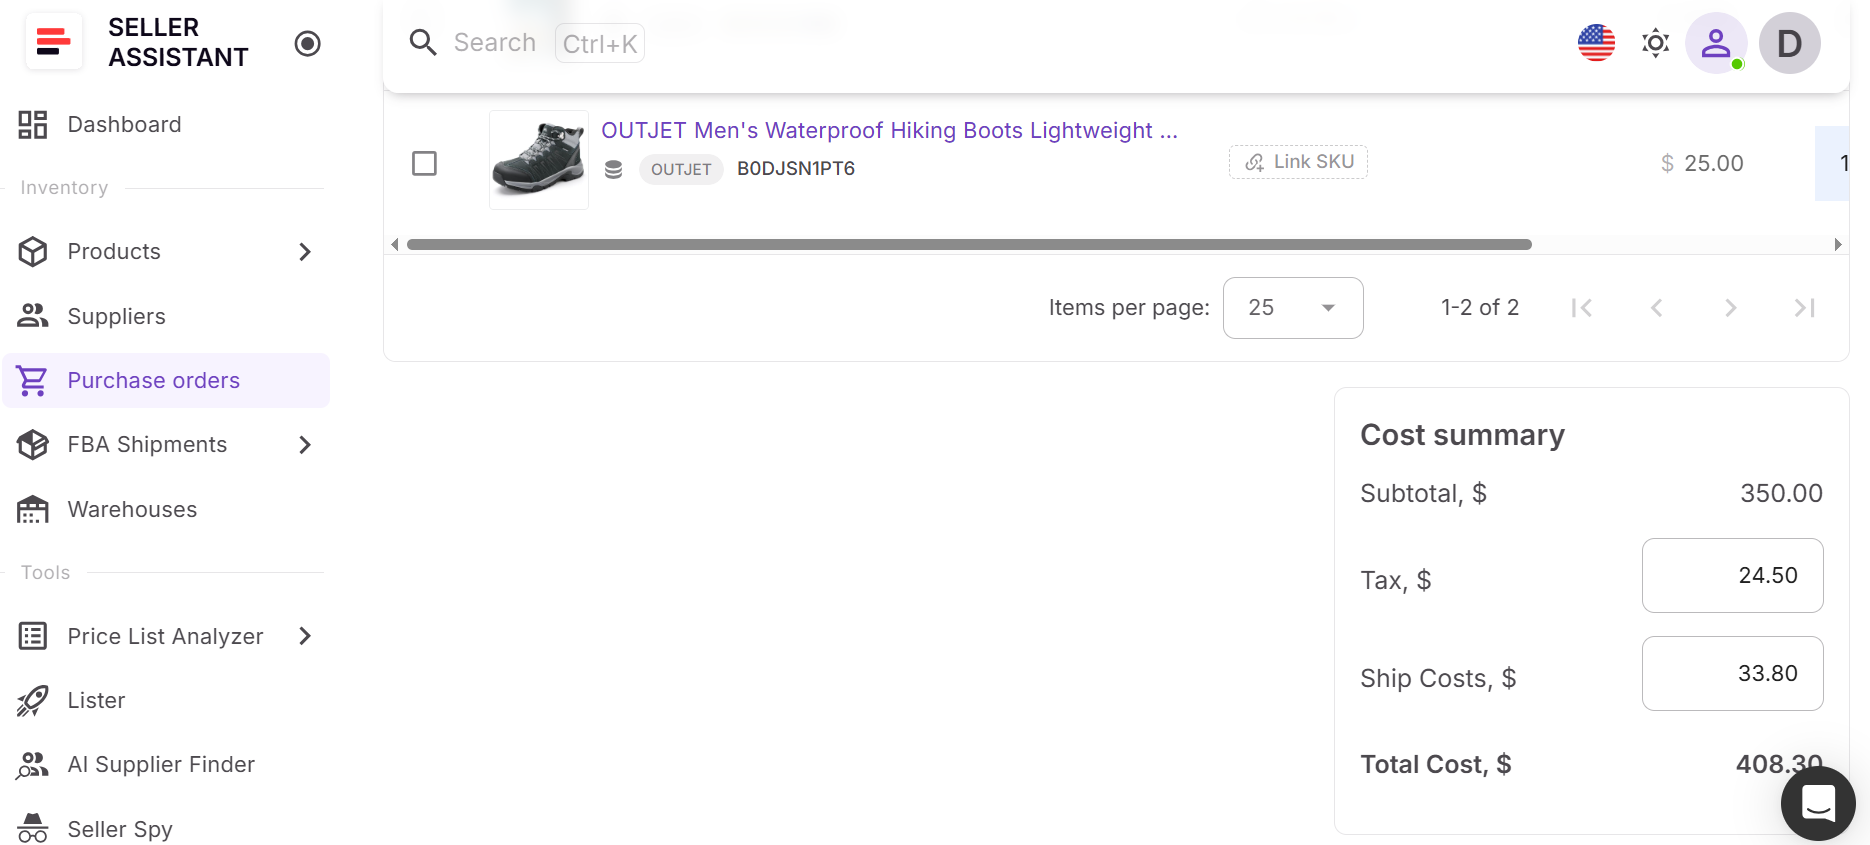
Step 7. Check the cost summary panel
Inside the purchase order, review the cost summary panel. It shows the order-level costs: Subtotal, VAT or tax, Shipping costs, and Total cost.

Step 8. Review the final order
Check the total order cost to see how much capital the purchase order actually requires. This gives you a final validation point before committing to inventory.
FAQ
What is the difference between landed cost and cost summary panel?
Landed cost shows per-unit cost at the SKU level, while the cost summary panel shows total cost at the purchase order level. You need both to understand unit margins and total investment.
When should I use landed cost in my workflow?
You should use landed cost during and after product analysis to verify true profitability before buying. It helps you avoid moving forward with deals that only look profitable at sourcing.
Why is shipping not fully included in my initial profit calculations?
Shipping costs often depend on the final purchase order and are added later in the workflow. That’s why they appear in the cost summary panel and then affect landed cost.
Can I adjust costs manually in Seller Assistant?
Yes, you can edit or override cost components in landed cost to reflect real expenses. You can also update shipping, VAT, and other costs in the purchase order before finalizing it.
What happens if I ignore some cost components?
Missing costs like VAT, prep, or inbound fees will make your margins look higher than they actually are. This often leads to buying unprofitable products and losing money after inventory reaches FBA.
Final Thoughts
Most Amazon sellers don’t lose money because they can’t calculate profit – they lose it because they miss costs. When expenses like shipping, VAT, prep, and inbound fees are added too late, even the best-looking deals can turn into losses.
Seller Assistant’s landed cost and the cost summary panel solve this problem by covering both sides of the equation. Landed cost shows the true per-unit profitability at the SKU level, while the cost summary panel confirms the total investment at the purchase order level. Together, they give you a complete and accurate view of your costs before and after you buy.
Seller Assistant automates and connects every stage of your Amazon wholesale and arbitrage workflow. It brings together in one platform: workflow management tools – Purchase Orders Module, Suppliers Database, Warehouses Database, FBA Shipments, bulk research & sourcing tools – Price List Analyzer, Bulk Restriction Checker, Sourcing AI, Brand Analyzer, Seller Spy, Chrome extensions – Seller Assistant Browser Extension, IP-Alert Extension, and built-in VPN by Seller Assistant, and integrations & team access features – seamless API connectivity, integrations with Zapier, Airtable, and Make, and Virtual Assistant Accounts.